> ## Documentation Index
> Fetch the complete documentation index at: https://docs.textql.com/llms.txt
> Use this file to discover all available pages before exploring further.
# Single Sign-On (SSO)
> Configure enterprise SSO with OIDC for your organization
## Overview
TextQL supports Single Sign-On (SSO) via OpenID Connect (OIDC), allowing your users to authenticate using your organization's identity provider instead of managing separate credentials.
## Supported Identity Providers
* Okta
* Microsoft Entra ID (Azure AD)
* Ping Identity
## Getting Started
Before configuring SSO, you'll need to access your TextQL organization as an administrator. If you don't have an organization yet, you'll need to create one first.
### Step 1: Login to TextQL
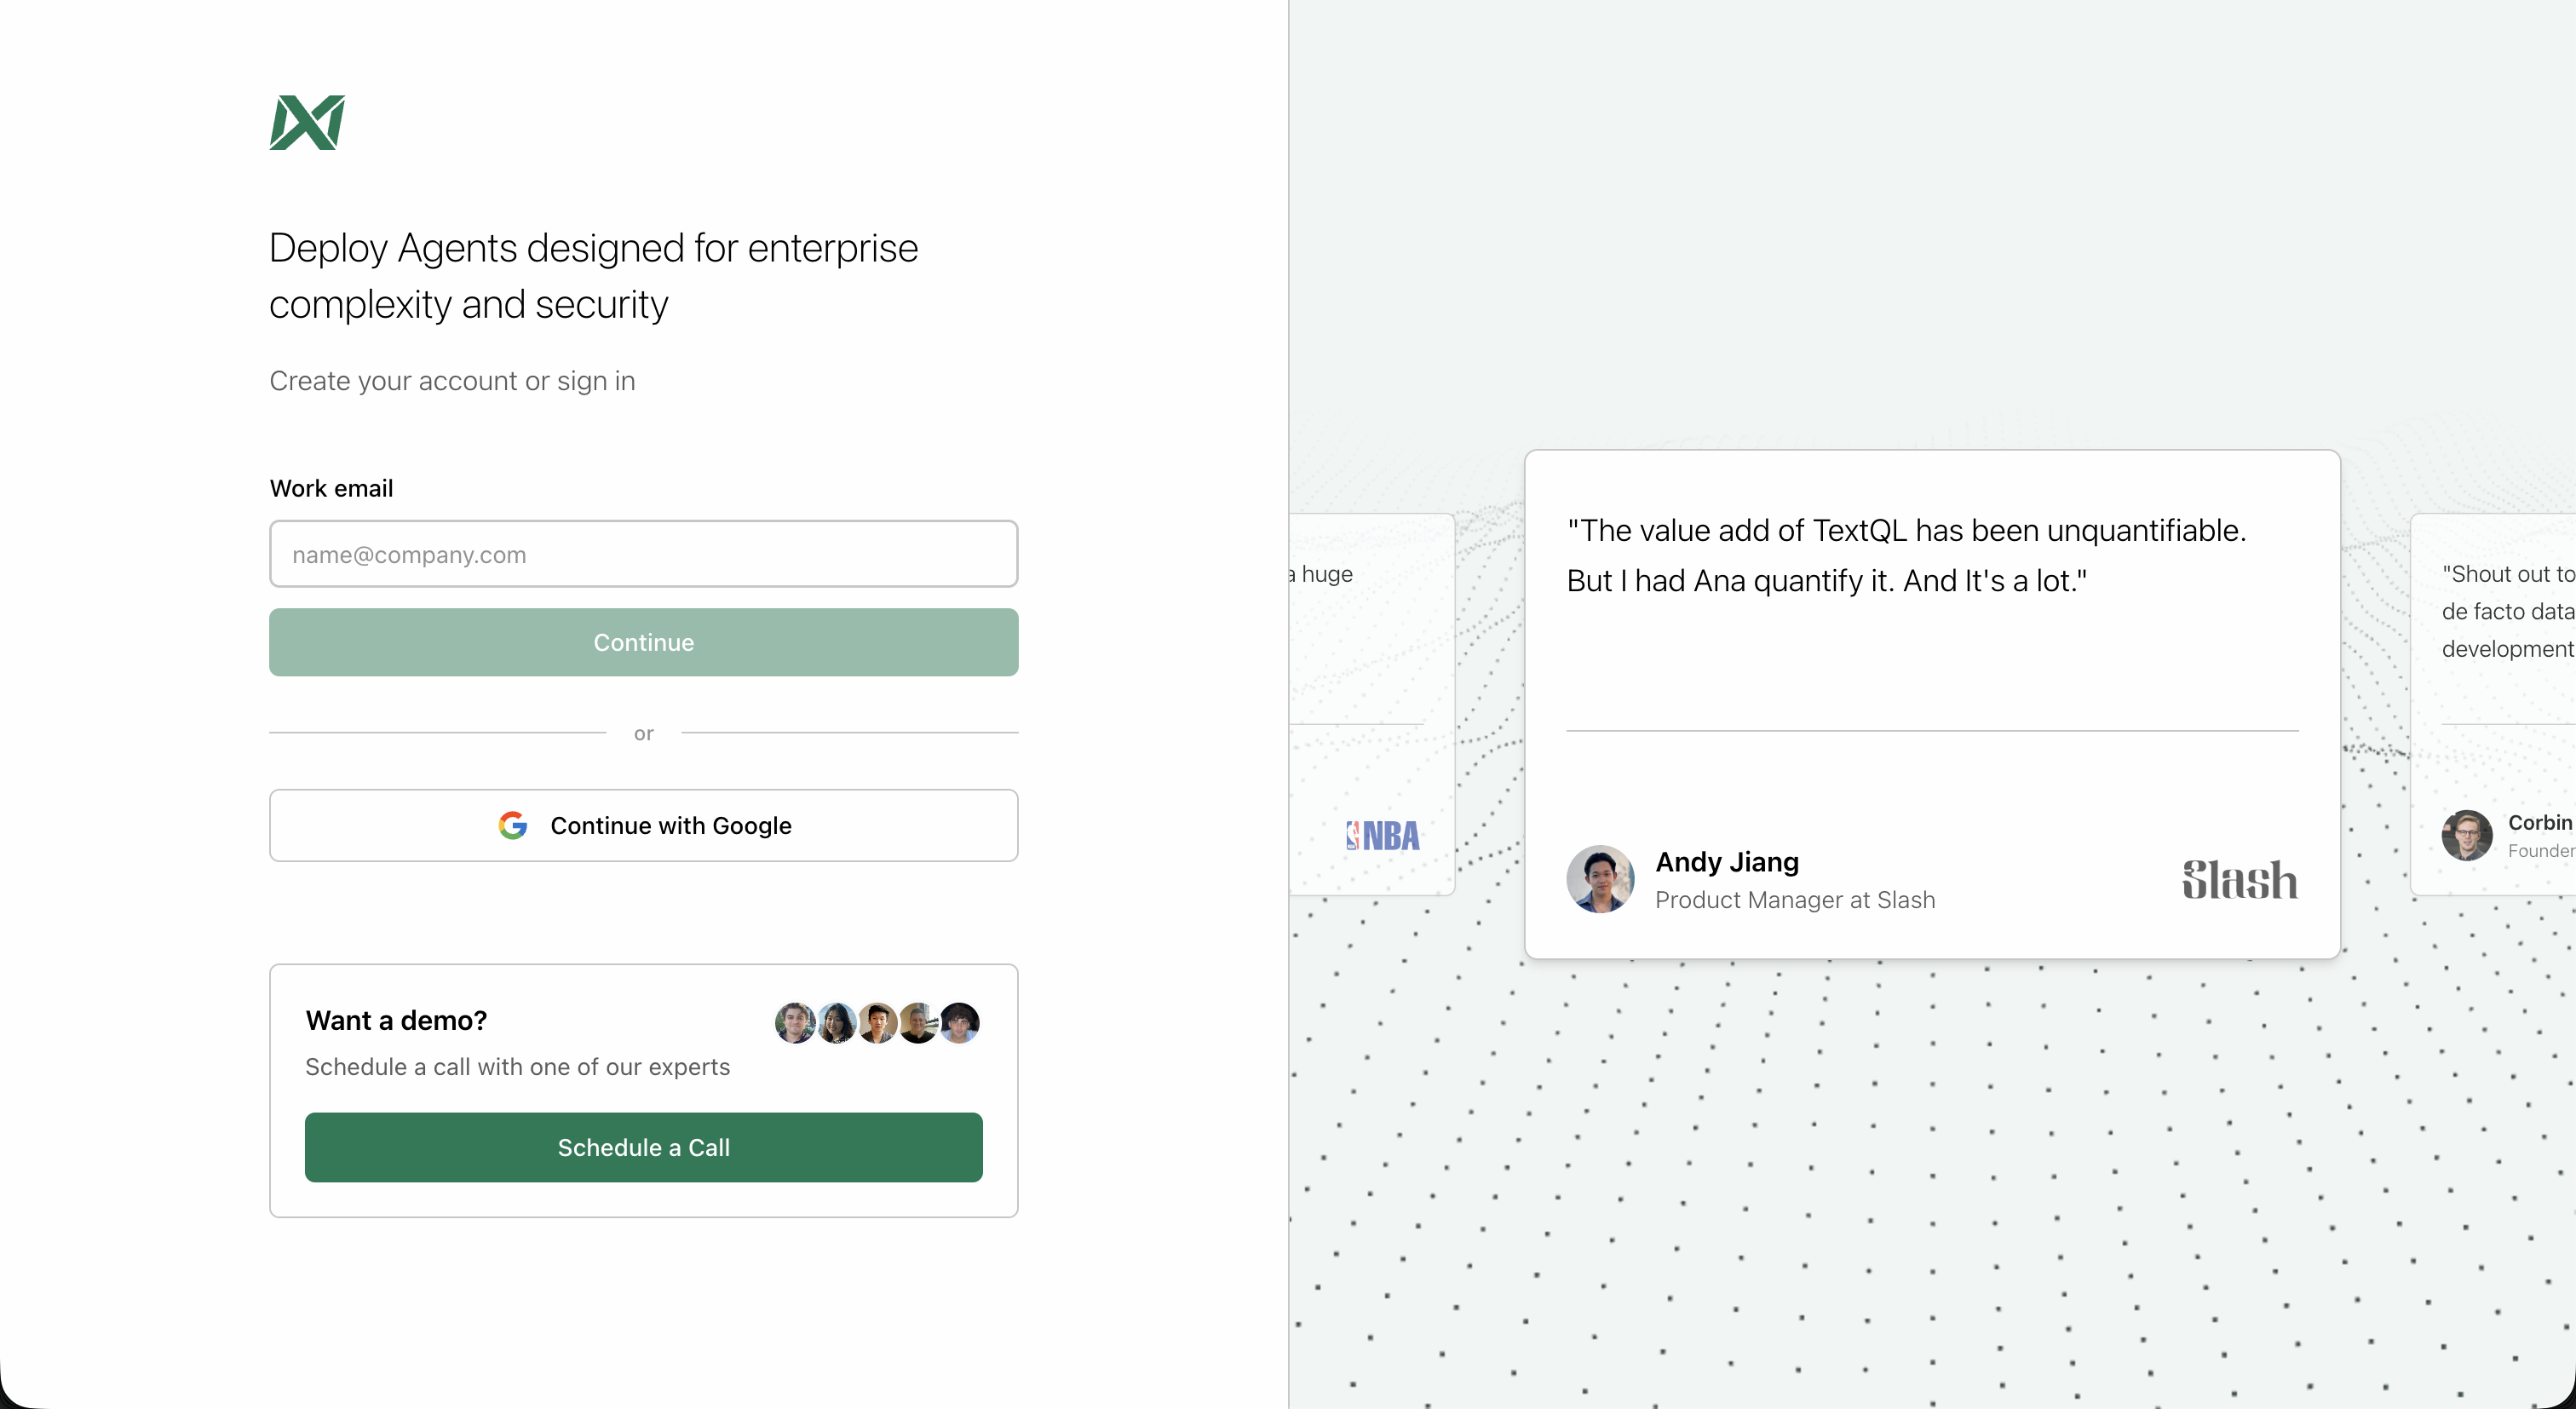
Navigate to the TextQL login page and sign in using one of the available methods:
* **Work email**: Enter your email address to receive a login email
* **Continue with Google**: Use your Google account for quick authentication
 Once logged in, ensure you have admin access to your organization. Only organization administrators can configure SSO settings.
### Step 2: Navigate to Settings
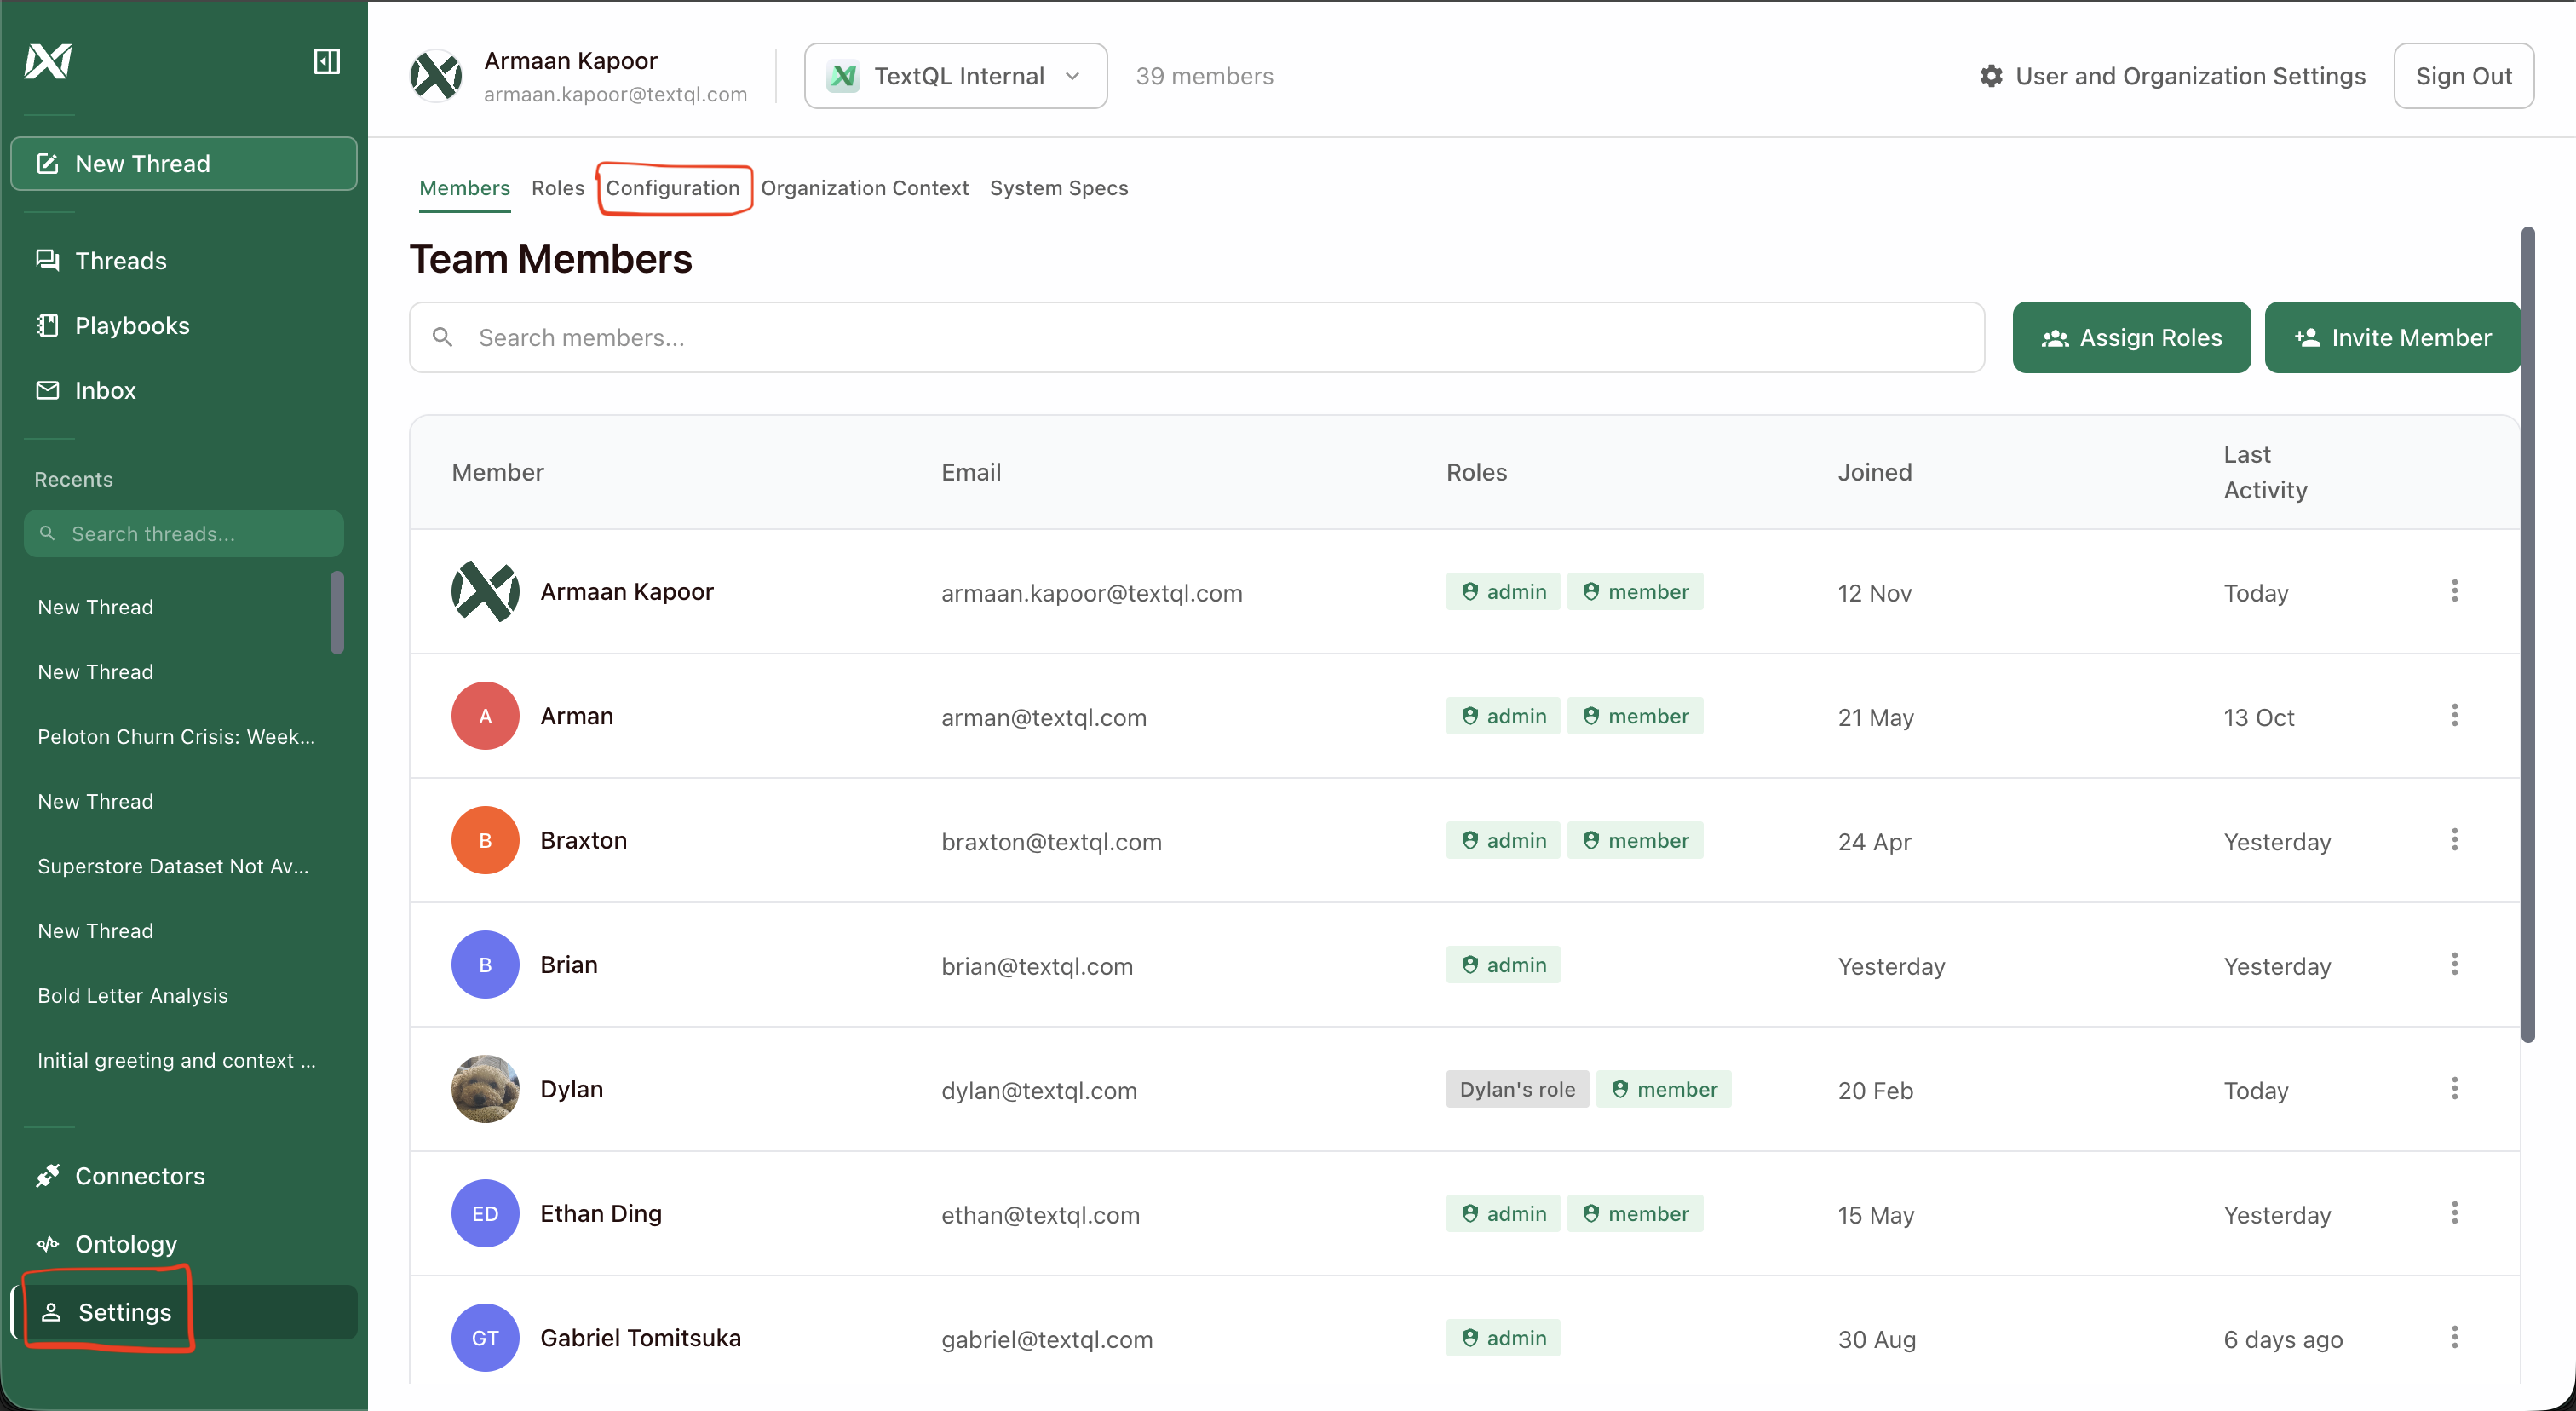
From the left sidebar, click on **Settings** to access your organization settings.
Once logged in, ensure you have admin access to your organization. Only organization administrators can configure SSO settings.
### Step 2: Navigate to Settings
From the left sidebar, click on **Settings** to access your organization settings.
 ### Step 3: Open OIDC Settings
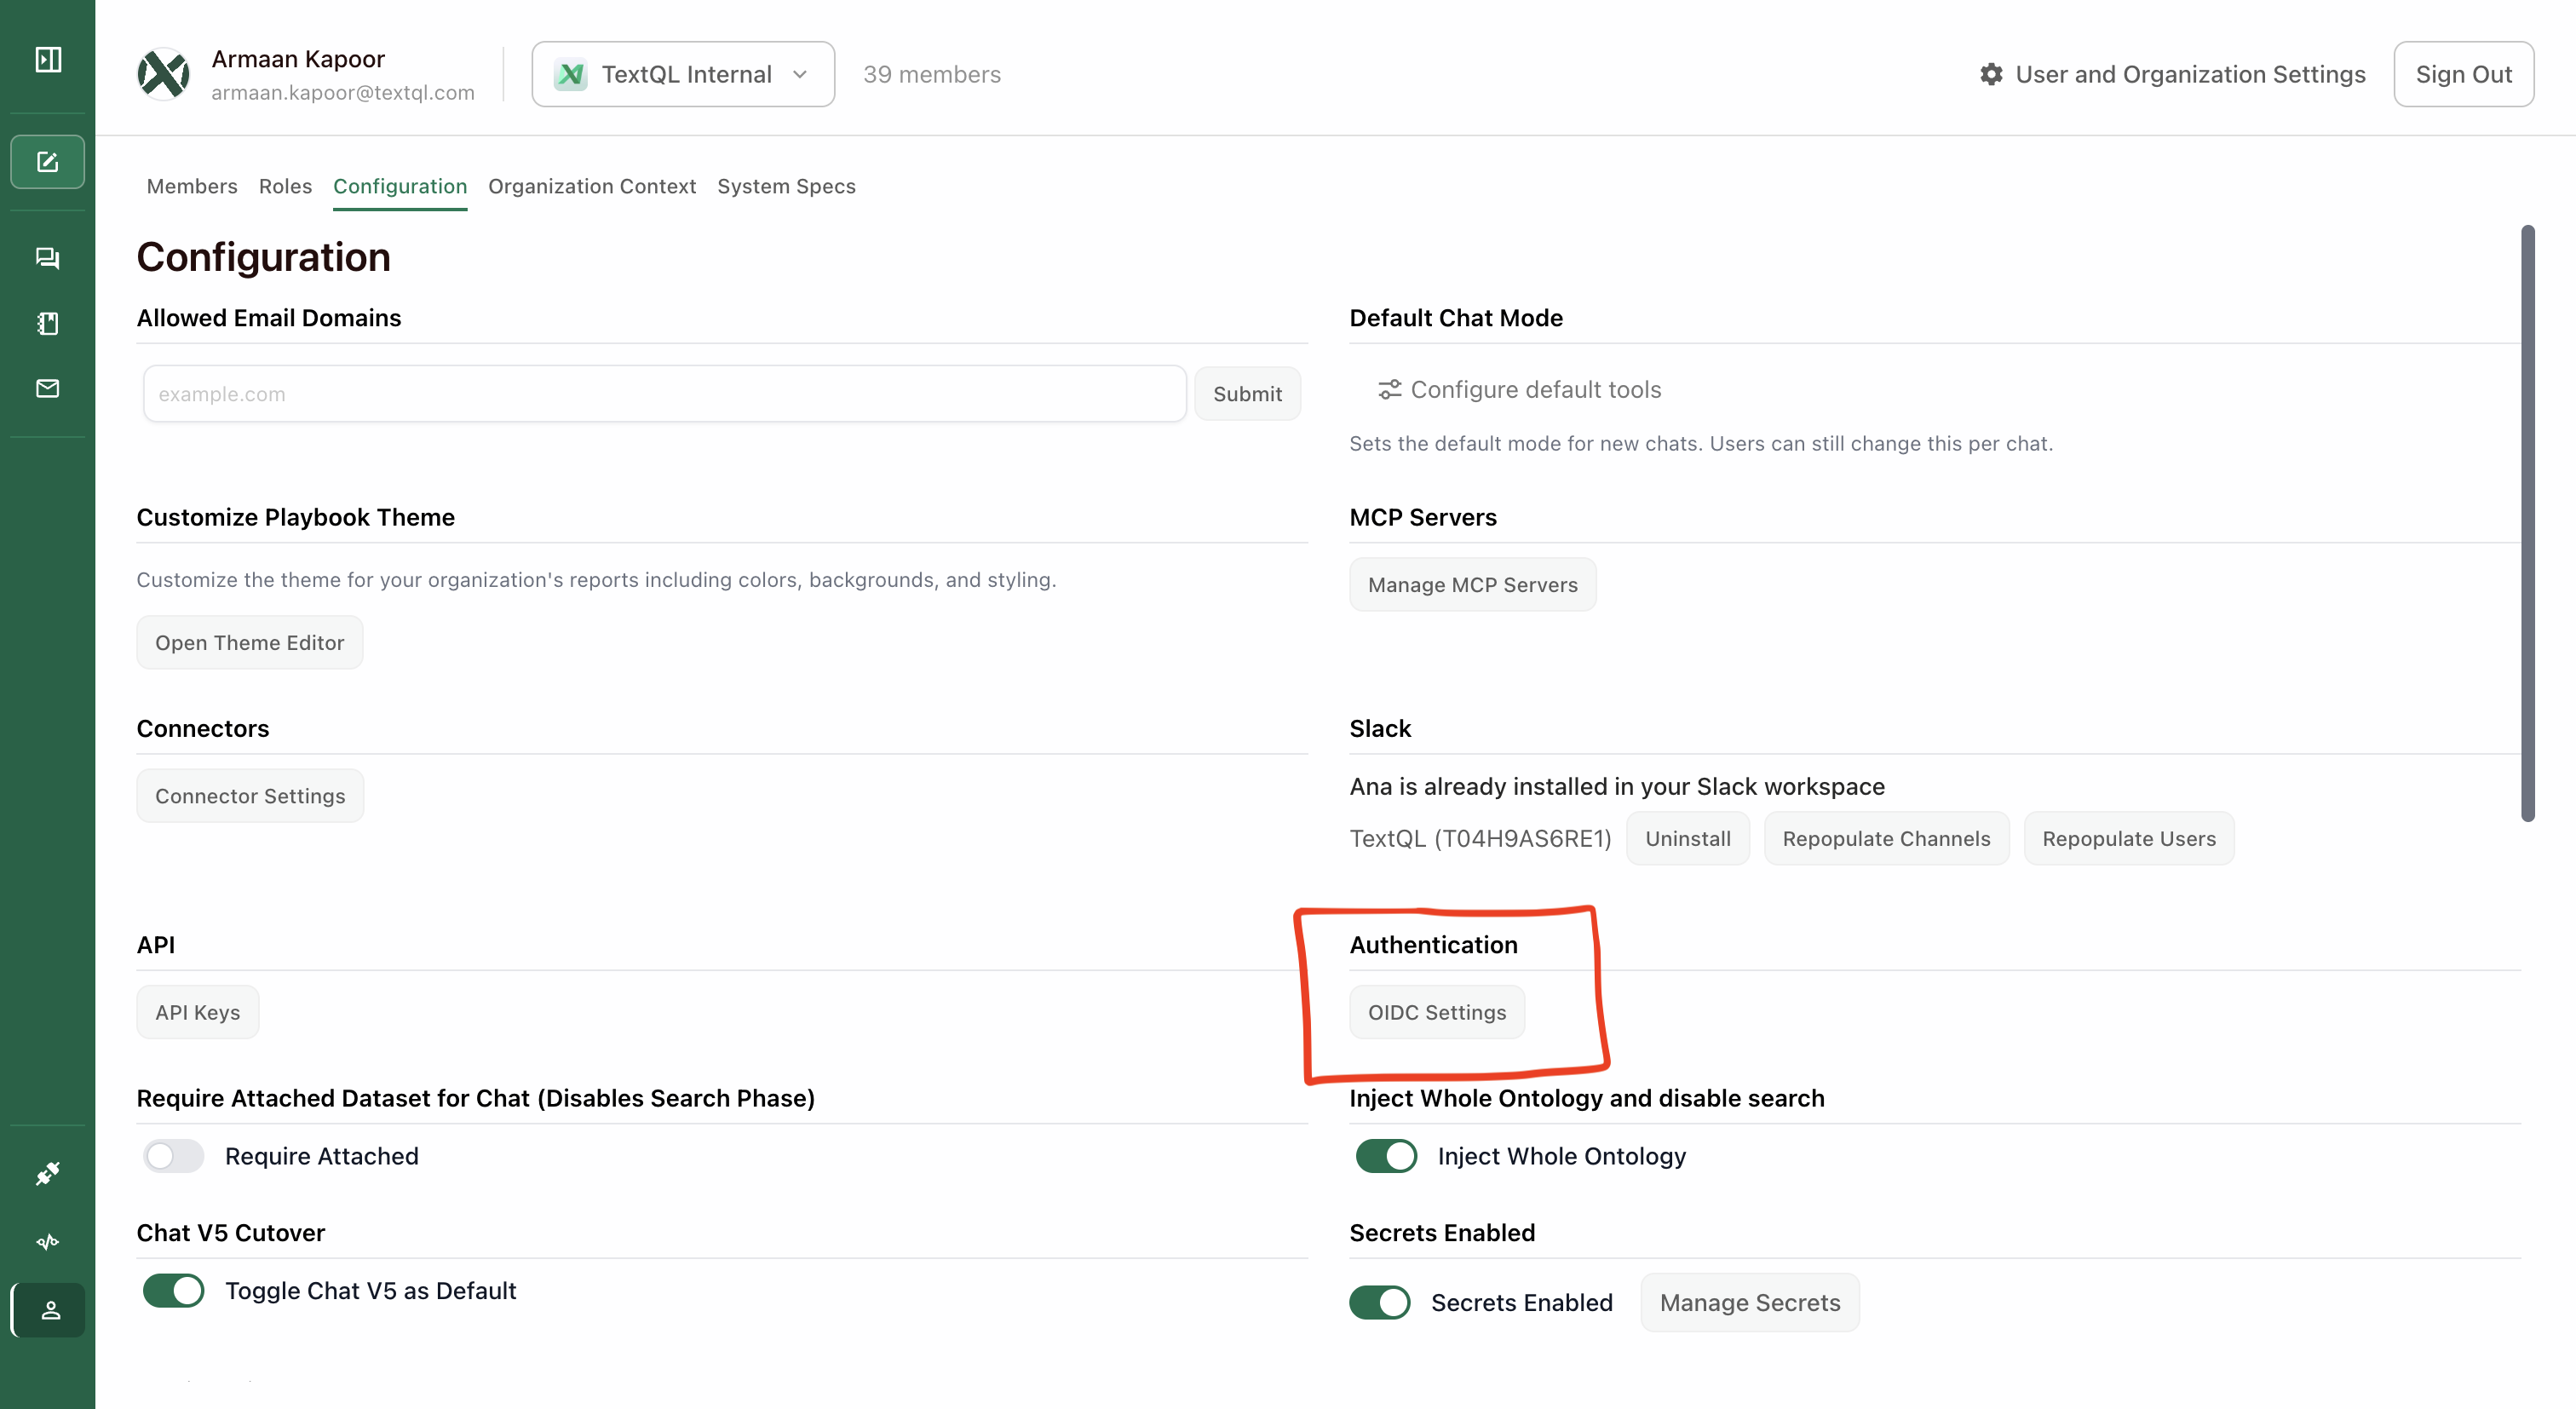
In the Configuration tab, scroll down to the **Authentication** section and click **OIDC Settings**.
### Step 3: Open OIDC Settings
In the Configuration tab, scroll down to the **Authentication** section and click **OIDC Settings**.
 ### Step 4: Configure OIDC Fields
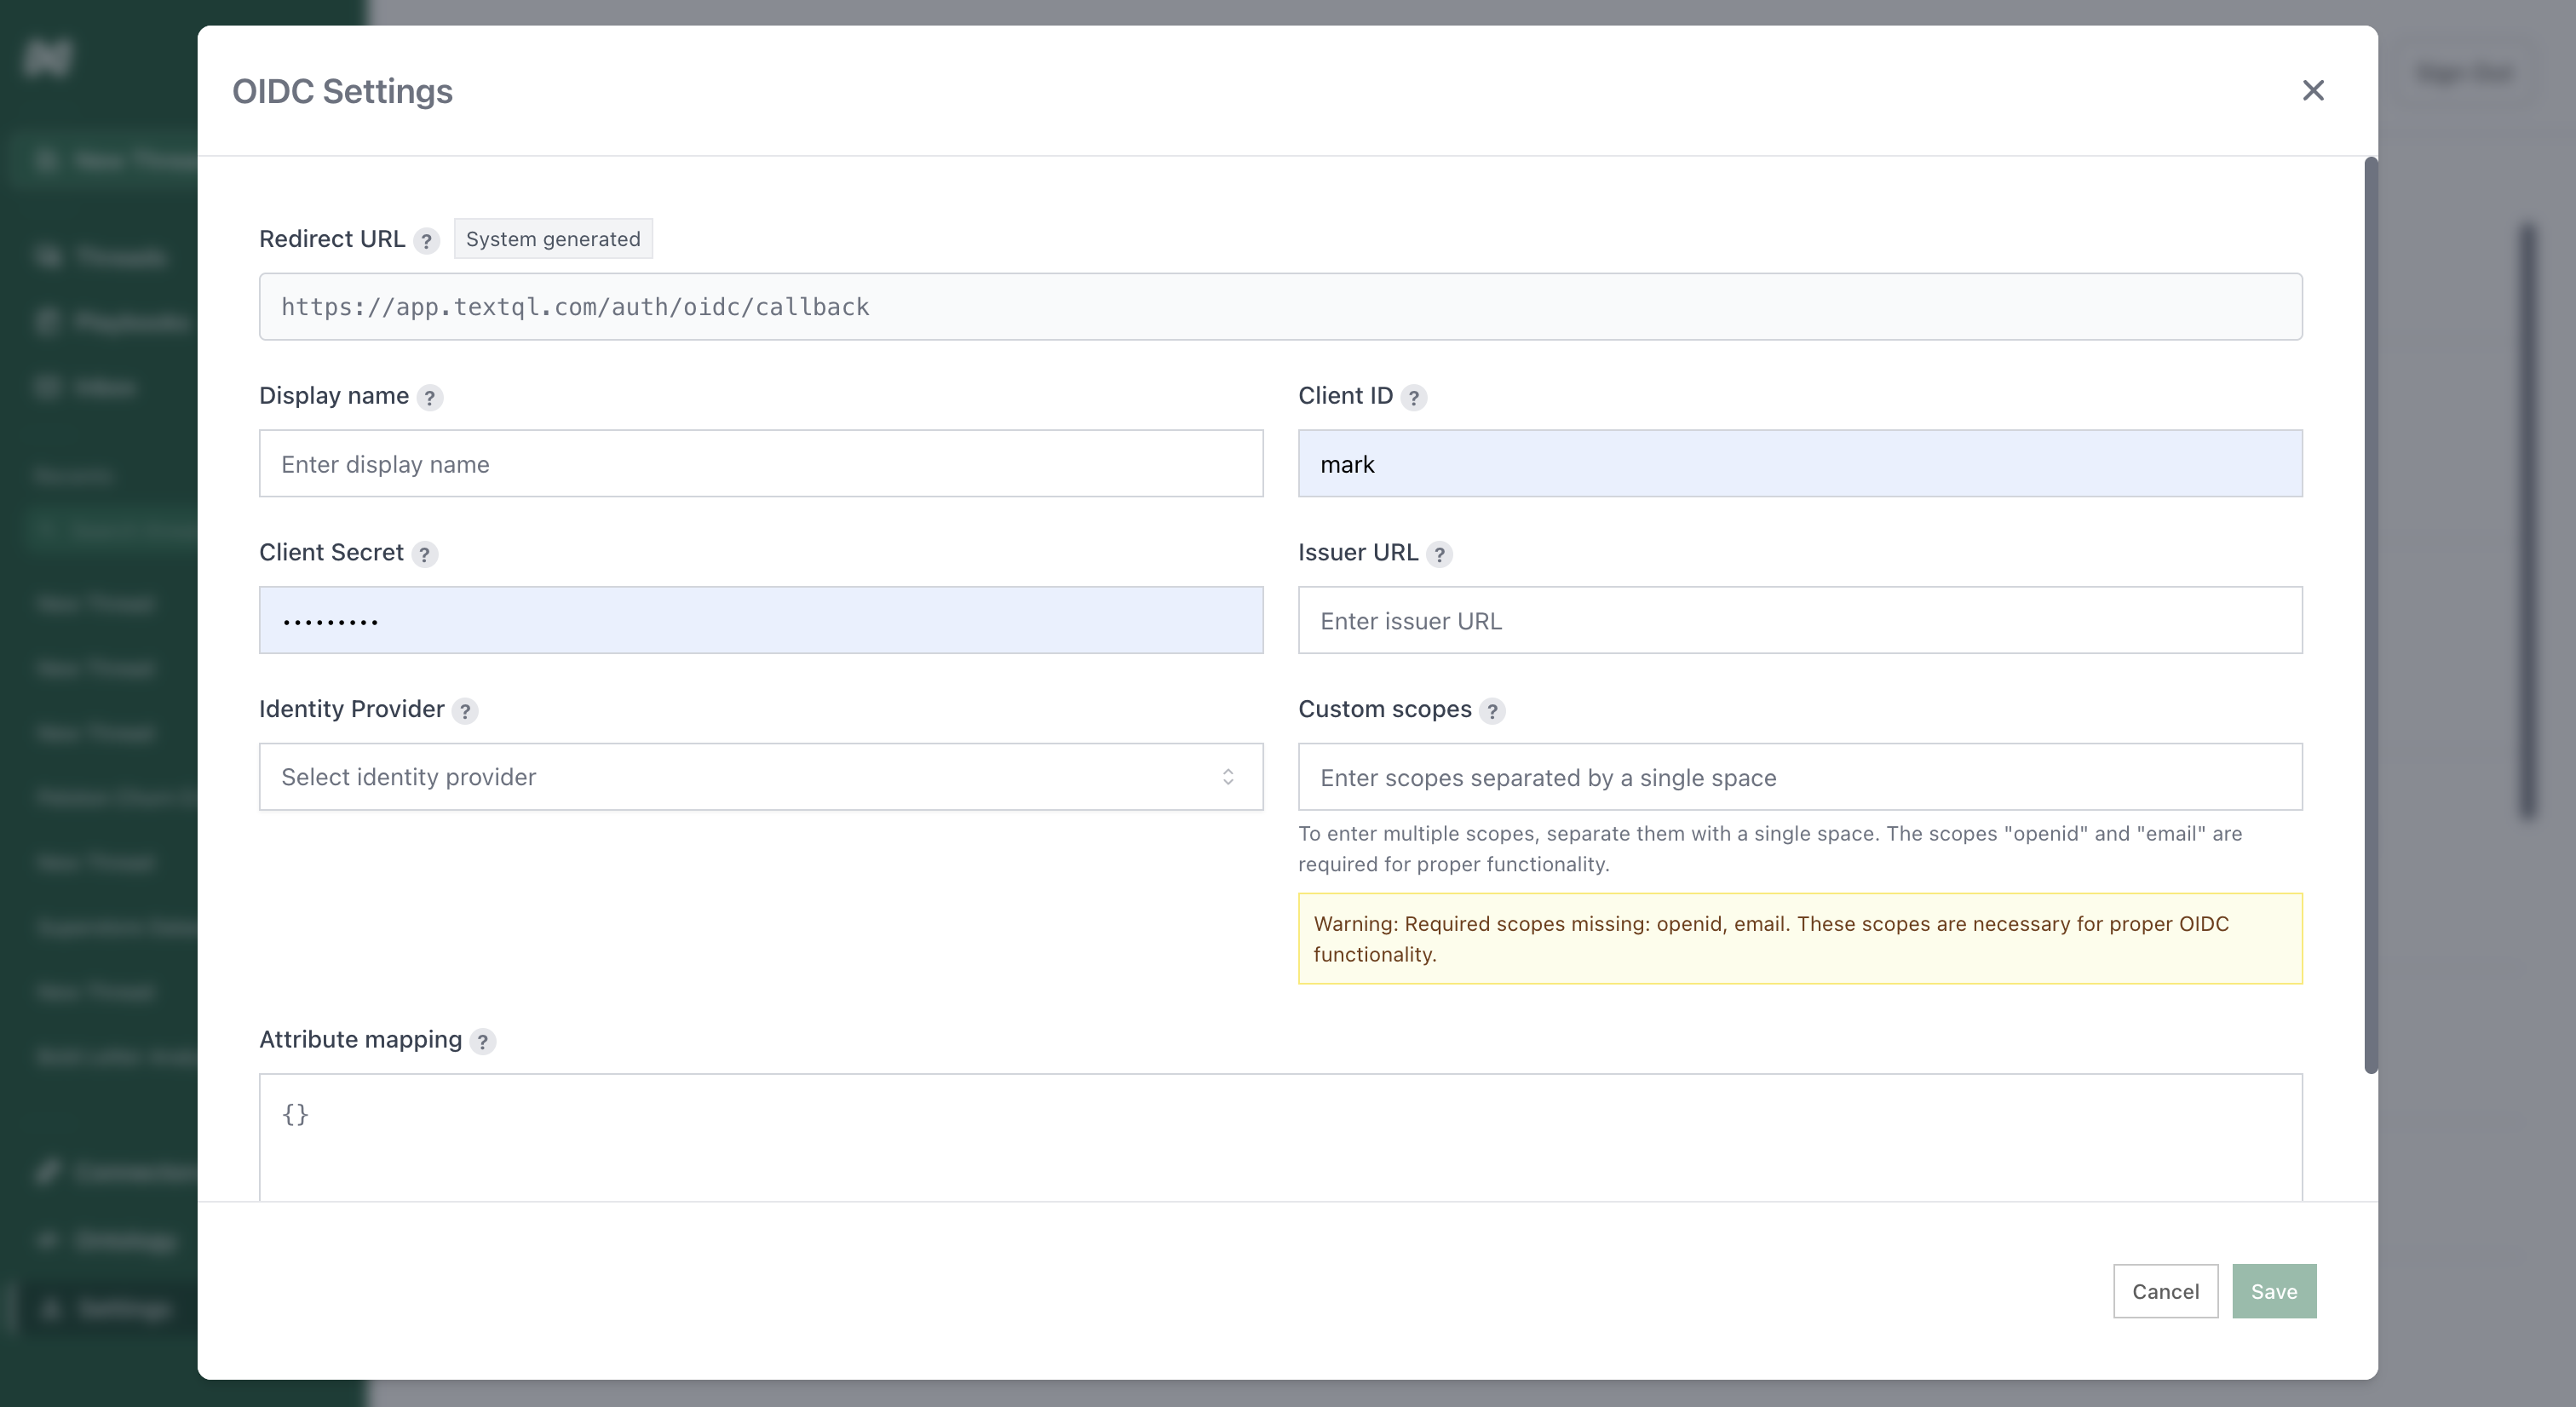
The OIDC Settings modal contains all the fields needed to connect your identity provider to TextQL.
### Step 4: Configure OIDC Fields
The OIDC Settings modal contains all the fields needed to connect your identity provider to TextQL.
 #### Redirect URL
This URL is system-generated and read-only. Copy this value and paste it into your identity provider's configuration as the callback/redirect URI.
#### Display Name
A friendly name for this SSO connection (e.g., "Company SSO"). This is what users will see during login.
#### Client ID
The unique identifier for your application, provided by your identity provider when you create the OIDC application.
#### Client Secret
The secret key used to authenticate your application. This is provided by your identity provider during OIDC app creation.
#### Issuer URL
The base URL of your identity provider (e.g., `https://yourcompany.okta.com` or `https://login.microsoftonline.com/your-tenant-id`).
#### Identity Provider
Select your identity provider from the dropdown:
* Okta OIDC
* Microsoft OIDC
* Ping OIDC
For detailed setup instructions for each provider:
* [Configuring SSO with Okta](/core/admin/sso-okta)
#### Custom Scopes
OAuth scopes that determine what information your application can access. Required scopes are `openid` and `email`.
Format: Space-separated values (e.g., `openid email`)
#### Attribute Mapping
JSON mapping of identity provider attributes to TextQL user fields. This allows you to map custom claims from your IdP to user properties.
Example:
```json theme={null}
{
"email": "email",
"name": "name",
"given_name": "first_name",
"family_name": "last_name"
}
```
## How It Works
Once SSO is configured:
1. User visits the TextQL login page
2. User enters their email address
3. TextQL detects the email domain matches your configured OIDC organization
4. User is automatically redirected to your identity provider
5. User authenticates with their corporate credentials
6. User is redirected back to TextQL and logged in
### Organization Scoping for OIDC Users
When a user authenticates via OIDC, TextQL restricts which organizations they can access:
* **Membership-based discovery**: OIDC users only see organizations they are already members of. Domain-based org discovery is disabled for OIDC sessions — users cannot find or join orgs simply by sharing an email domain.
* **Provider-scoped org list**: If your current organization has an OIDC provider configured, the org switcher only shows other organizations that share the same provider. This prevents OIDC-managed users from switching into orgs outside their identity provider's scope.
* **Org-switch validation**: When switching organizations, TextQL verifies that the target org has the same OIDC provider configured. If it does not, the switch is blocked.
This means that if you manage multiple TextQL organizations under one identity provider, users will be able to move between them seamlessly. Organizations not covered by your IdP will not appear in the switcher for OIDC-authenticated users.
## Testing
After saving your configuration:
1. Open a new incognito/private browser window
2. Navigate to your TextQL login page
3. Enter an email address from your organization's domain
4. Verify you're redirected to your identity provider
5. Complete authentication
6. Verify you're logged into TextQL
## Troubleshooting
### Users not being redirected to SSO
* Verify the email domain matches what's configured in your OIDC settings
* Check that the OIDC configuration is saved and active
### Authentication fails at identity provider
* Verify the Redirect URL is correctly configured in your IdP
* Check that the Client ID and Client Secret are correct
* Ensure users are assigned to the application in your IdP
### Users redirected but not logged in
* Verify required scopes (`openid` and `email`) are configured
* Check that the Issuer URL is correct
* Review attribute mapping to ensure email field is properly mapped
* **`email_verified` claim issues**: Some identity providers send the `email_verified` claim as a string (`"true"`) rather than a boolean, or omit it from the ID token entirely. TextQL handles both cases automatically — it parses string values and falls back to the UserInfo endpoint when the claim is absent. If sign-in still fails, check your IdP's token configuration to ensure `email_verified` is included and set to `true` for your users.
### OIDC user cannot see a specific organization
* Confirm the user has been added as a member of that organization (domain-based discovery is not used for OIDC sessions)
* Confirm the target organization has the same OIDC provider configured as the user's current org
## Security Considerations
* Client Secrets are stored encrypted in the database
* Only organization administrators can view or modify SSO settings
* Users must be assigned to the application in your identity provider to authenticate
* Sessions follow your organization's token expiration policies
* OIDC users are scoped to organizations covered by their identity provider — they cannot switch into or discover orgs outside their IdP's scope
#### Redirect URL
This URL is system-generated and read-only. Copy this value and paste it into your identity provider's configuration as the callback/redirect URI.
#### Display Name
A friendly name for this SSO connection (e.g., "Company SSO"). This is what users will see during login.
#### Client ID
The unique identifier for your application, provided by your identity provider when you create the OIDC application.
#### Client Secret
The secret key used to authenticate your application. This is provided by your identity provider during OIDC app creation.
#### Issuer URL
The base URL of your identity provider (e.g., `https://yourcompany.okta.com` or `https://login.microsoftonline.com/your-tenant-id`).
#### Identity Provider
Select your identity provider from the dropdown:
* Okta OIDC
* Microsoft OIDC
* Ping OIDC
For detailed setup instructions for each provider:
* [Configuring SSO with Okta](/core/admin/sso-okta)
#### Custom Scopes
OAuth scopes that determine what information your application can access. Required scopes are `openid` and `email`.
Format: Space-separated values (e.g., `openid email`)
#### Attribute Mapping
JSON mapping of identity provider attributes to TextQL user fields. This allows you to map custom claims from your IdP to user properties.
Example:
```json theme={null}
{
"email": "email",
"name": "name",
"given_name": "first_name",
"family_name": "last_name"
}
```
## How It Works
Once SSO is configured:
1. User visits the TextQL login page
2. User enters their email address
3. TextQL detects the email domain matches your configured OIDC organization
4. User is automatically redirected to your identity provider
5. User authenticates with their corporate credentials
6. User is redirected back to TextQL and logged in
### Organization Scoping for OIDC Users
When a user authenticates via OIDC, TextQL restricts which organizations they can access:
* **Membership-based discovery**: OIDC users only see organizations they are already members of. Domain-based org discovery is disabled for OIDC sessions — users cannot find or join orgs simply by sharing an email domain.
* **Provider-scoped org list**: If your current organization has an OIDC provider configured, the org switcher only shows other organizations that share the same provider. This prevents OIDC-managed users from switching into orgs outside their identity provider's scope.
* **Org-switch validation**: When switching organizations, TextQL verifies that the target org has the same OIDC provider configured. If it does not, the switch is blocked.
This means that if you manage multiple TextQL organizations under one identity provider, users will be able to move between them seamlessly. Organizations not covered by your IdP will not appear in the switcher for OIDC-authenticated users.
## Testing
After saving your configuration:
1. Open a new incognito/private browser window
2. Navigate to your TextQL login page
3. Enter an email address from your organization's domain
4. Verify you're redirected to your identity provider
5. Complete authentication
6. Verify you're logged into TextQL
## Troubleshooting
### Users not being redirected to SSO
* Verify the email domain matches what's configured in your OIDC settings
* Check that the OIDC configuration is saved and active
### Authentication fails at identity provider
* Verify the Redirect URL is correctly configured in your IdP
* Check that the Client ID and Client Secret are correct
* Ensure users are assigned to the application in your IdP
### Users redirected but not logged in
* Verify required scopes (`openid` and `email`) are configured
* Check that the Issuer URL is correct
* Review attribute mapping to ensure email field is properly mapped
* **`email_verified` claim issues**: Some identity providers send the `email_verified` claim as a string (`"true"`) rather than a boolean, or omit it from the ID token entirely. TextQL handles both cases automatically — it parses string values and falls back to the UserInfo endpoint when the claim is absent. If sign-in still fails, check your IdP's token configuration to ensure `email_verified` is included and set to `true` for your users.
### OIDC user cannot see a specific organization
* Confirm the user has been added as a member of that organization (domain-based discovery is not used for OIDC sessions)
* Confirm the target organization has the same OIDC provider configured as the user's current org
## Security Considerations
* Client Secrets are stored encrypted in the database
* Only organization administrators can view or modify SSO settings
* Users must be assigned to the application in your identity provider to authenticate
* Sessions follow your organization's token expiration policies
* OIDC users are scoped to organizations covered by their identity provider — they cannot switch into or discover orgs outside their IdP's scope