> ## Documentation Index
> Fetch the complete documentation index at: https://docs.textql.com/llms.txt
> Use this file to discover all available pages before exploring further.
# PowerBI Connector
> Connecting PowerBI to TextQL
The PowerBI connector allows you to integrate your Microsoft PowerBI workspaces and datasets with TextQL, enabling Ana to query and analyze your PowerBI data directly. This connector uses Azure Active Directory (Azure AD) application registration for secure authentication.
With the PowerBI connector, you can:
* Discover and sync reports and datasets from your PowerBI workspaces
* Query your PowerBI data using natural language through Ana
* Get insights from your PowerBI reports and visualizations
## Prerequisites
To set up the PowerBI connector, you'll need:
* **Administrator access** to your organization's Azure portal for app registration
* **Workspace admin access** in PowerBI to grant permissions
* **PowerBI Pro or Premium** license
## Step 1: Azure AD App Registration
First, you need to create an Azure AD application registration to obtain the required credentials.
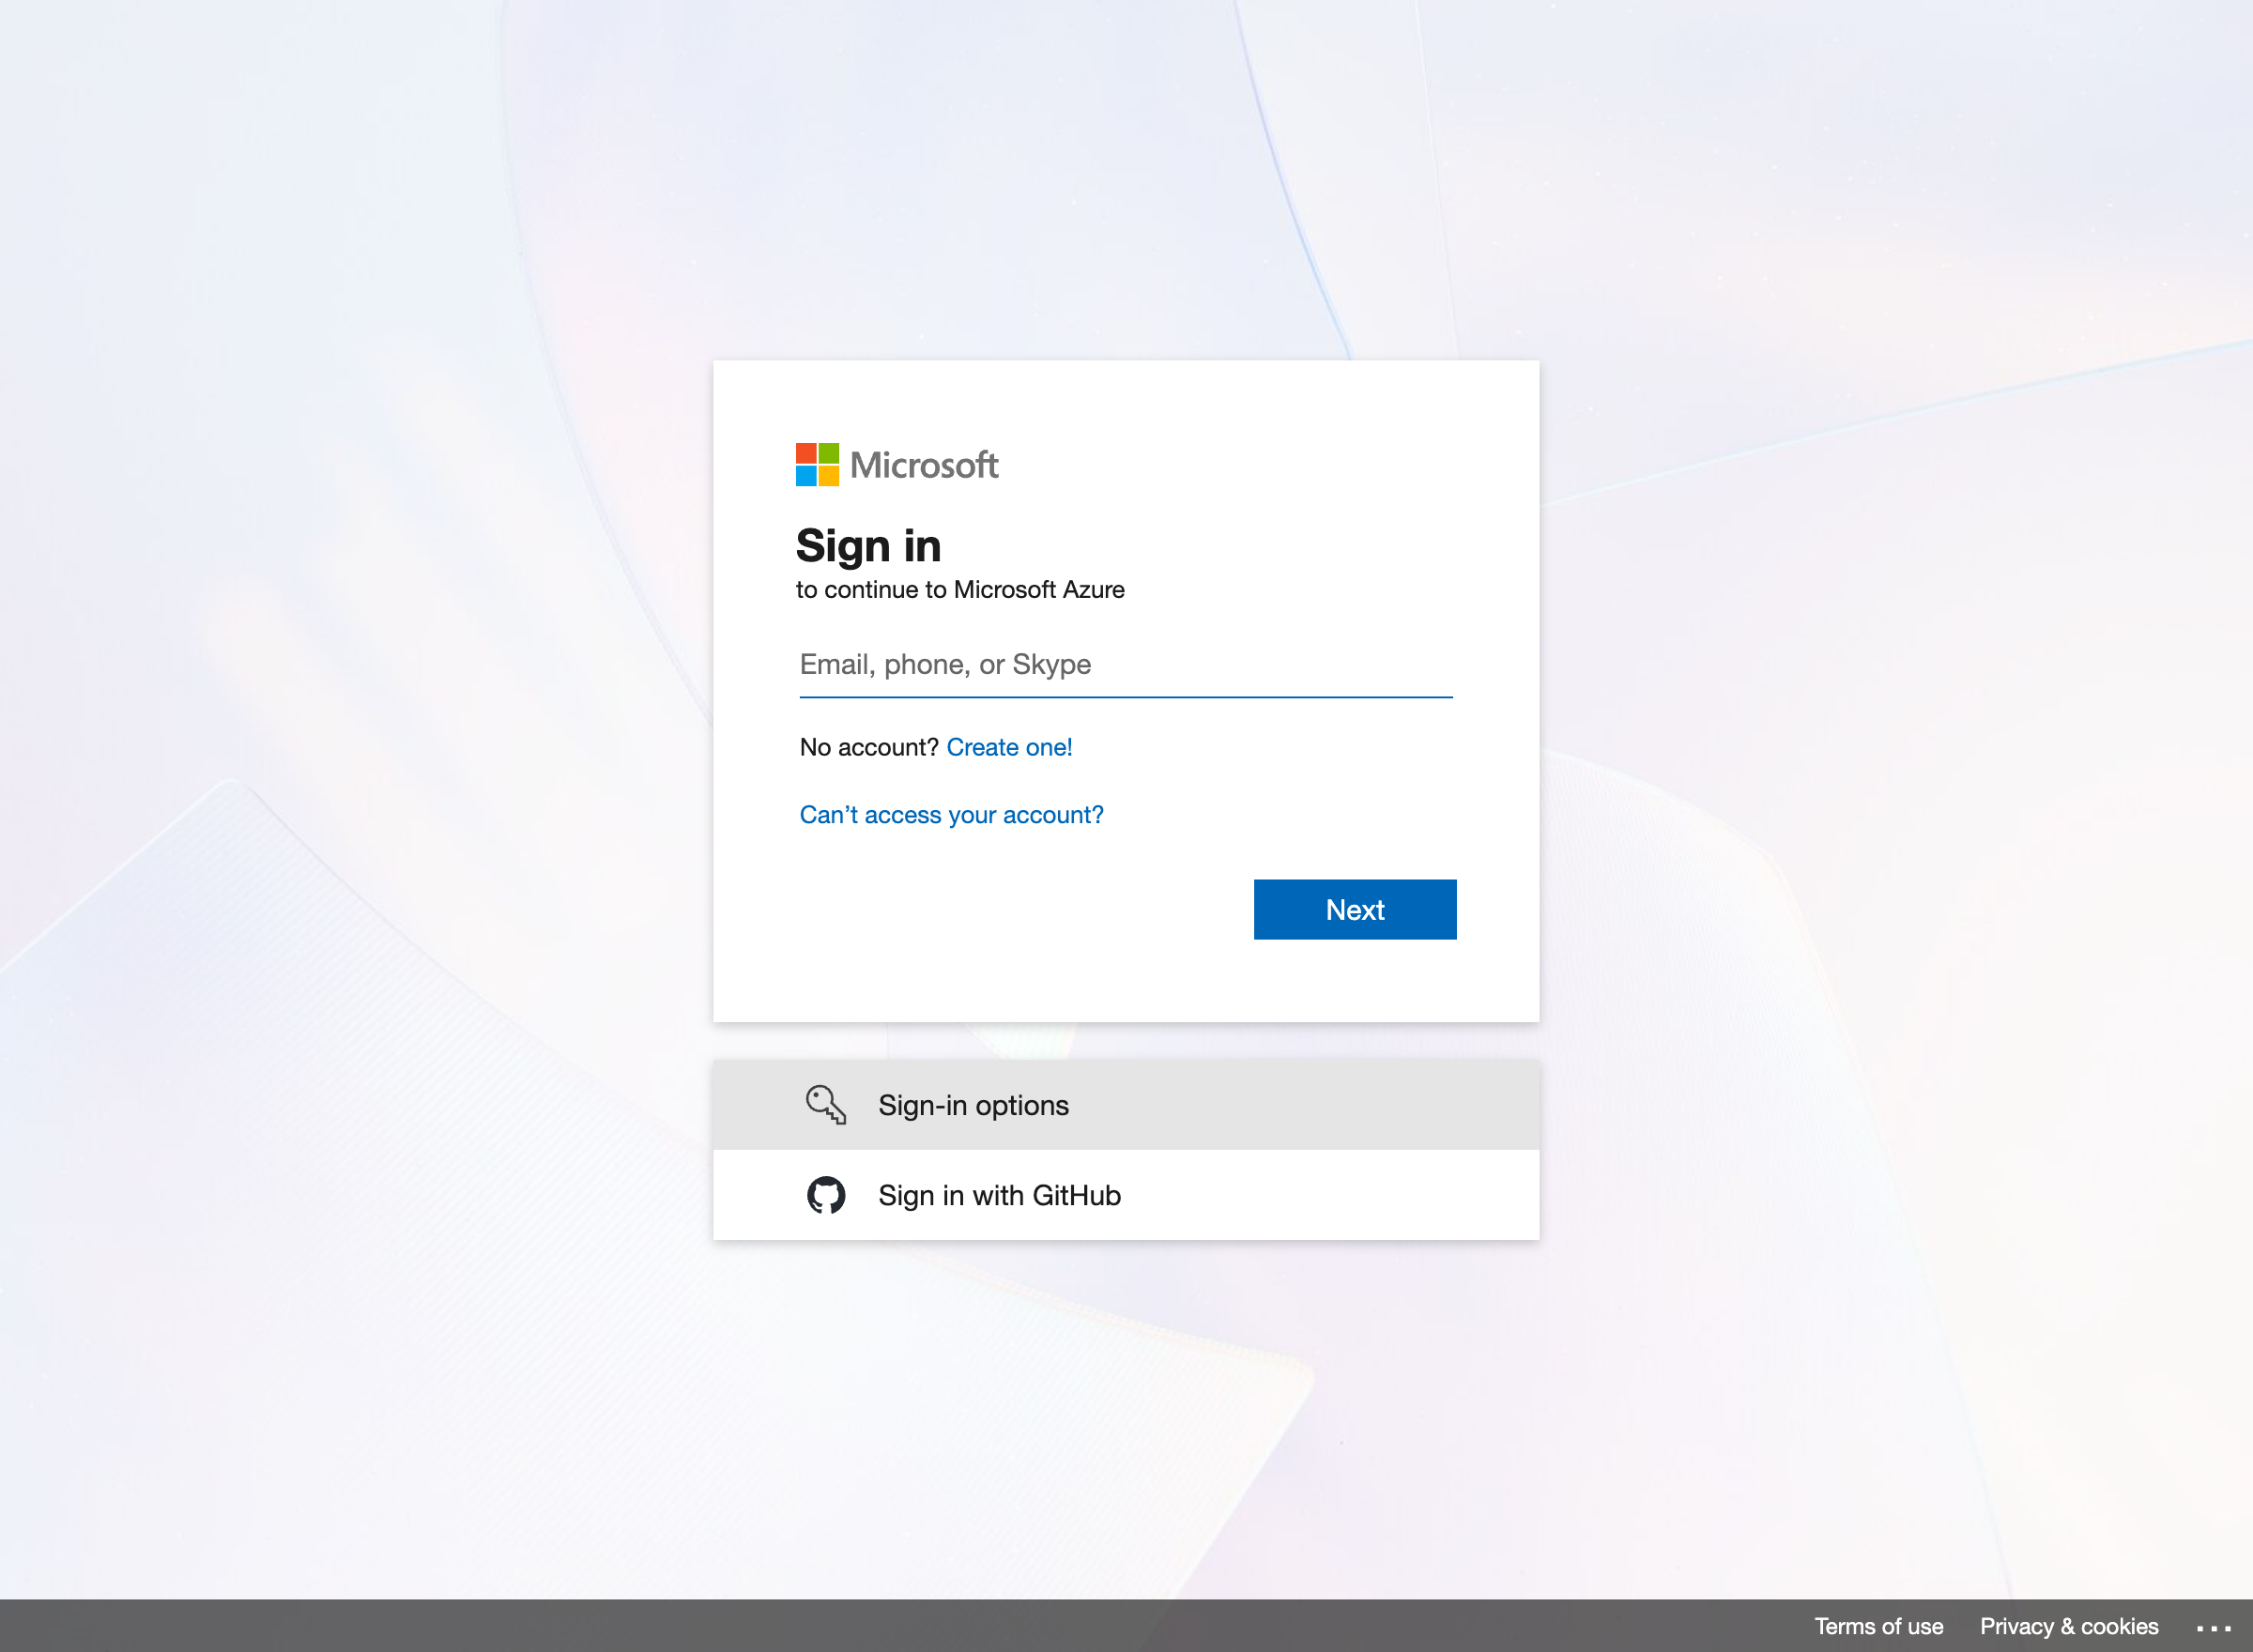
### 1.1 Navigate to Azure Portal
Go to [https://portal.azure.com](https://portal.azure.com) and sign in with your organizational account.
 ### 1.2 Create a New App Registration
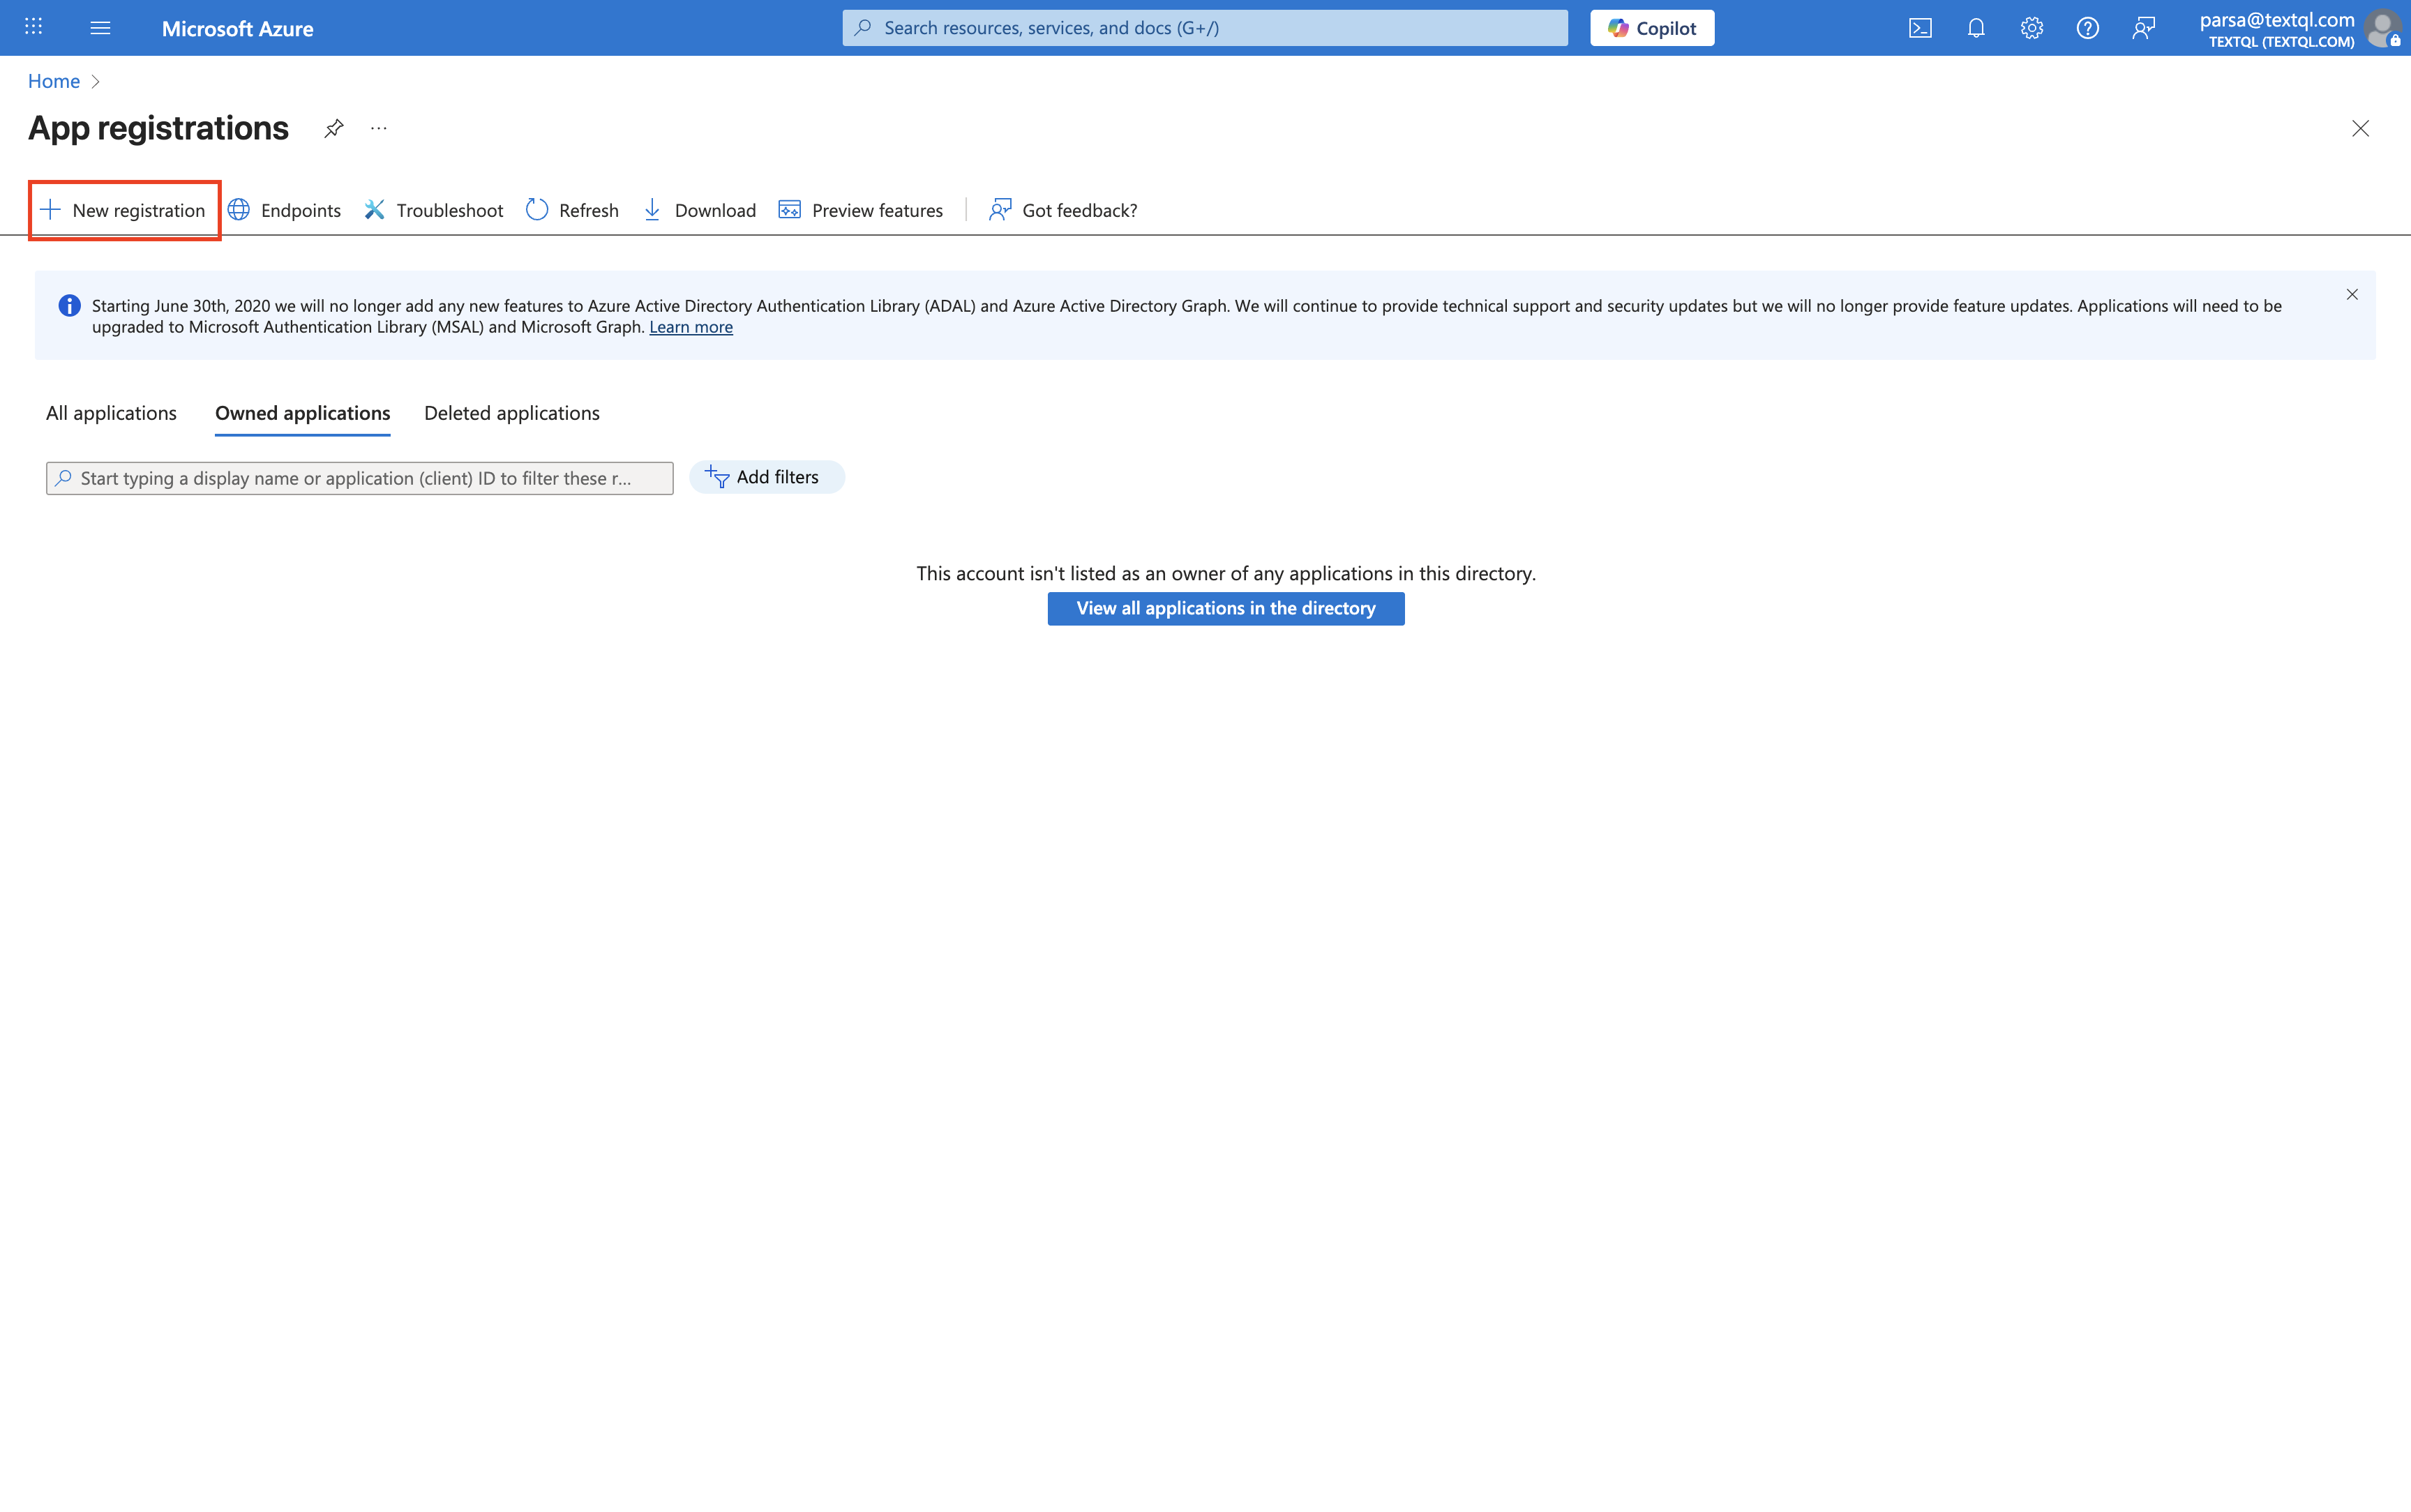
Navigate to **Azure Active Directory** > **App registrations** and click **+ New registration**.
### 1.2 Create a New App Registration
Navigate to **Azure Active Directory** > **App registrations** and click **+ New registration**.
 Fill in the registration form:
* **Name**: Choose a descriptive name (e.g., "TextQL PowerBI Connector")
* **Supported account types**: Select "Accounts in this organizational directory only"
* **Redirect URI**: Leave blank (not required for service principal authentication)
Fill in the registration form:
* **Name**: Choose a descriptive name (e.g., "TextQL PowerBI Connector")
* **Supported account types**: Select "Accounts in this organizational directory only"
* **Redirect URI**: Leave blank (not required for service principal authentication)
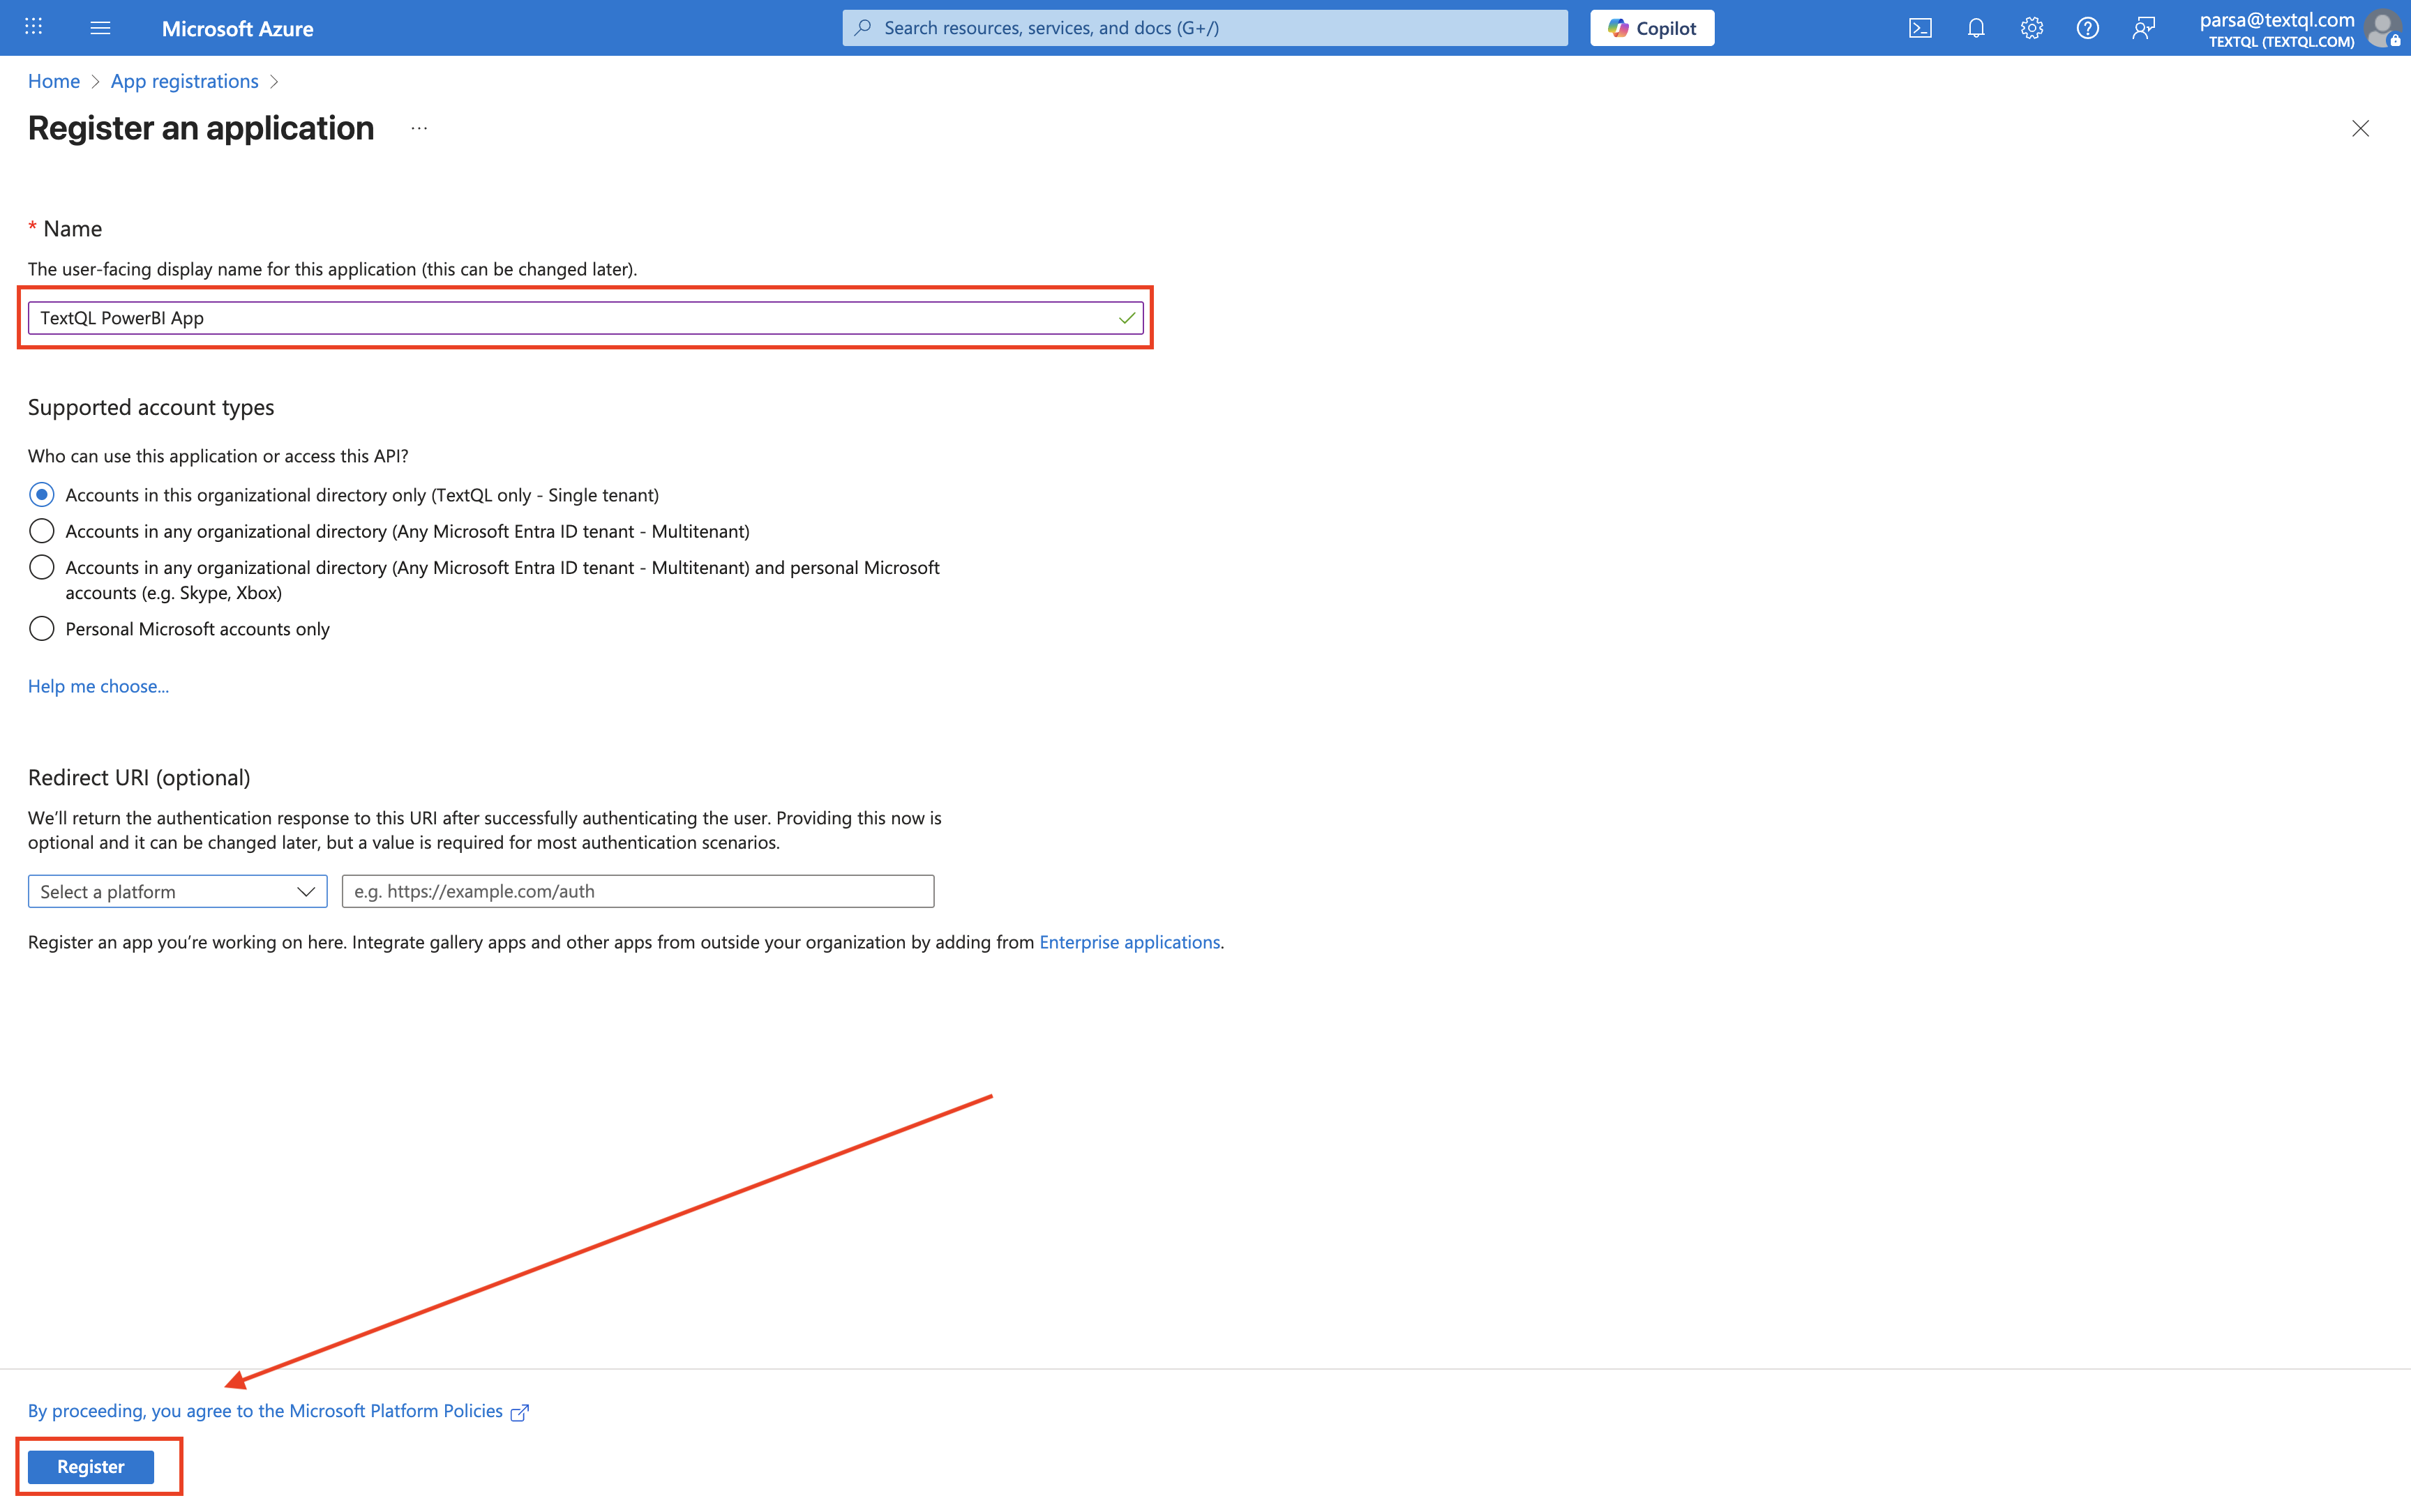 Click **Register** to create the application.
### 1.3 Copy the Tenant ID and Application (Client) ID
After registration, you'll be taken to the application overview page. Here you can find two critical pieces of information:
Click **Register** to create the application.
### 1.3 Copy the Tenant ID and Application (Client) ID
After registration, you'll be taken to the application overview page. Here you can find two critical pieces of information:
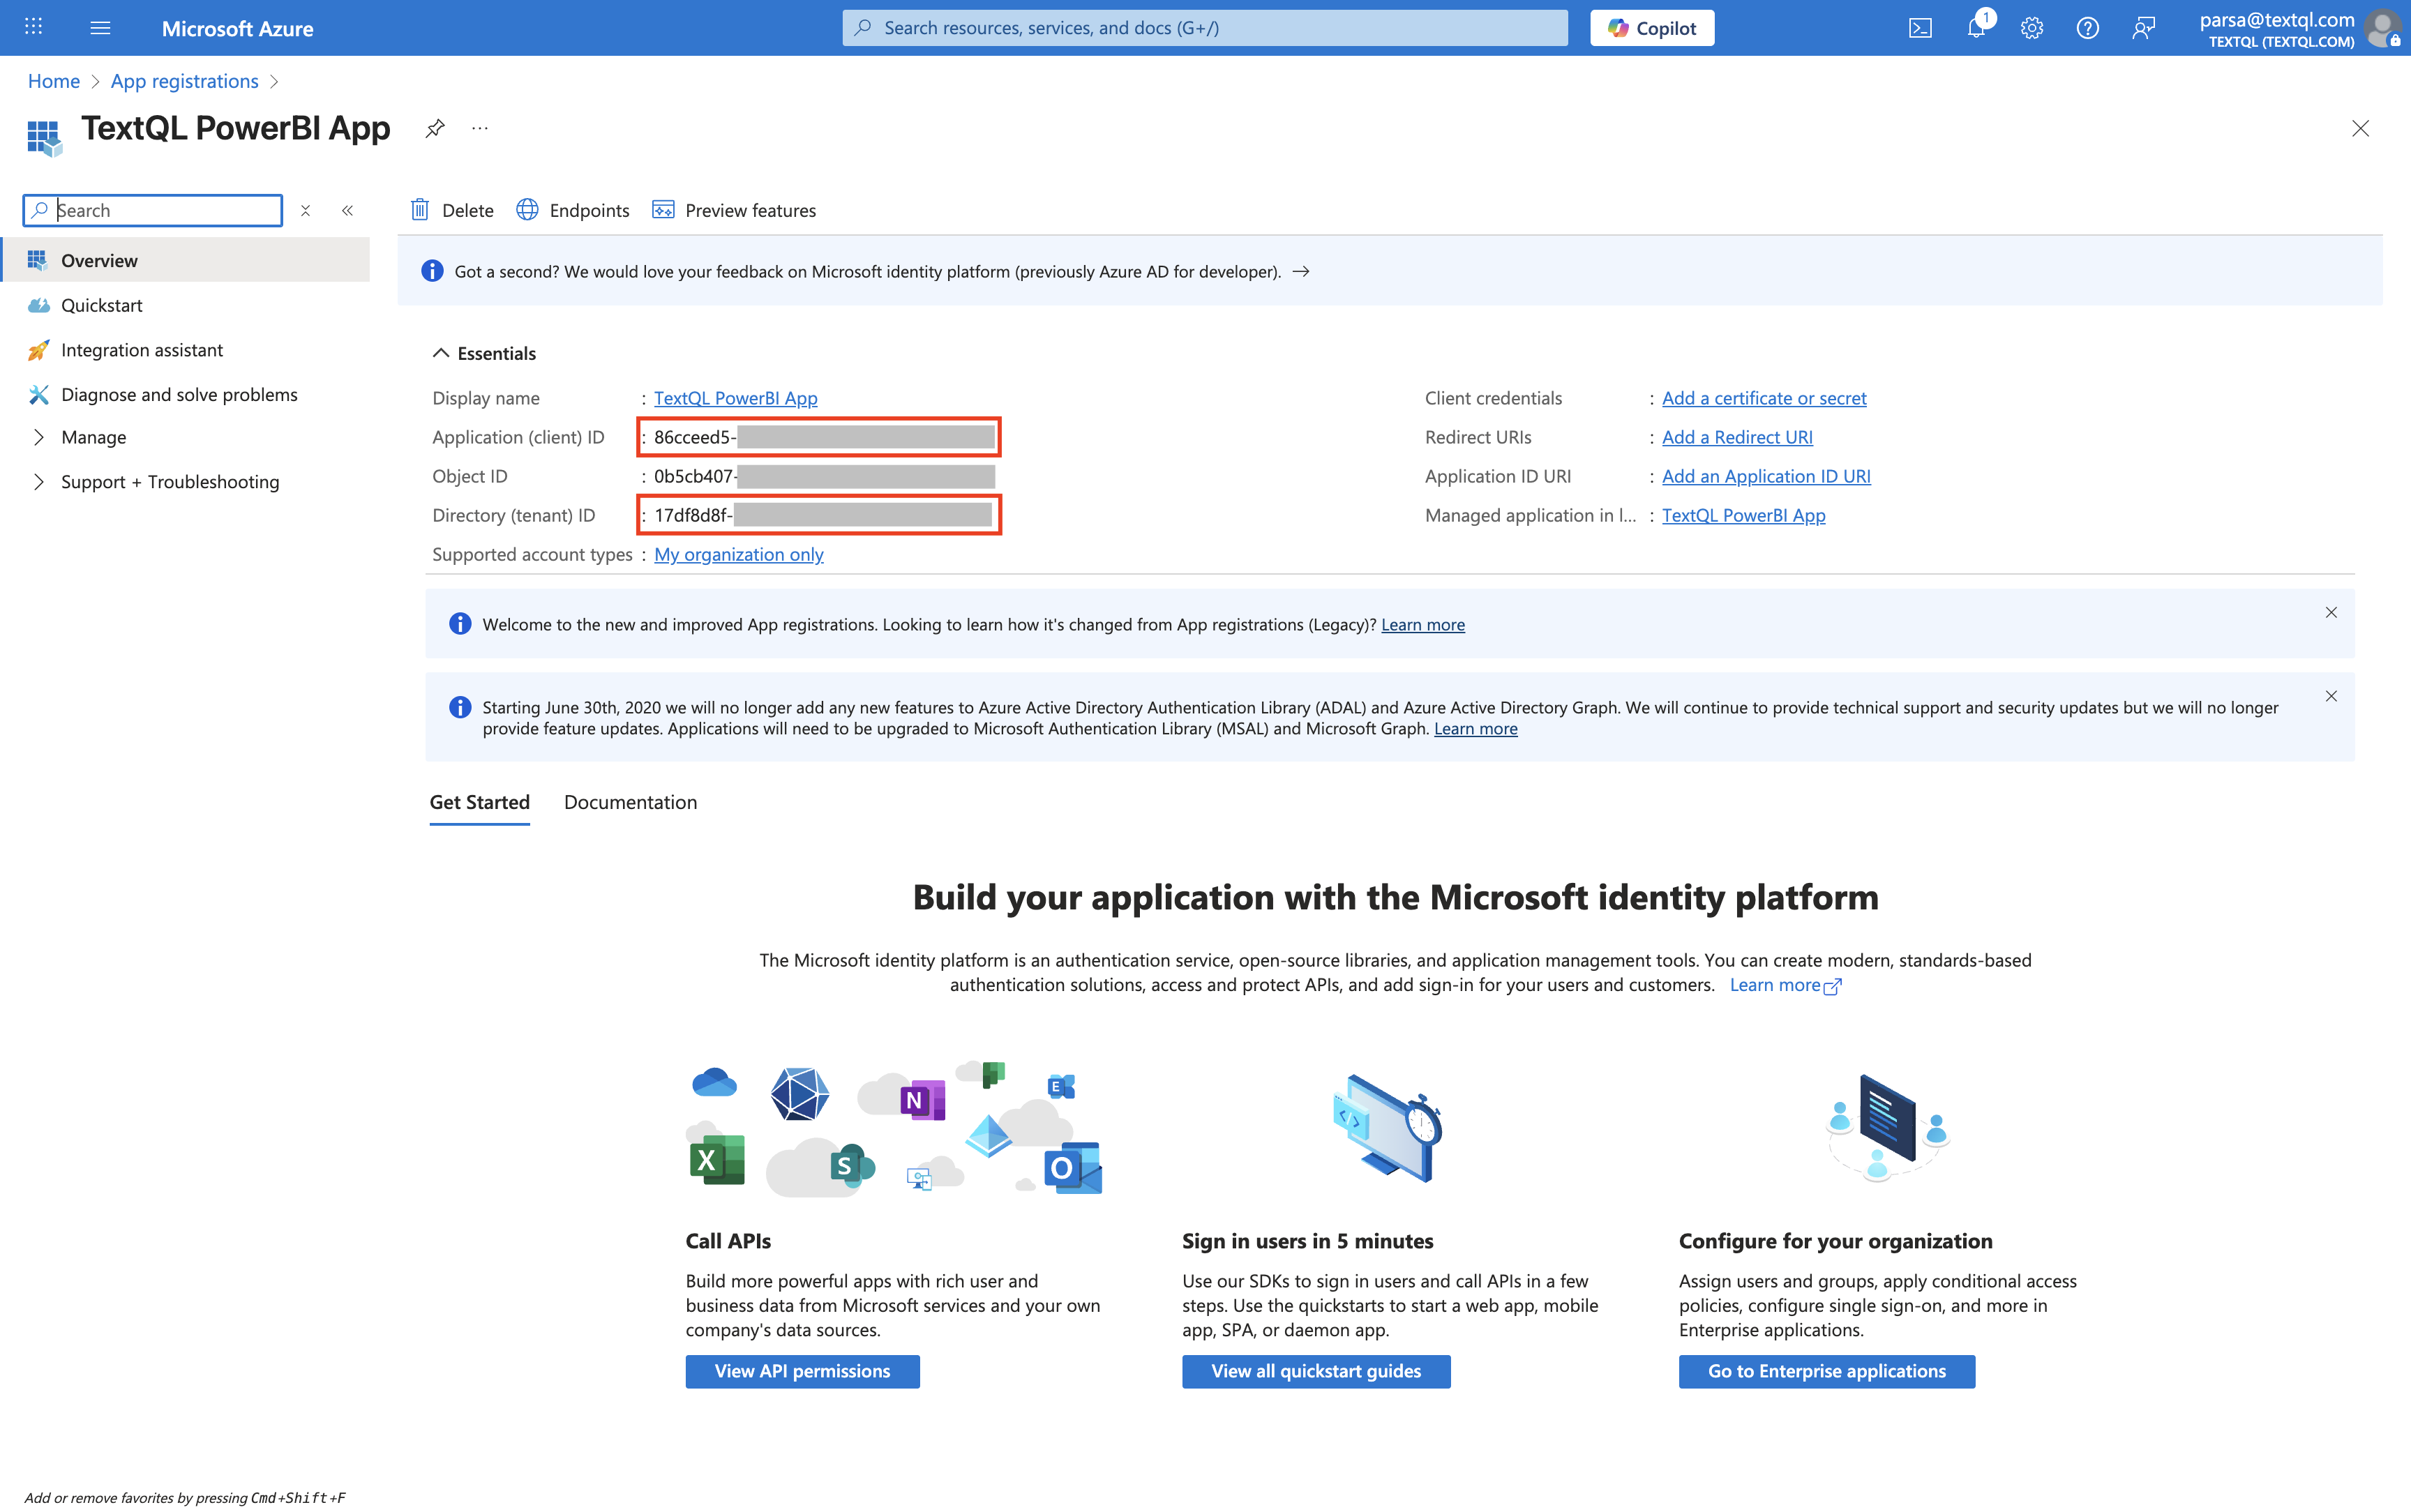 Copy and save:
* **Directory (tenant) ID**: This is your Azure Tenant ID
* **Application (client) ID**: This is your Application (Client) ID
### 1.4 Generate a Client Secret
Navigate to **Certificates & secrets** in the left sidebar and click **+ New client secret**.
Copy and save:
* **Directory (tenant) ID**: This is your Azure Tenant ID
* **Application (client) ID**: This is your Application (Client) ID
### 1.4 Generate a Client Secret
Navigate to **Certificates & secrets** in the left sidebar and click **+ New client secret**.
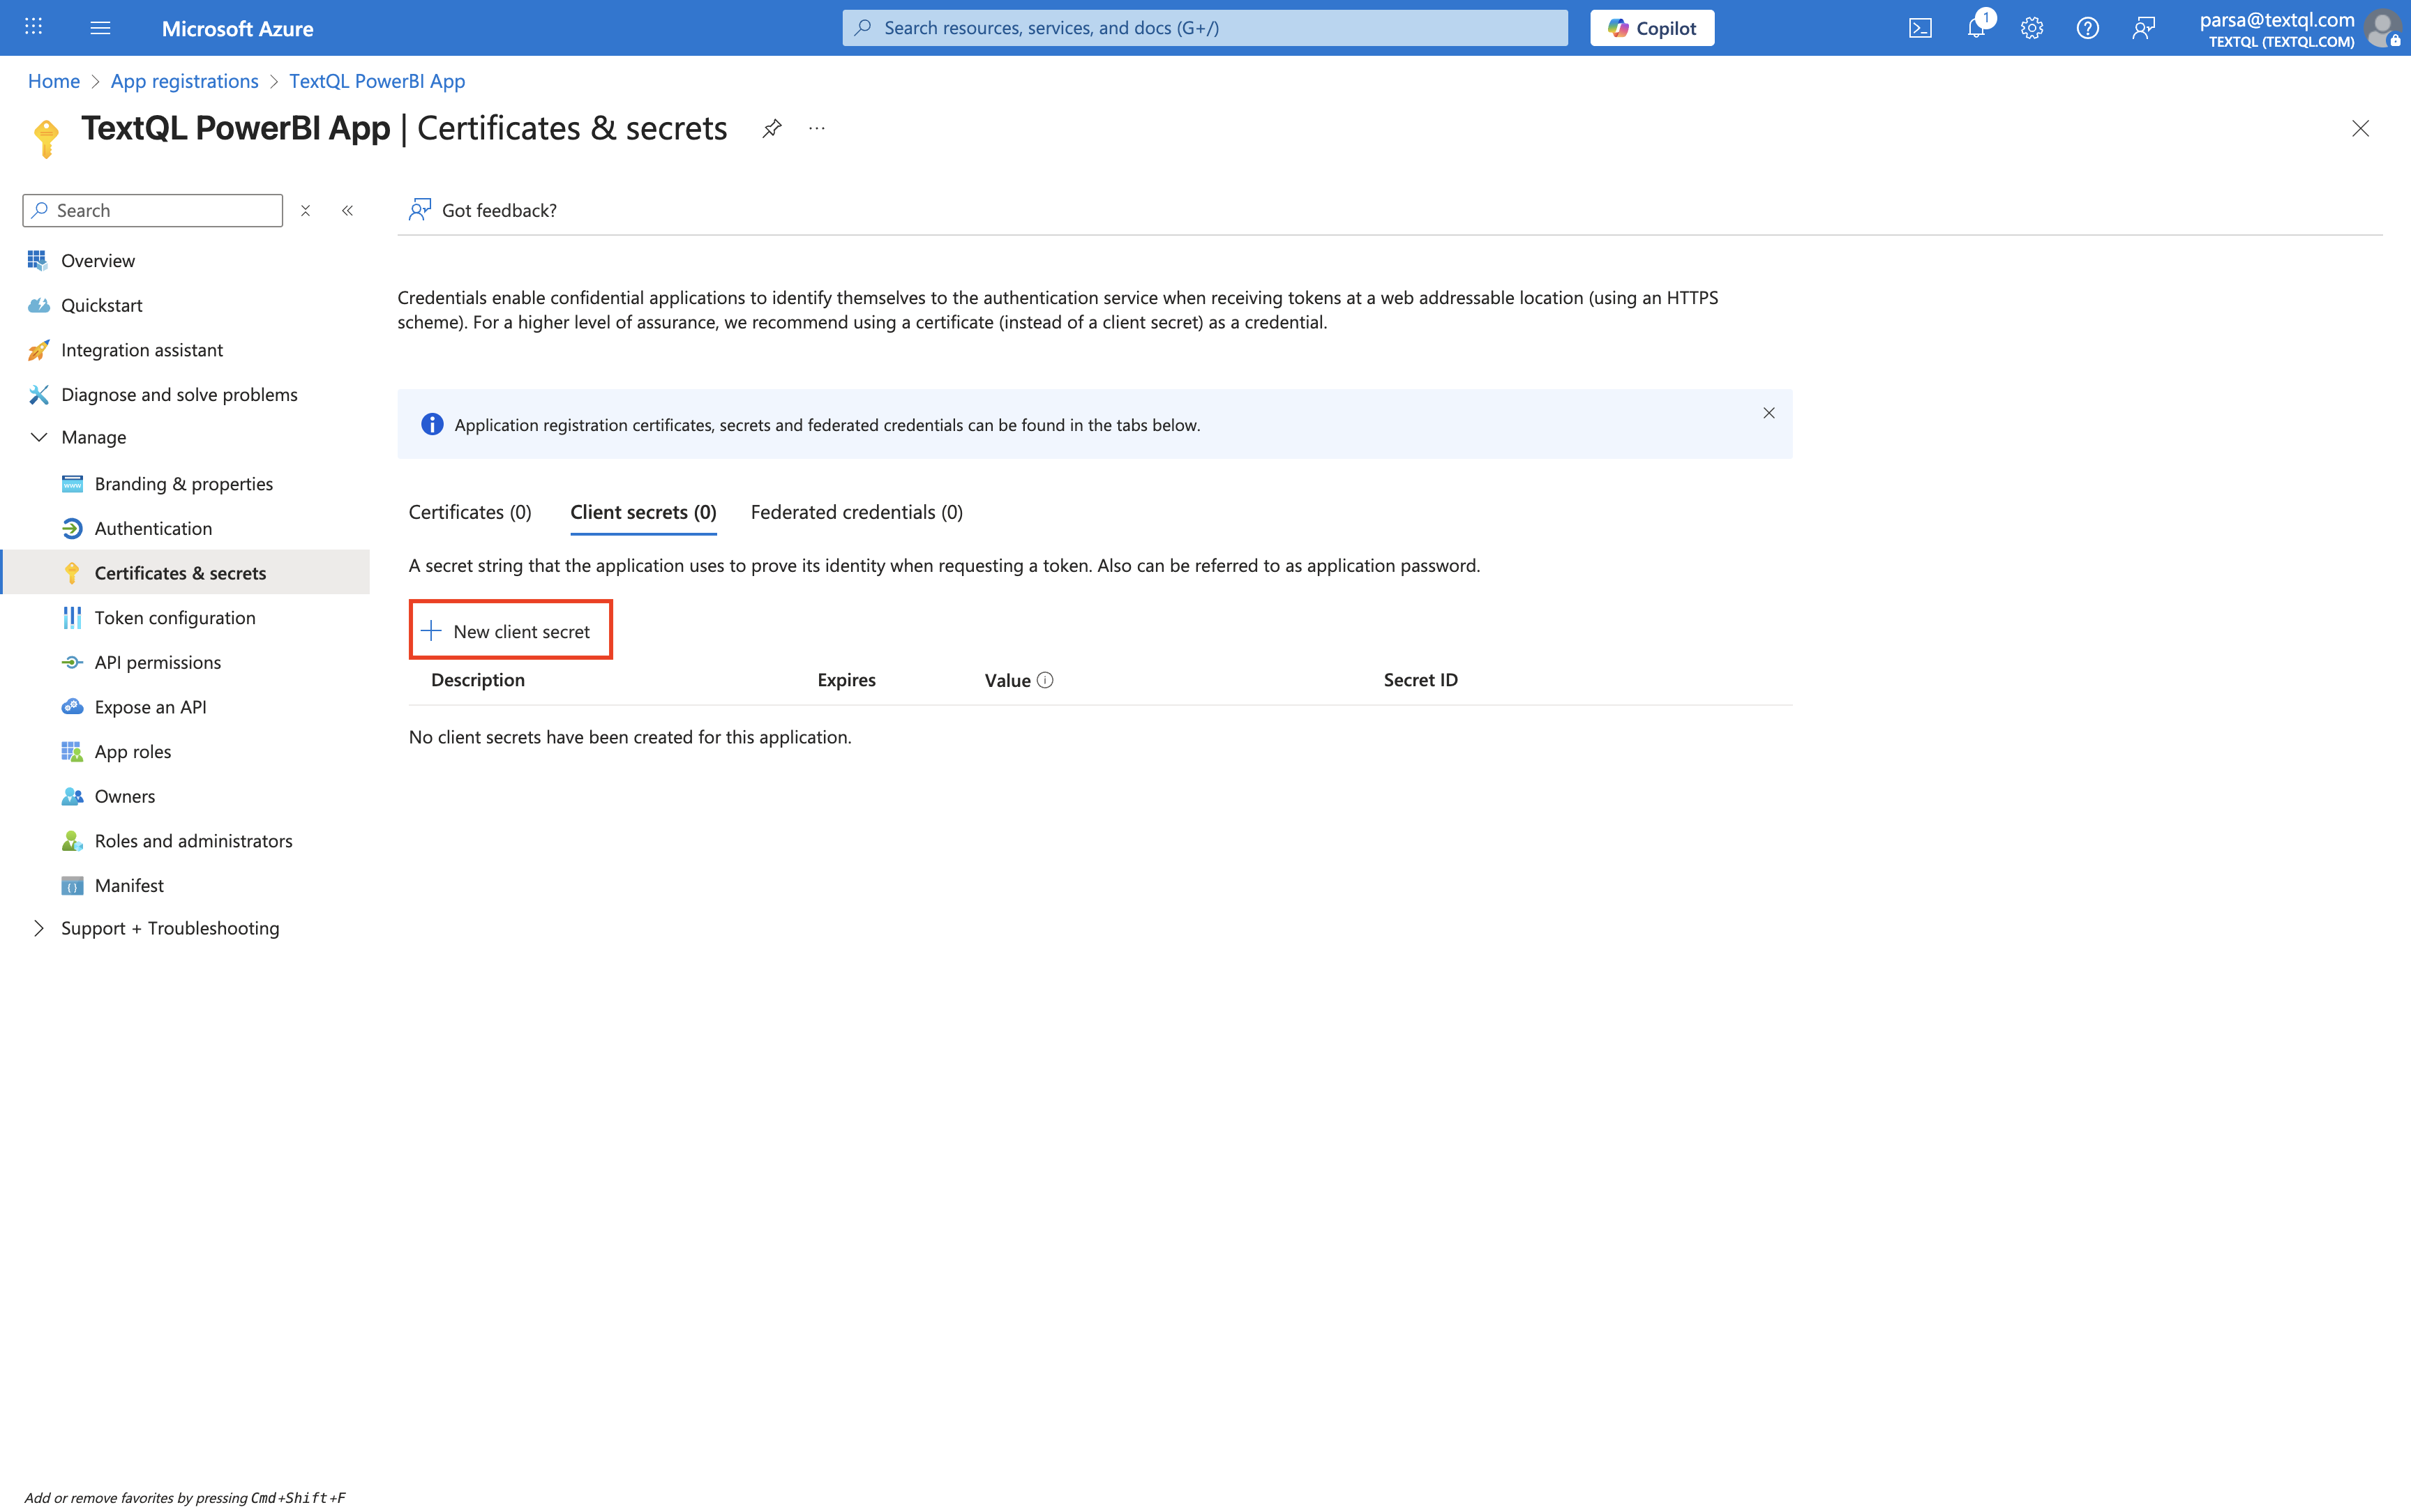 Add a description and choose an expiration period for your secret:
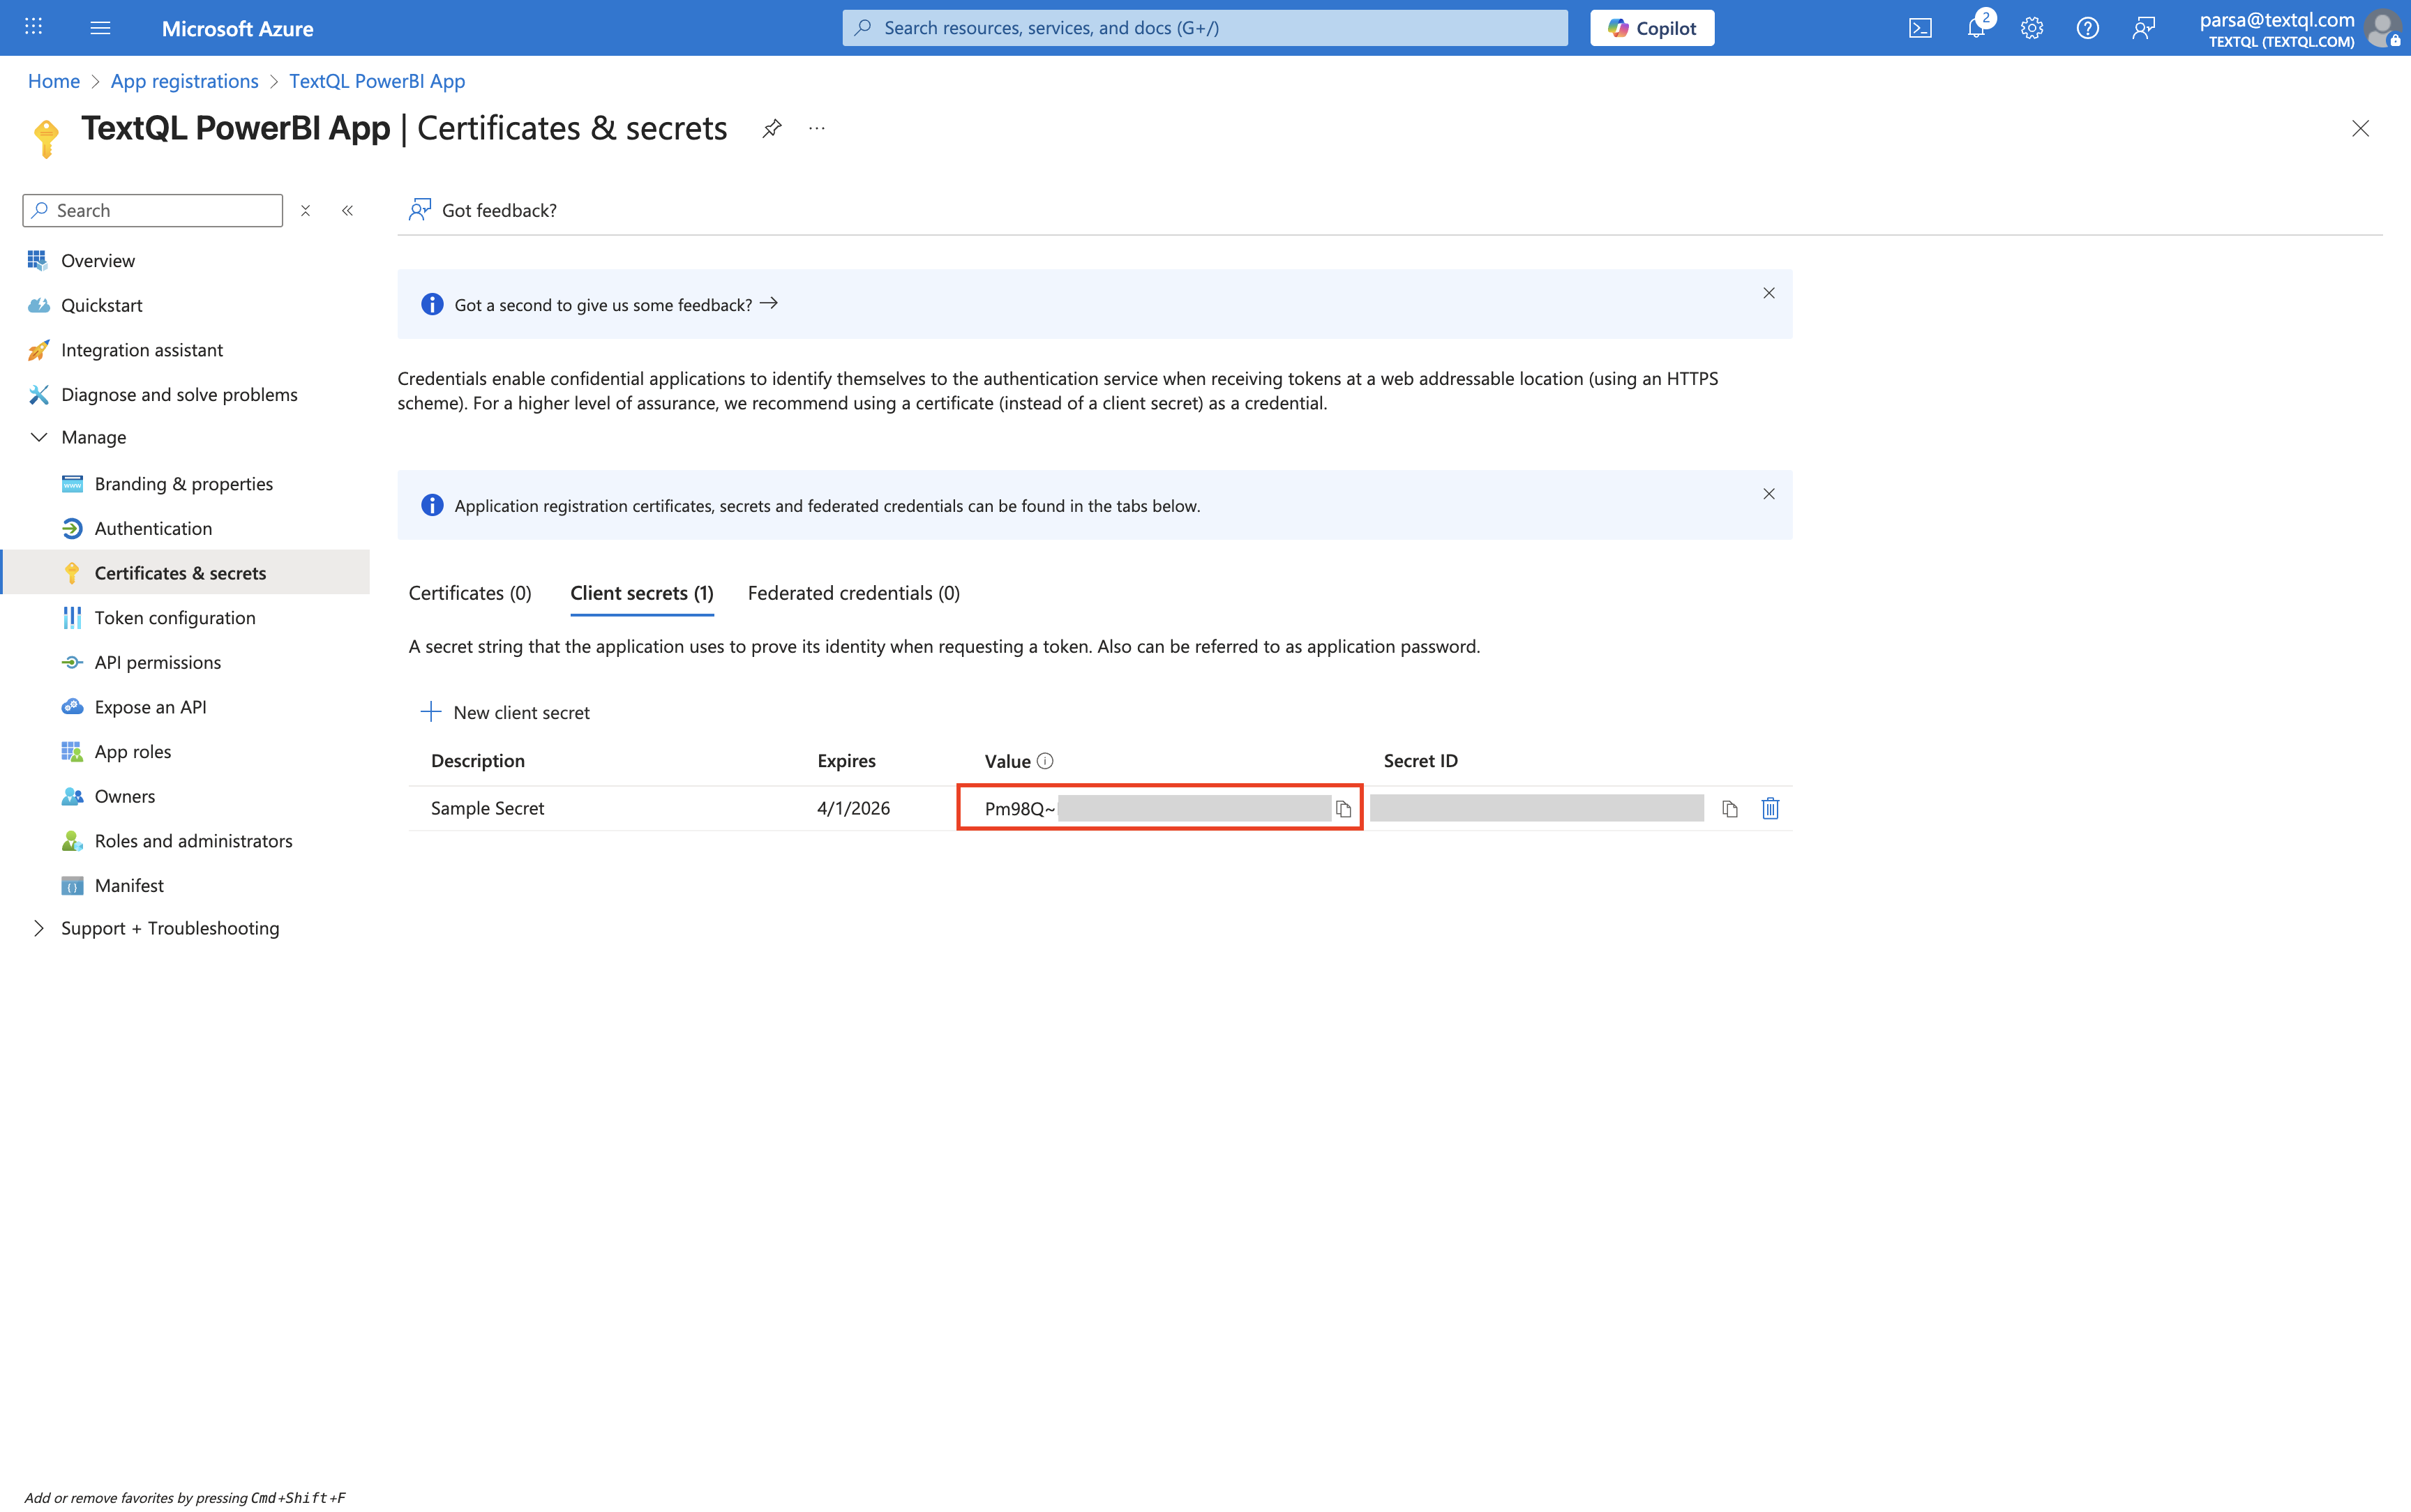
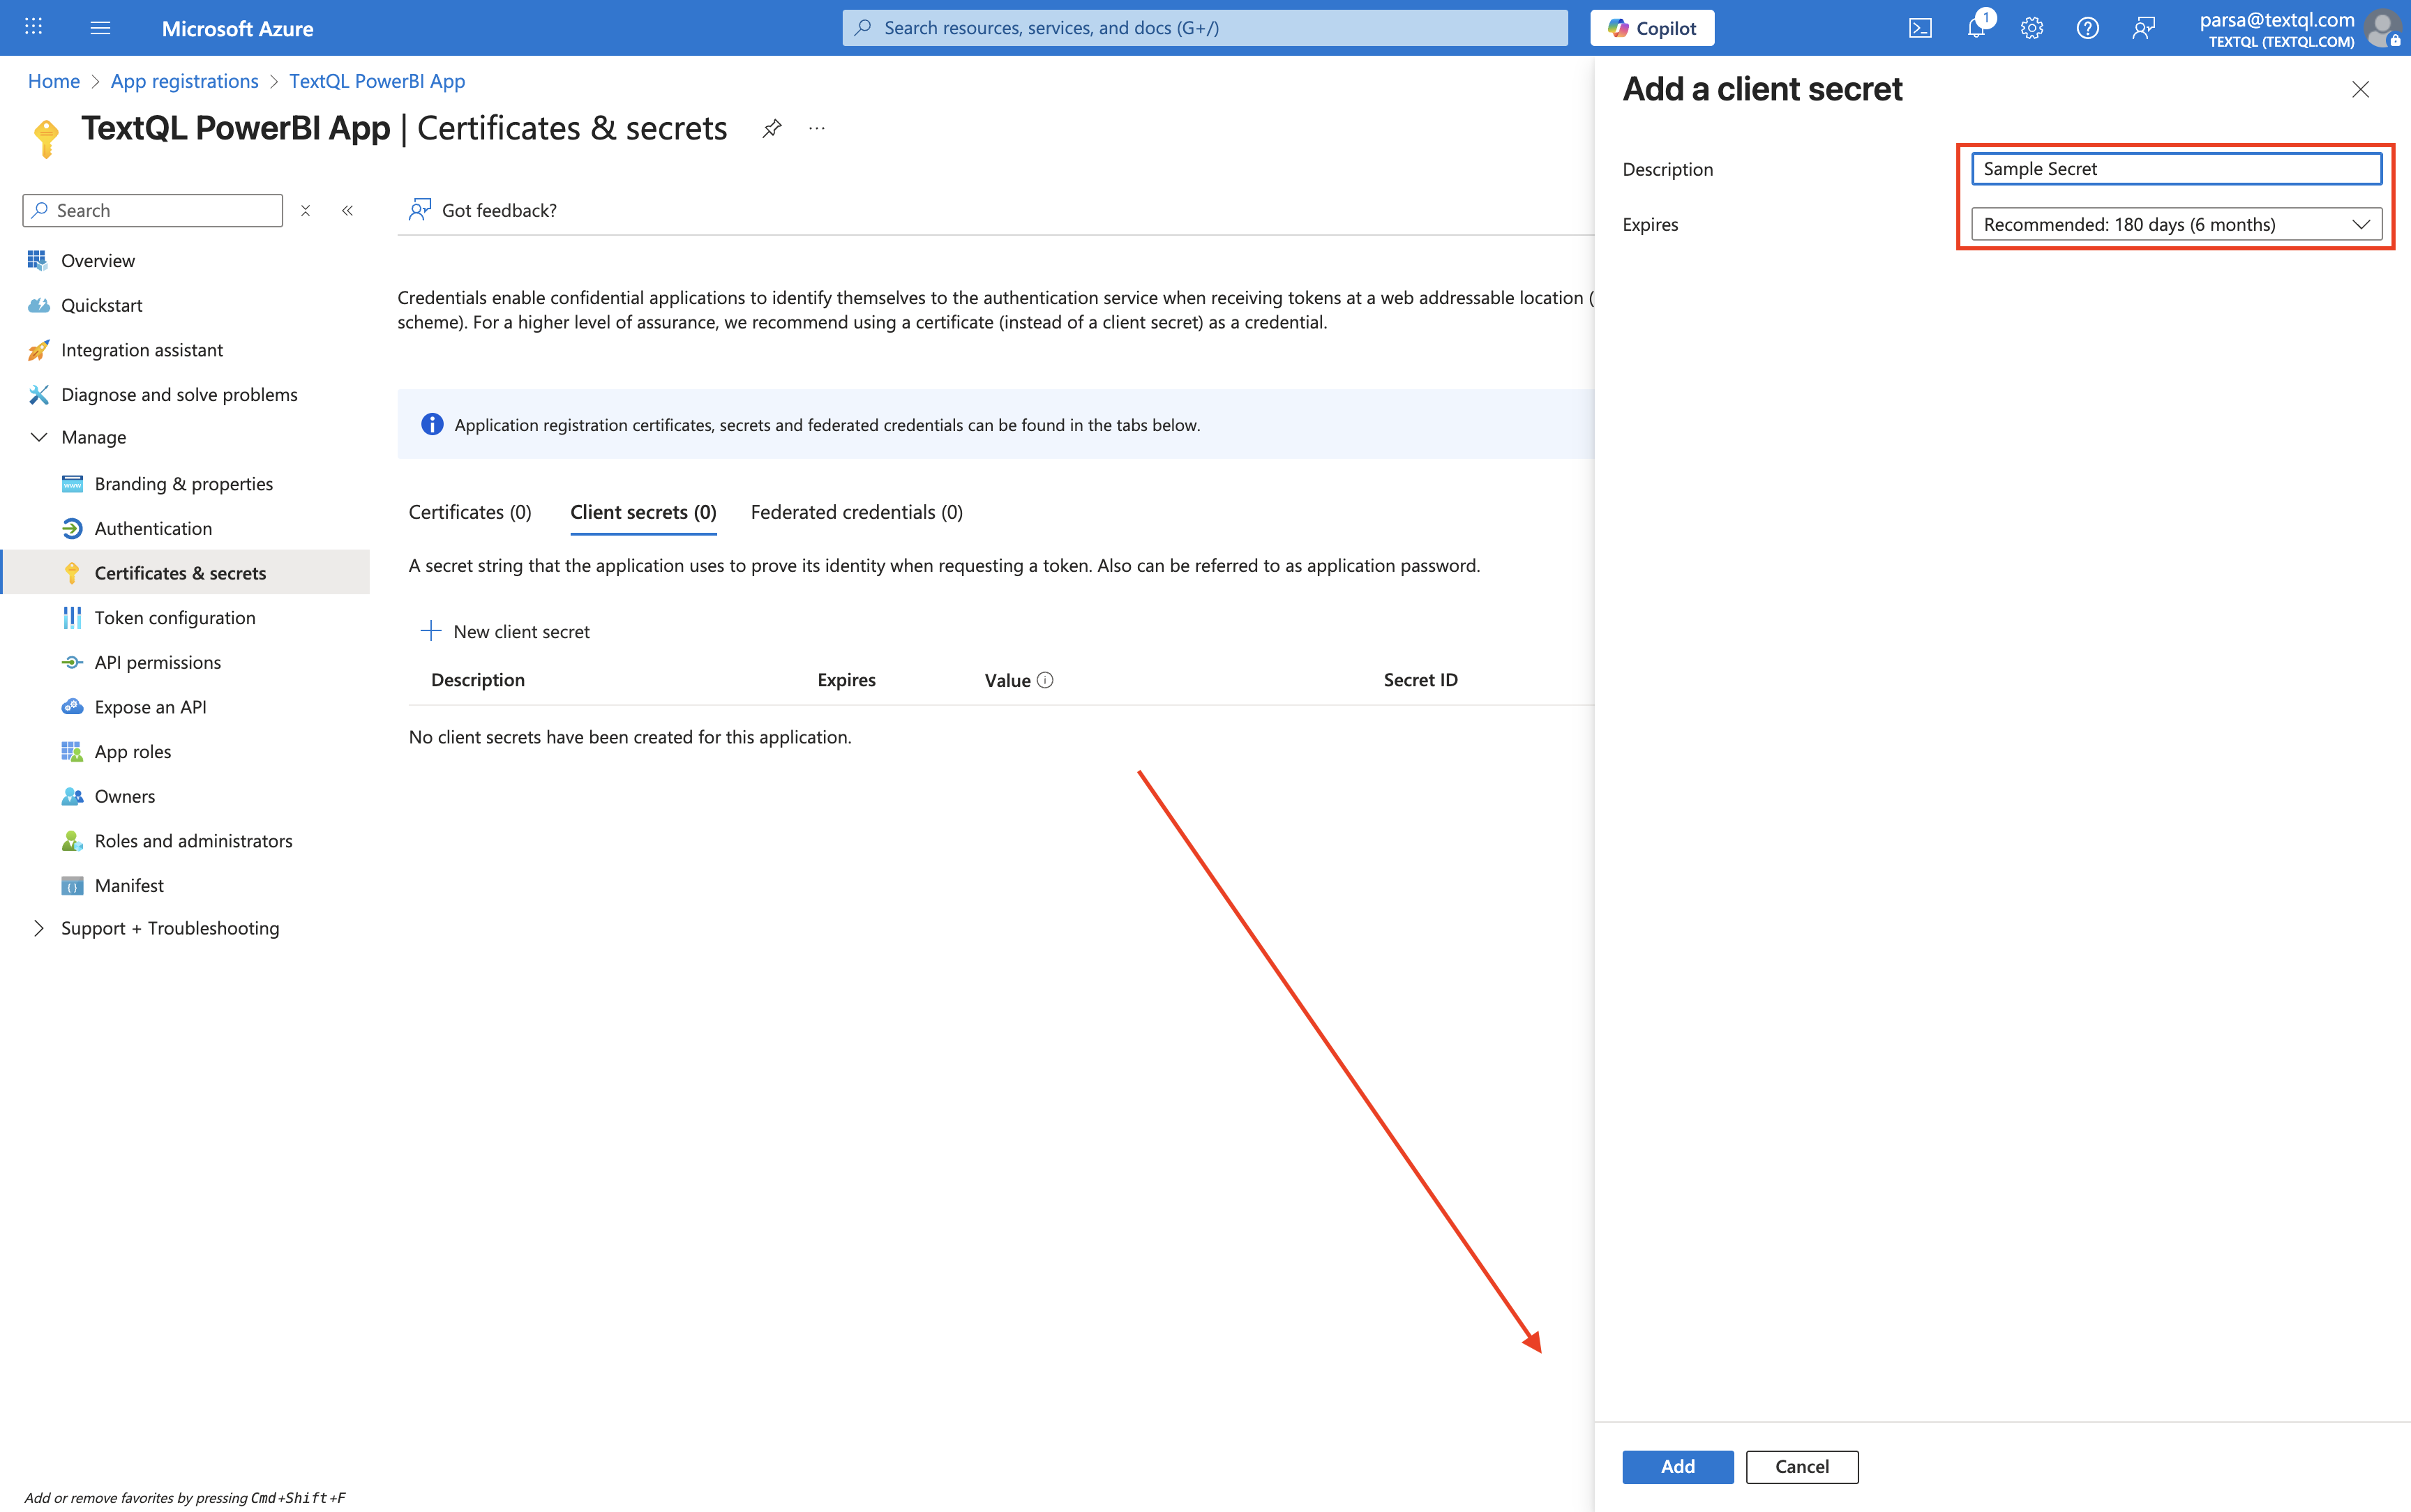 After clicking **Add**, copy the **Value** immediately - this is your Client Secret.
**Important**: The client secret value is only displayed once. Make sure to copy it immediately and store it securely. If you lose it, you'll need to generate a new one.
After clicking **Add**, copy the **Value** immediately - this is your Client Secret.
**Important**: The client secret value is only displayed once. Make sure to copy it immediately and store it securely. If you lose it, you'll need to generate a new one.
 ### 1.5 Configure PowerBI API Permissions
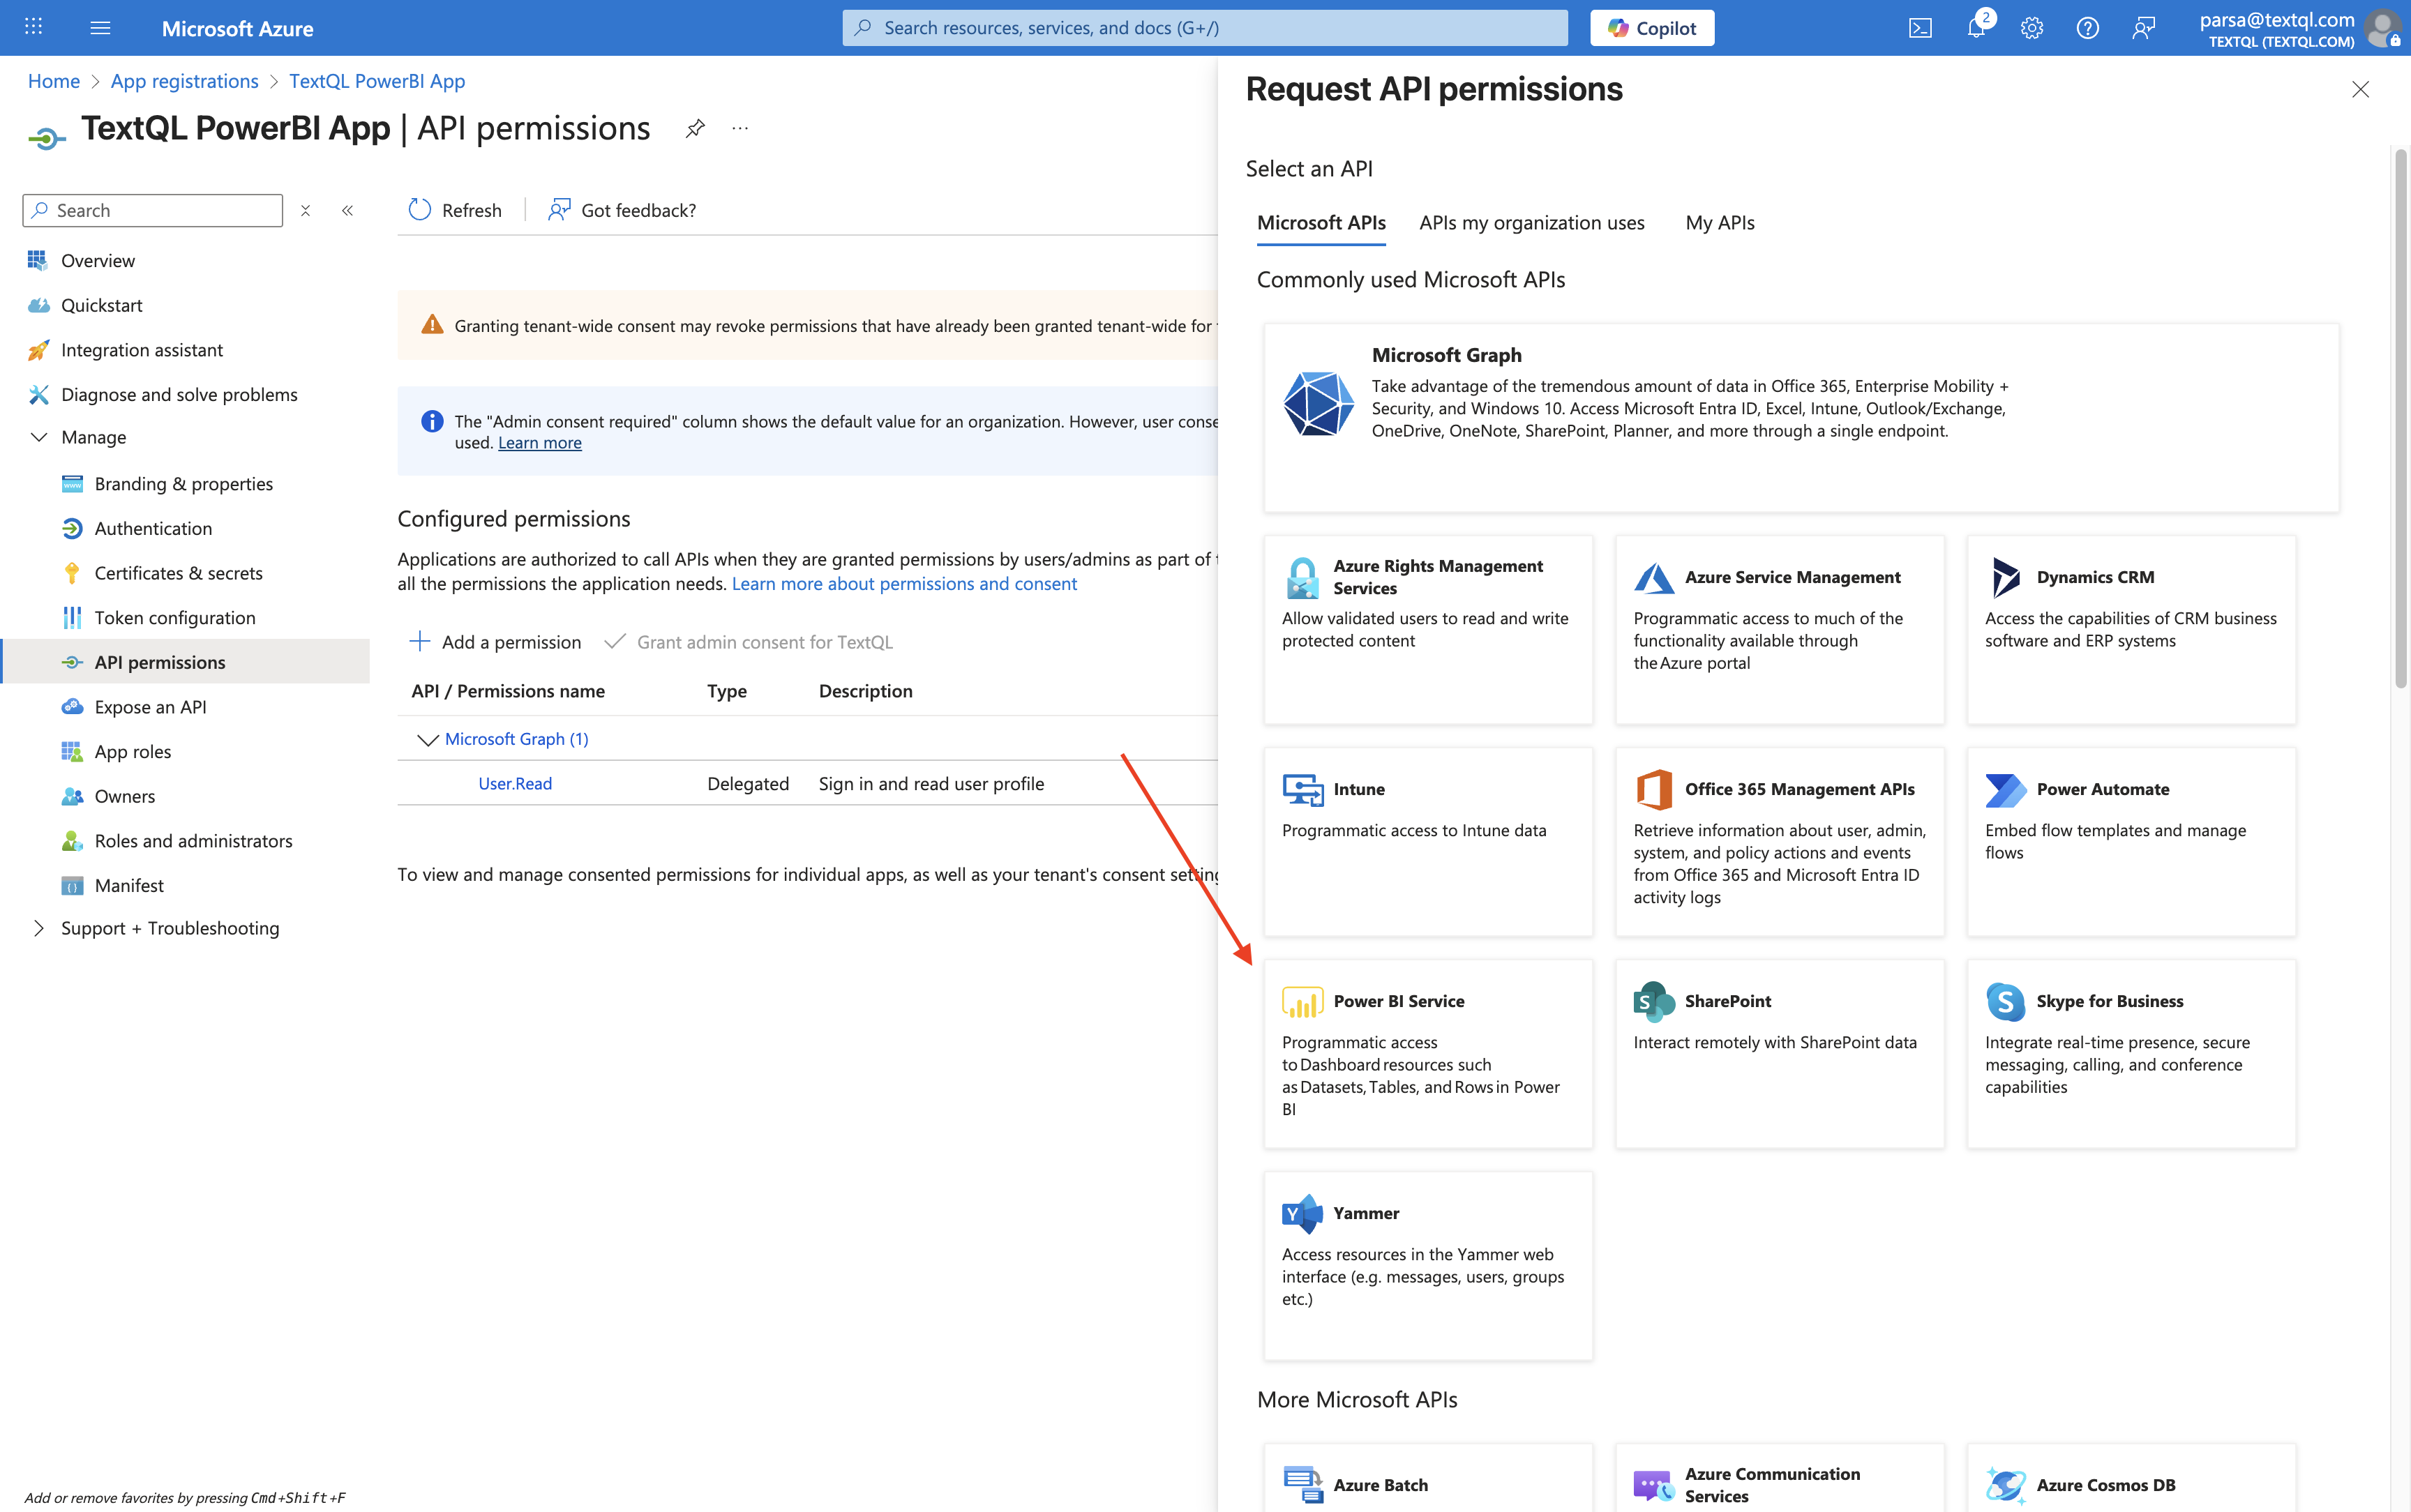
Navigate to **API permissions** in the left sidebar and click **+ Add a permission**.
### 1.5 Configure PowerBI API Permissions
Navigate to **API permissions** in the left sidebar and click **+ Add a permission**.
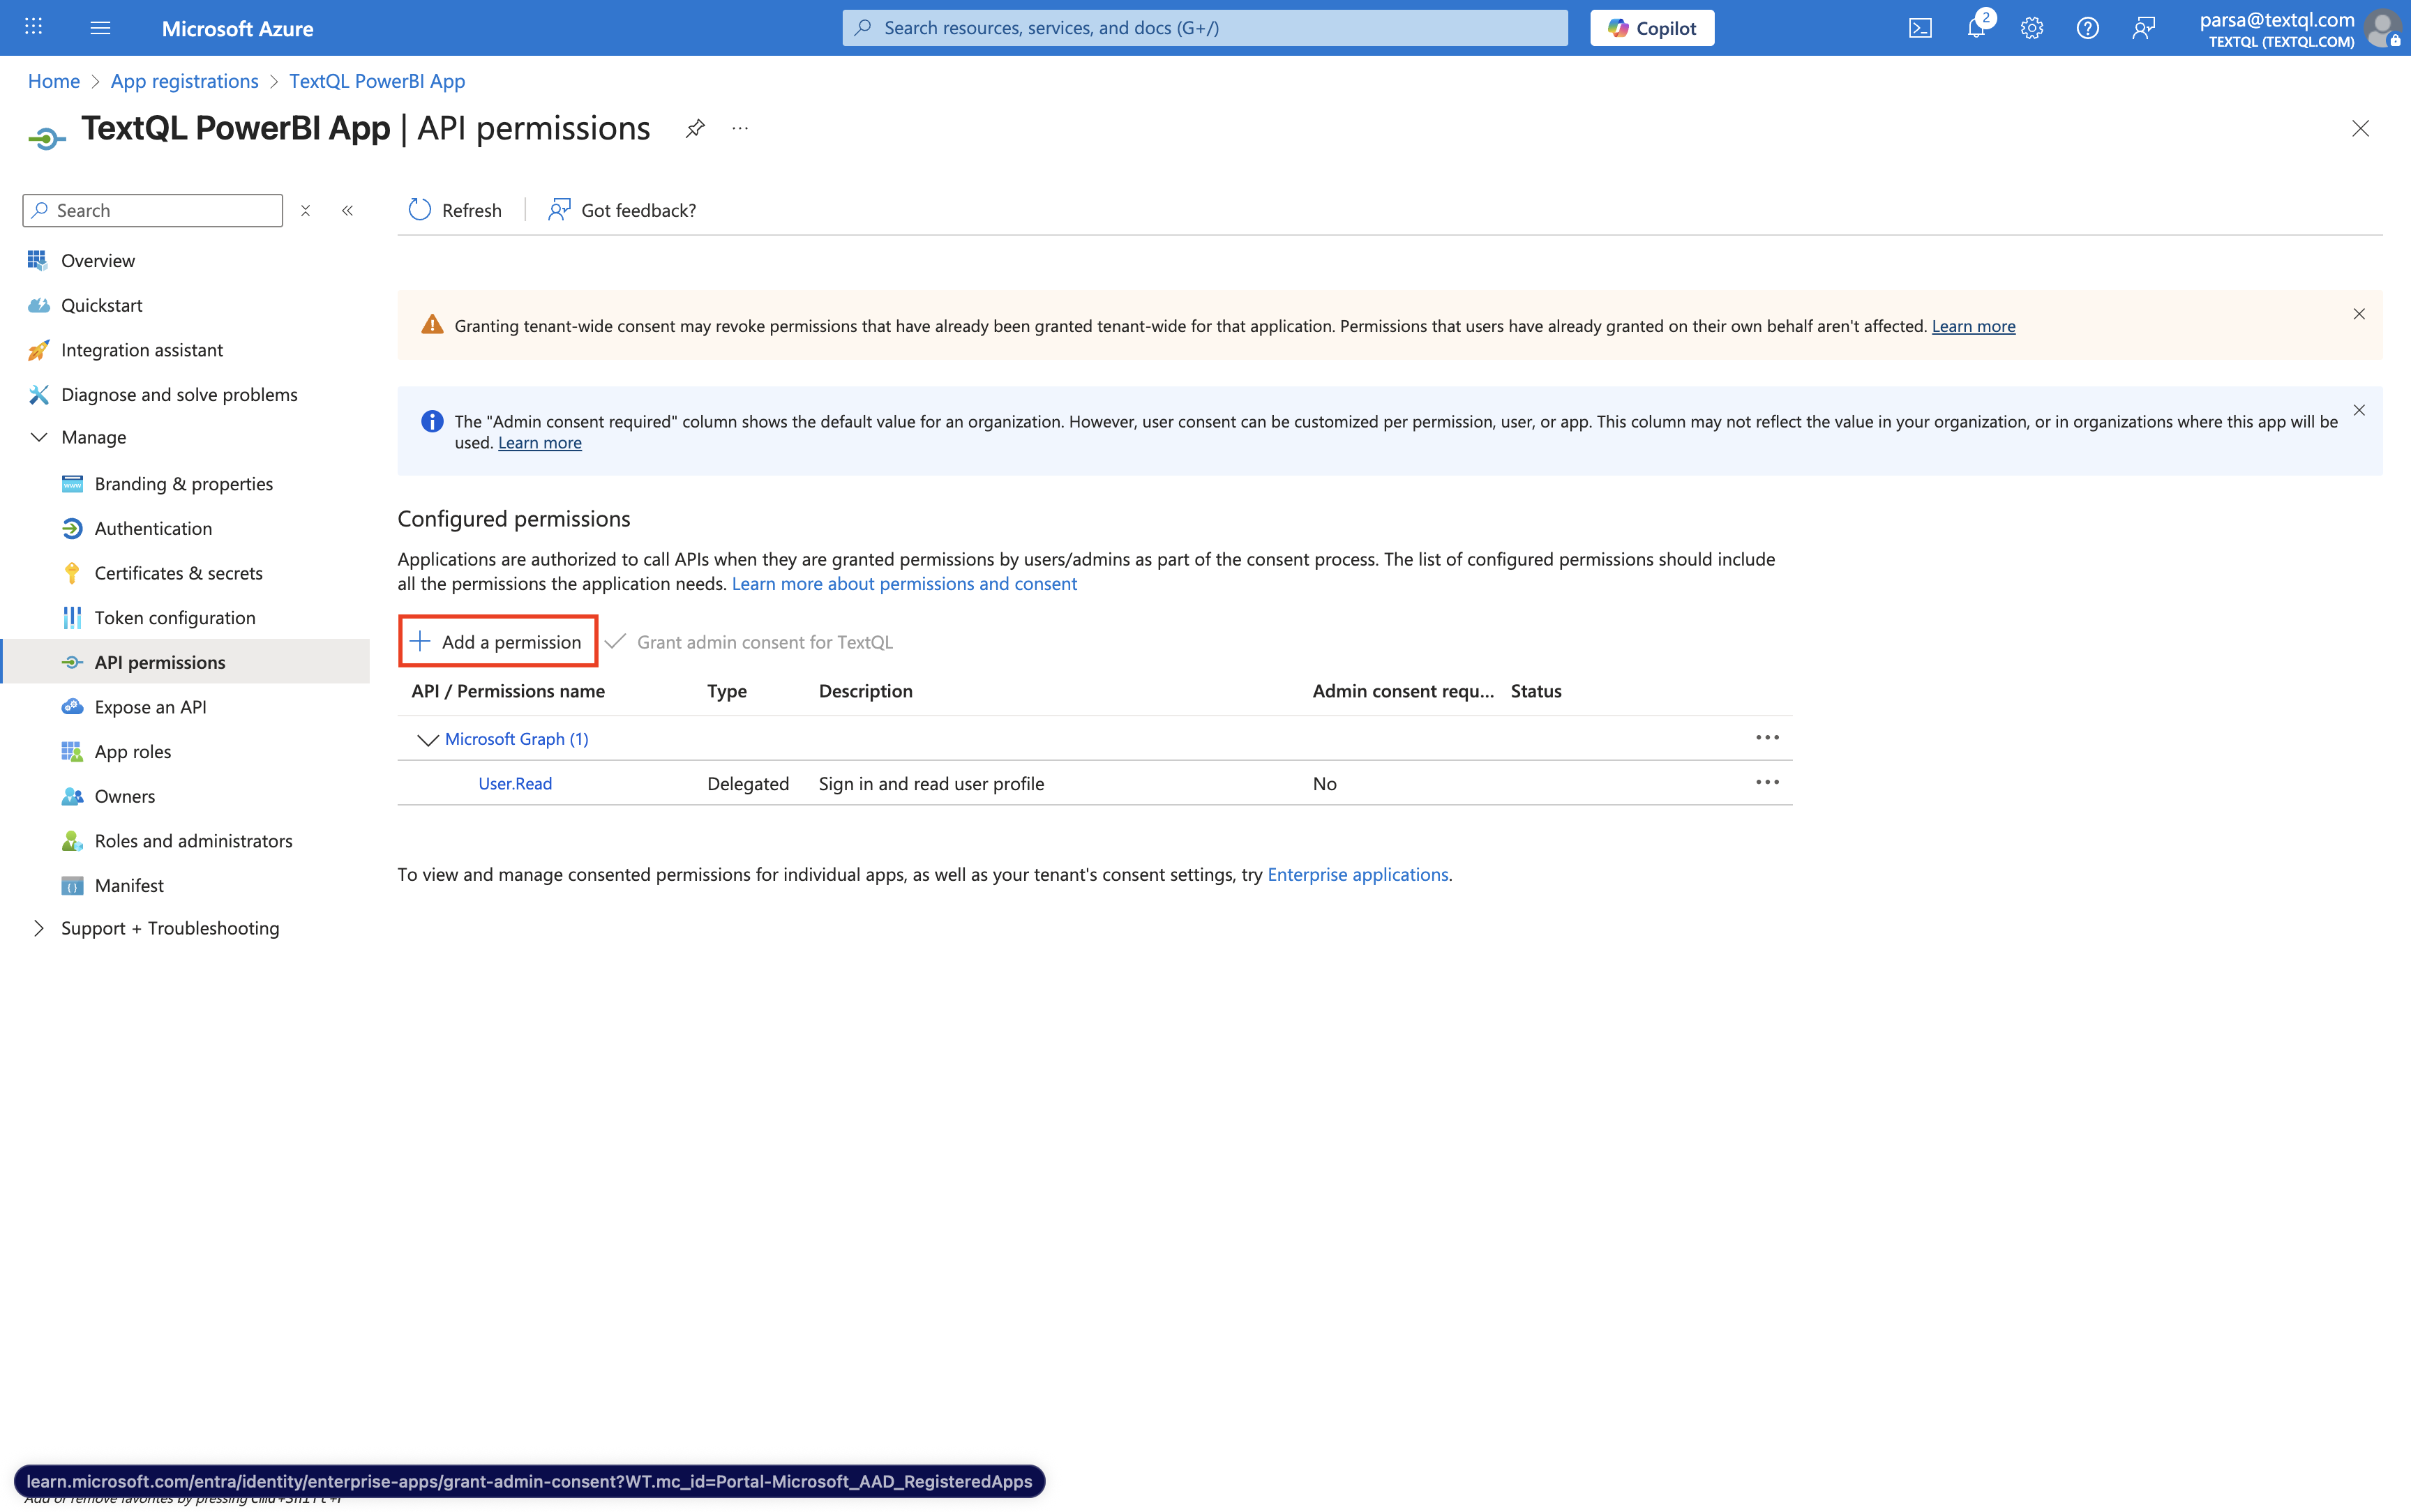 1. Select **PowerBI Service**
 2. Choose **Delegated permissions**
3. Select the following permissions:
* `Dataset.Read.All`
* `Workspace.Read.All`
* `Report.Read.All`
2. Choose **Delegated permissions**
3. Select the following permissions:
* `Dataset.Read.All`
* `Workspace.Read.All`
* `Report.Read.All`
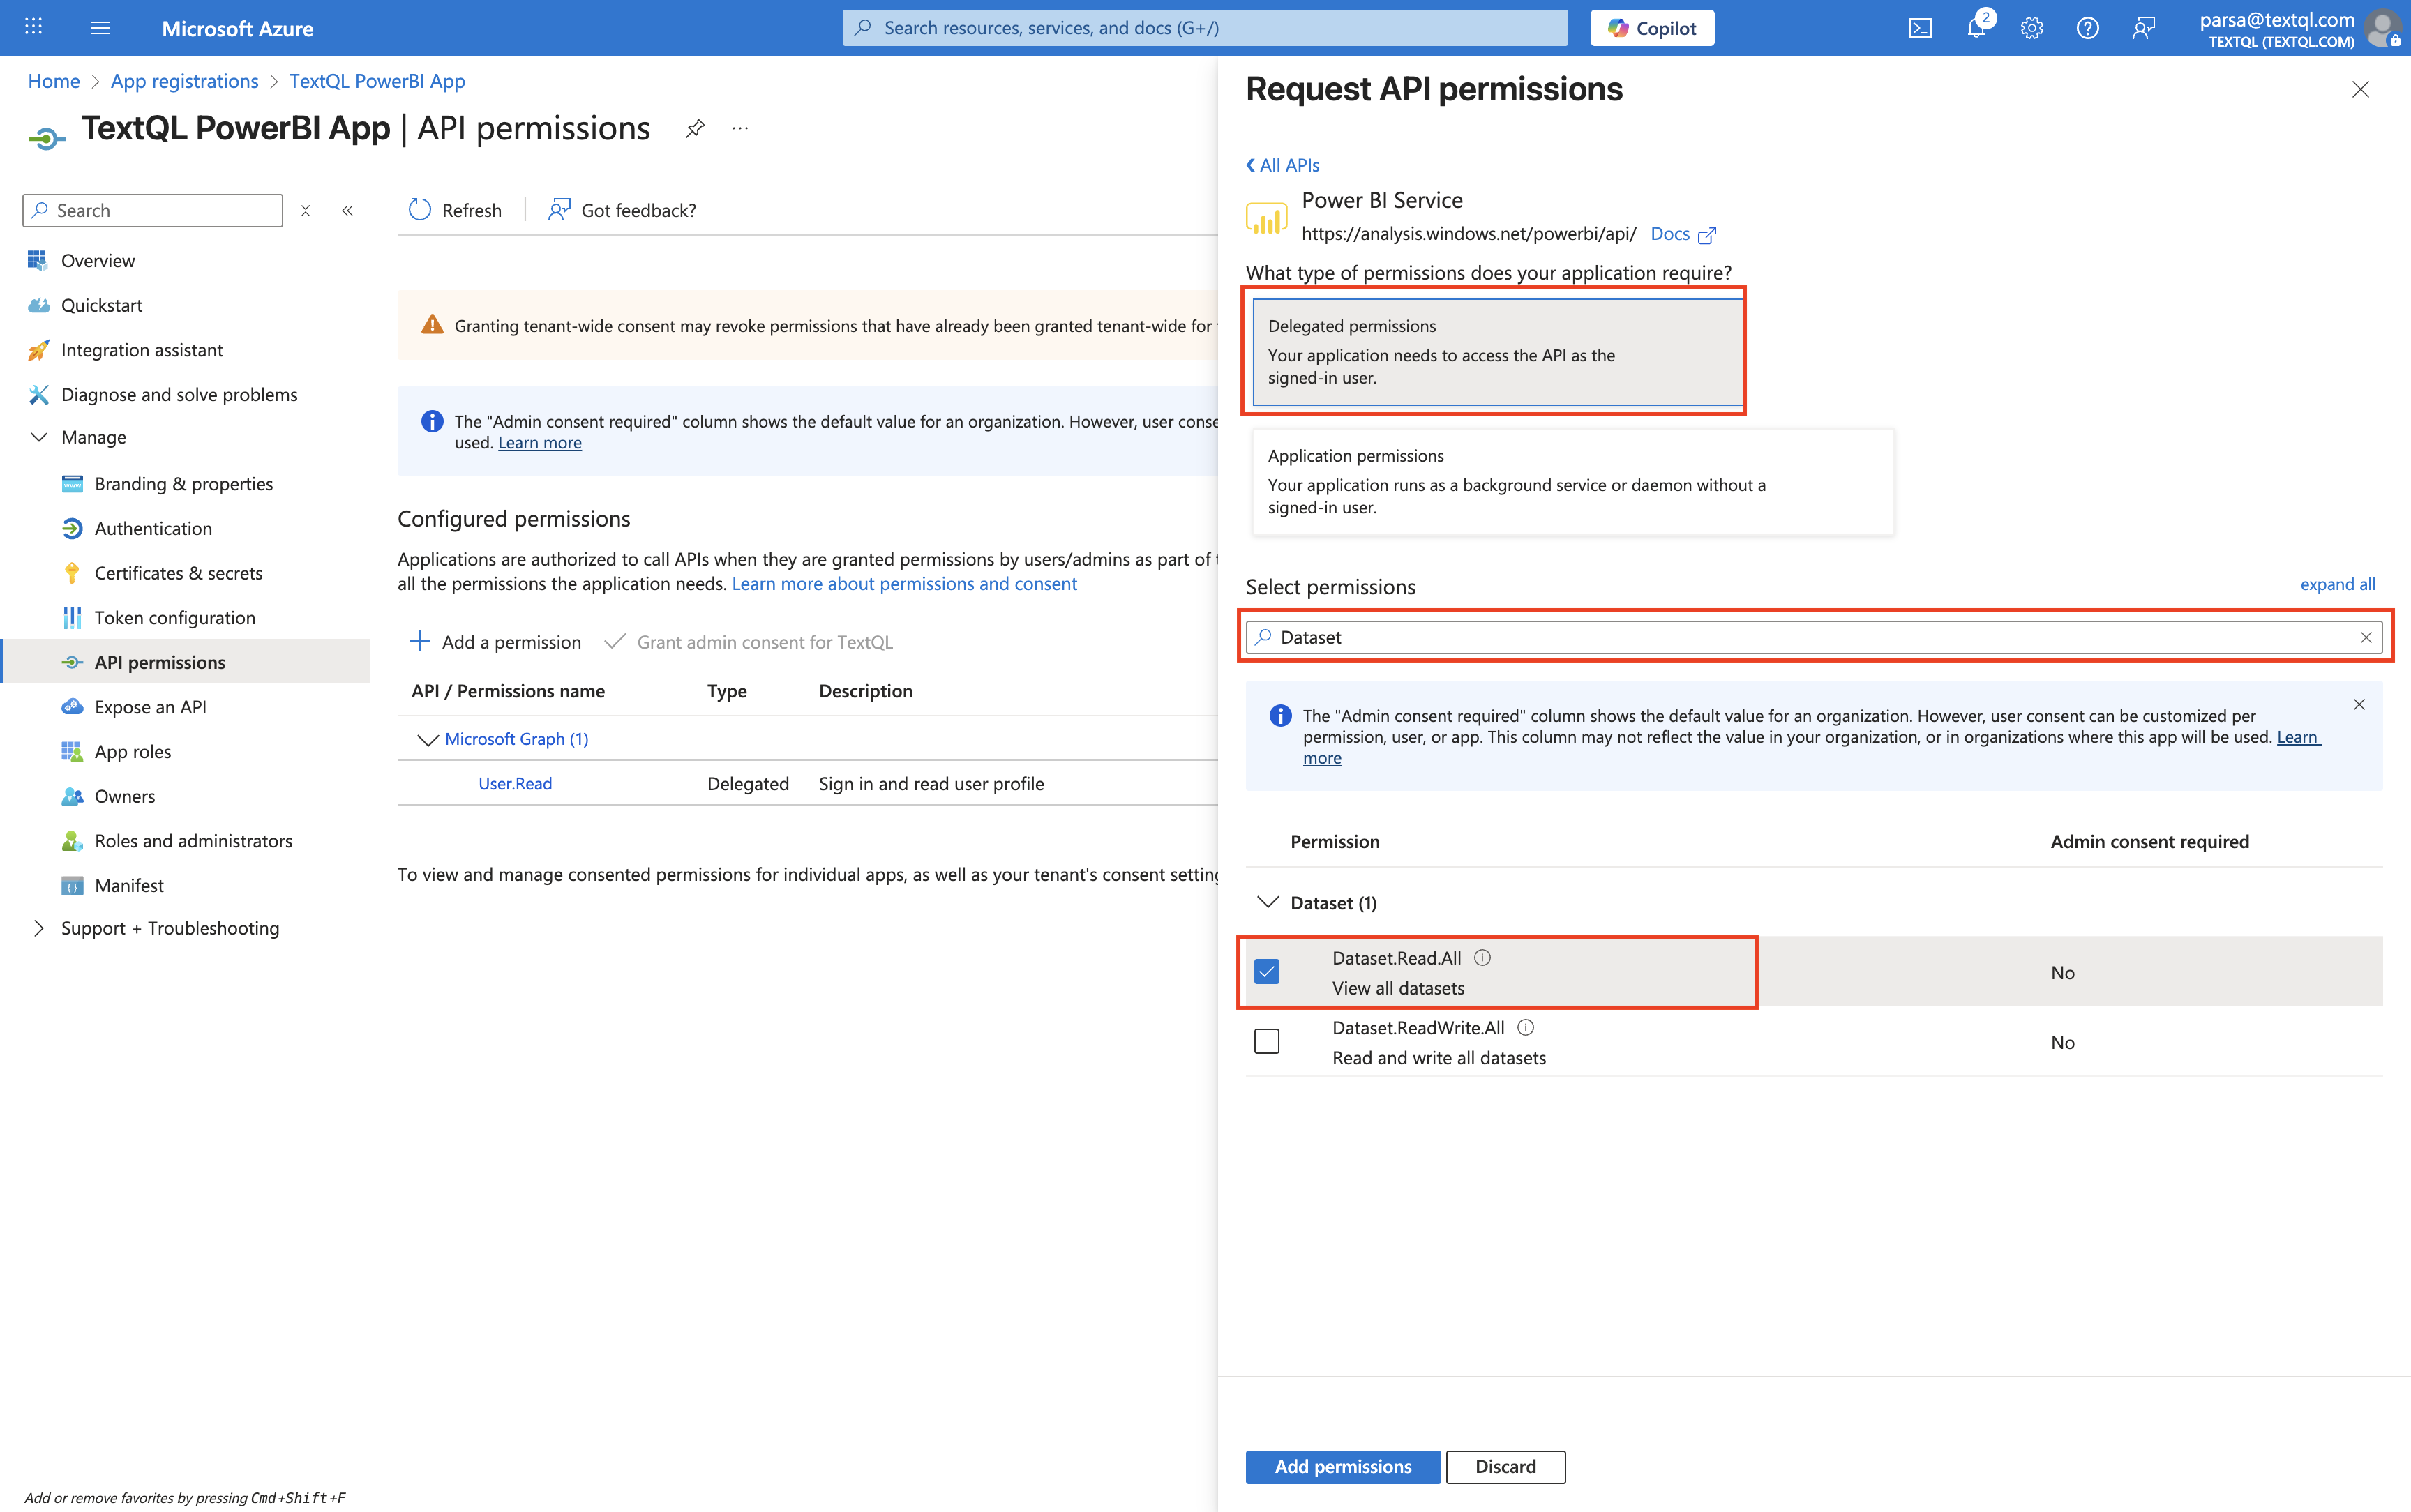 4. Click **Add permissions**
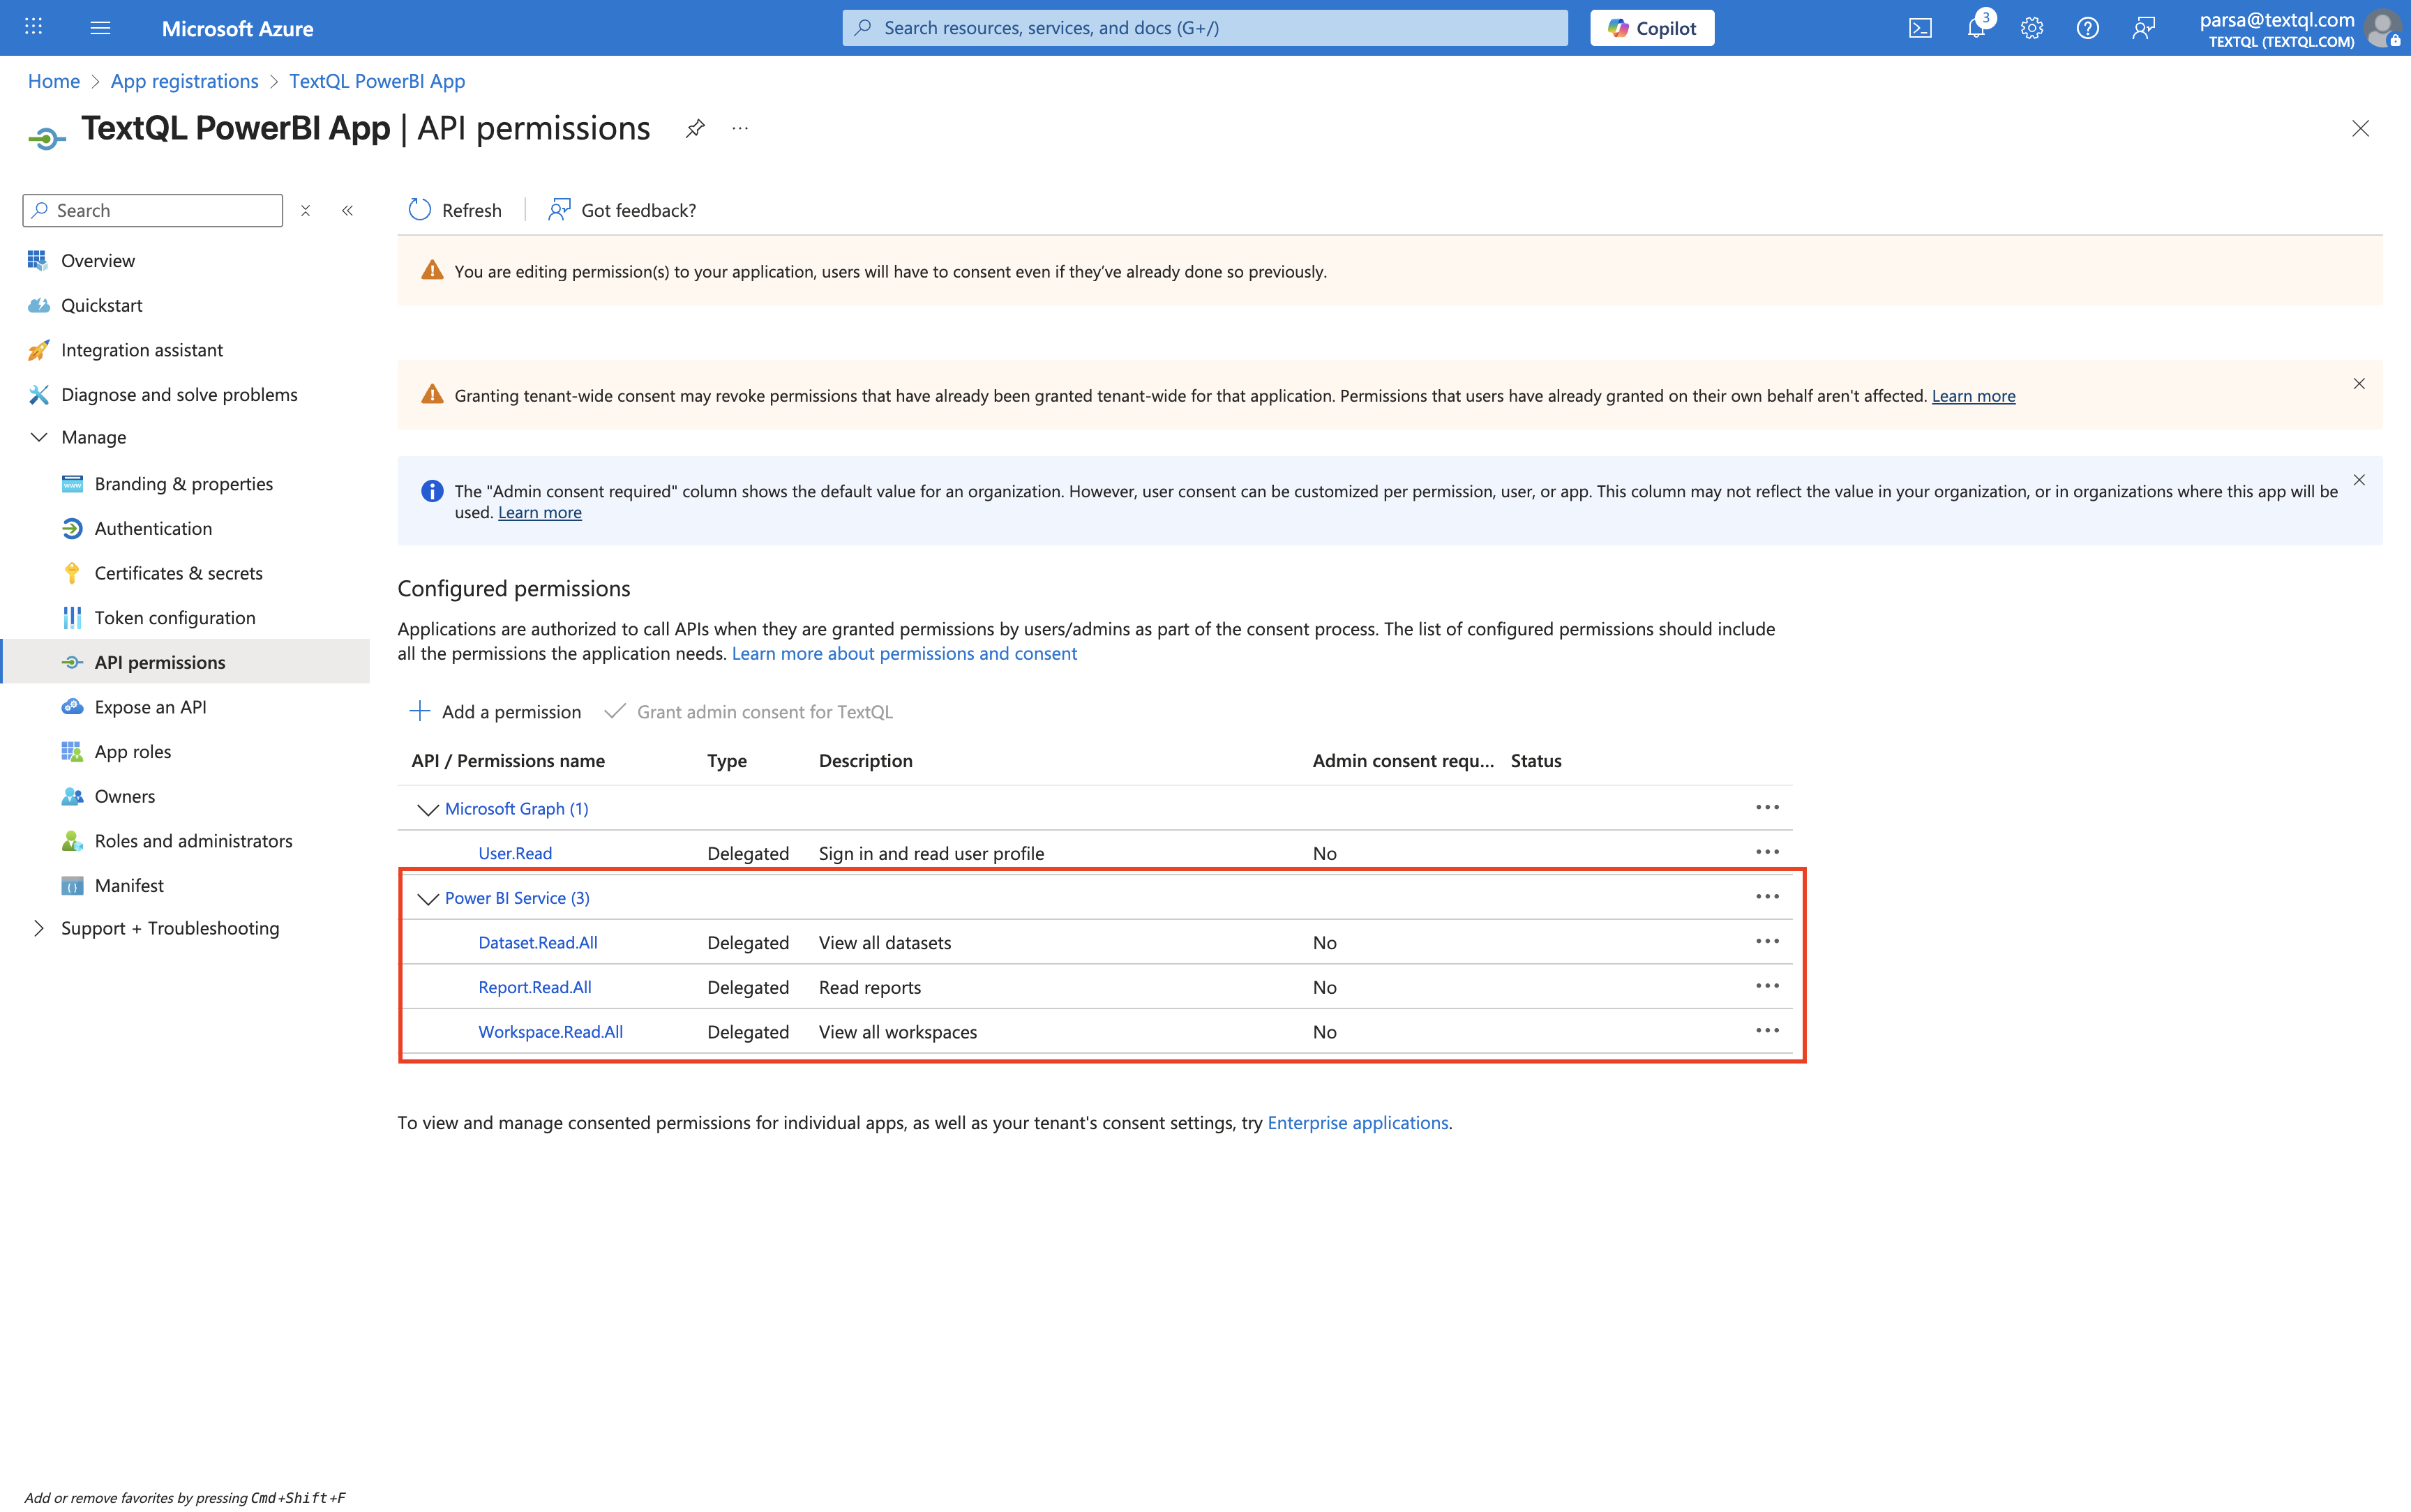 Depending on your organization's policies, you may need to request admin consent for these permissions. Contact your Azure AD administrator if required.
### 1.6 Enable Service Principal Access in PowerBI Admin Portal (Admin Only)
**Administrator access required**: This step requires PowerBI Admin or Fabric Admin permissions. If you don't have admin access, contact your PowerBI administrator to complete this step.
Before service principals can access PowerBI workspaces, an administrator must enable this feature in the PowerBI admin portal.
#### Step 1: Navigate to Tenant Settings
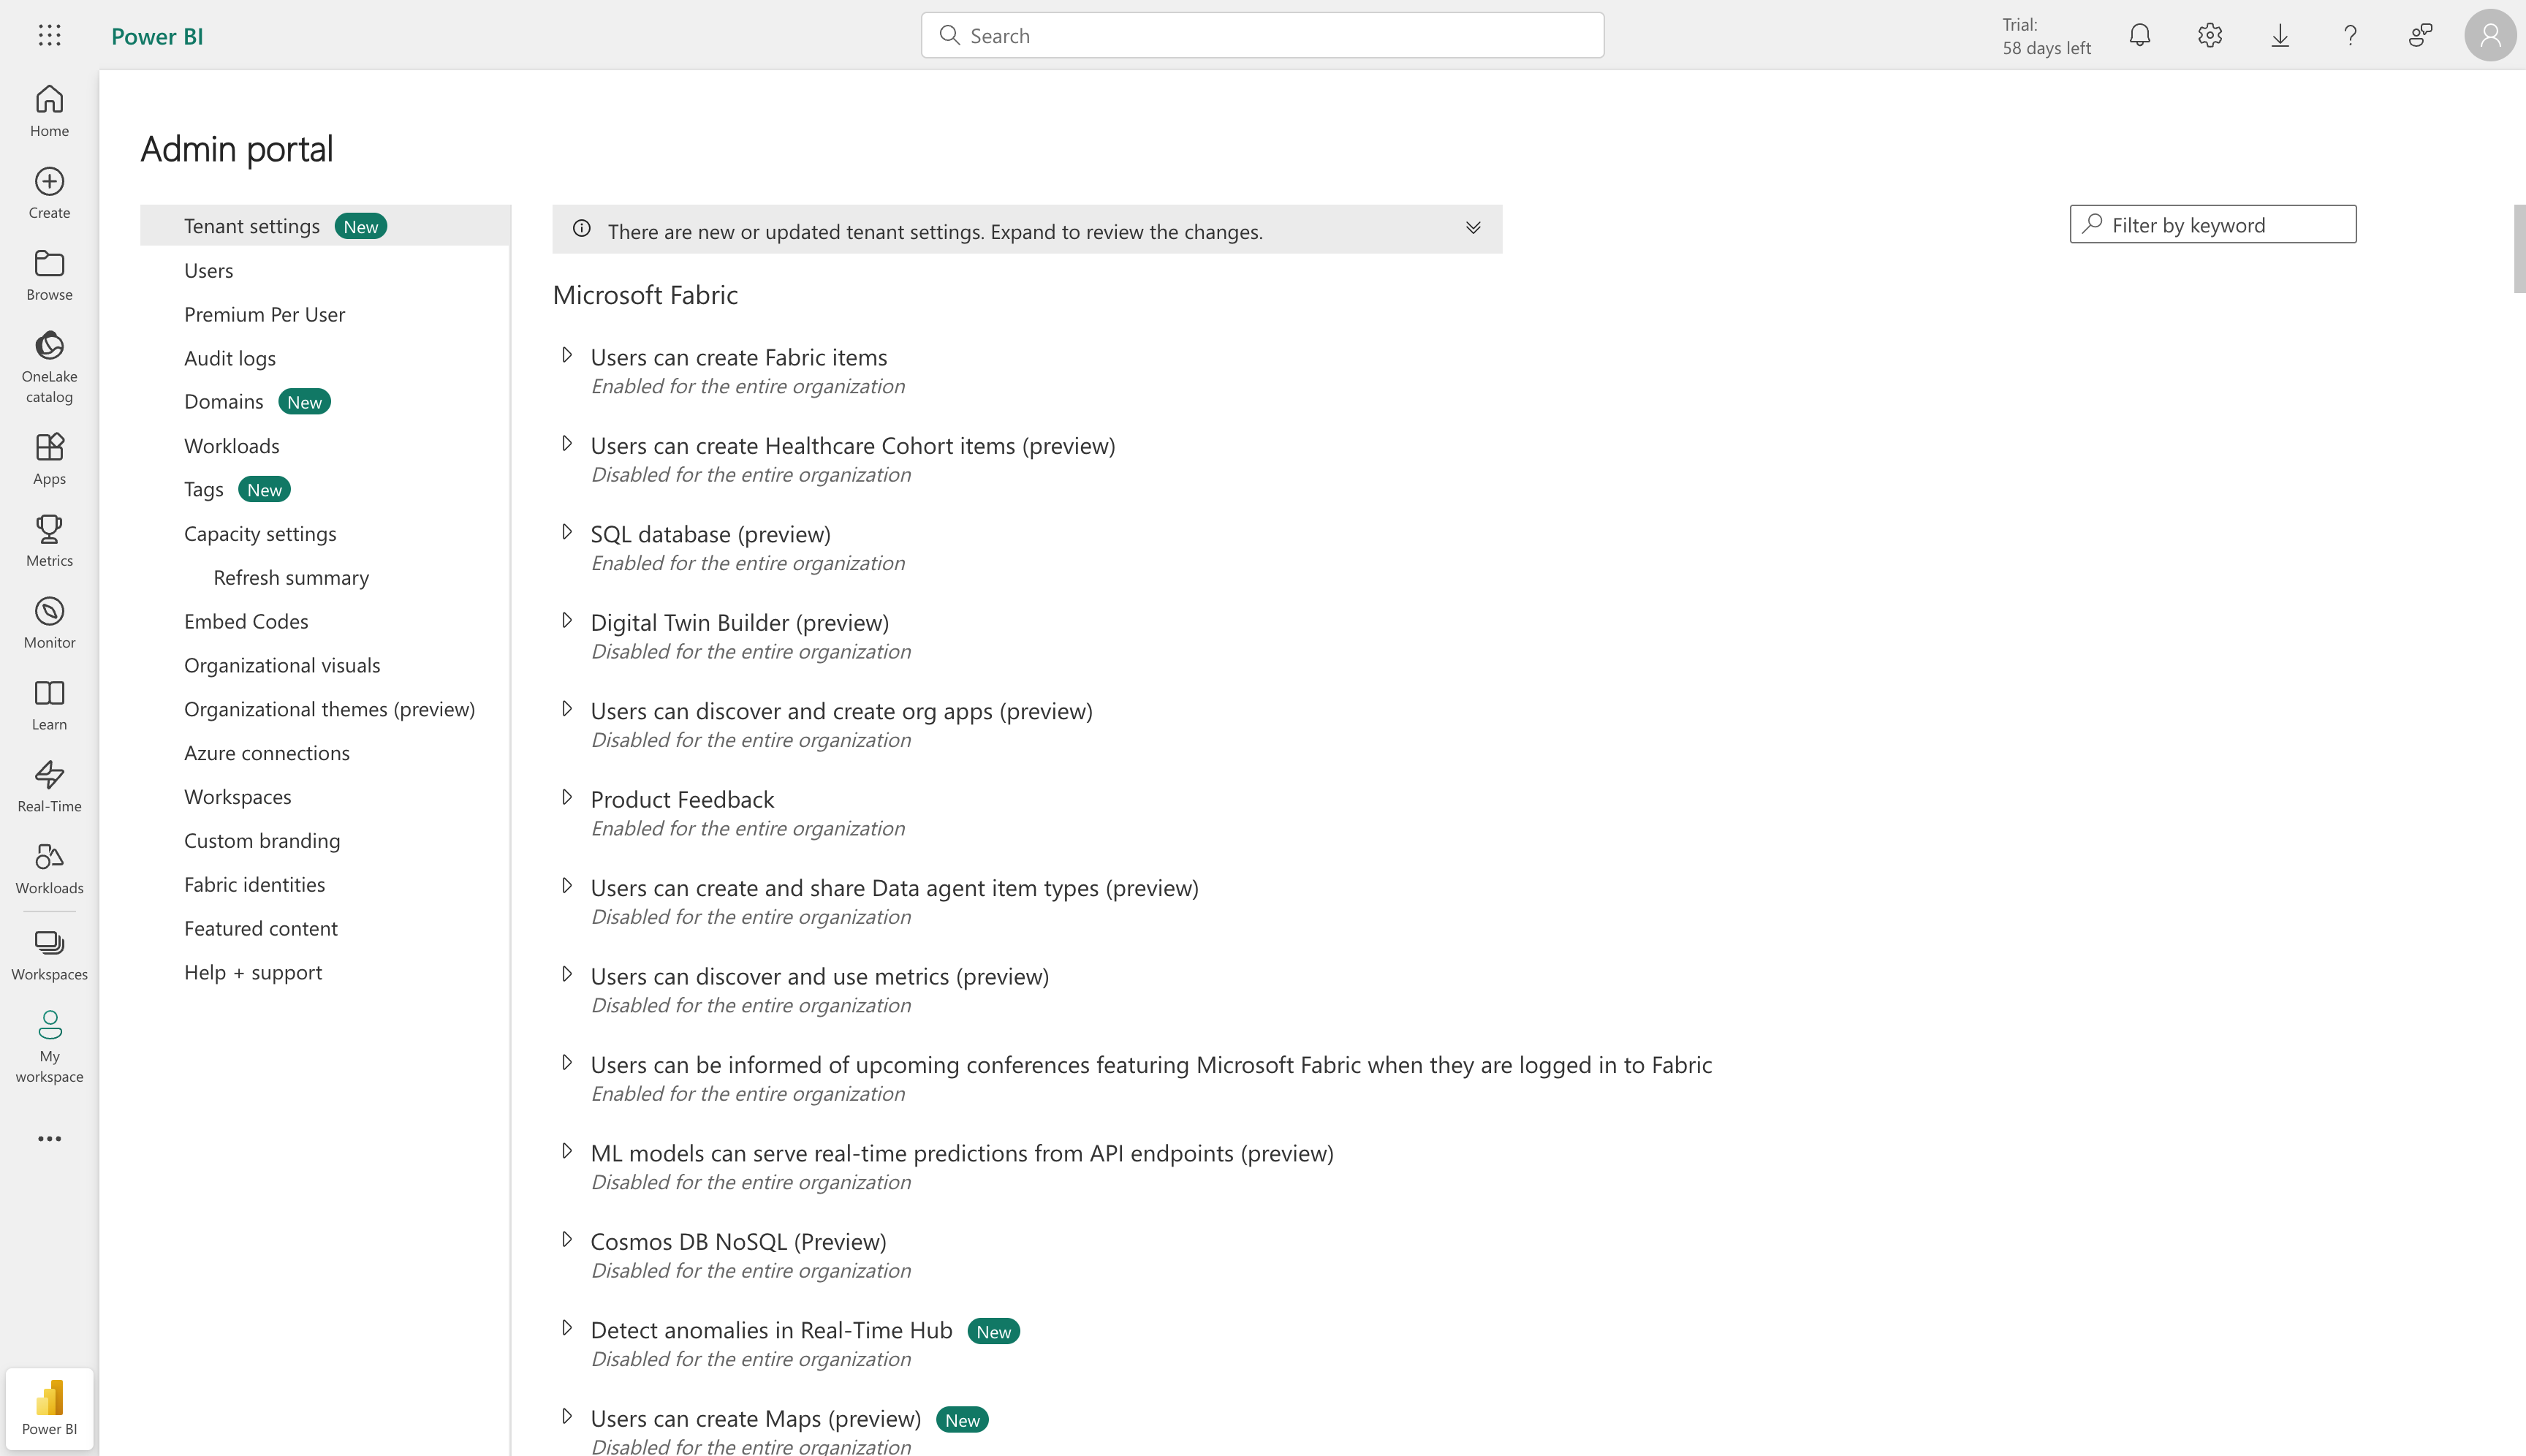
Navigate to the [PowerBI Admin Portal](https://app.powerbi.com/admin-portal/tenantSettings) and you'll see the Tenant settings page.
Depending on your organization's policies, you may need to request admin consent for these permissions. Contact your Azure AD administrator if required.
### 1.6 Enable Service Principal Access in PowerBI Admin Portal (Admin Only)
**Administrator access required**: This step requires PowerBI Admin or Fabric Admin permissions. If you don't have admin access, contact your PowerBI administrator to complete this step.
Before service principals can access PowerBI workspaces, an administrator must enable this feature in the PowerBI admin portal.
#### Step 1: Navigate to Tenant Settings
Navigate to the [PowerBI Admin Portal](https://app.powerbi.com/admin-portal/tenantSettings) and you'll see the Tenant settings page.
 #### Step 2: Search for Developer Settings
In the upper-right corner, use the "Filter by keyword" search box to search for **"developer"** or **"service principal"** to quickly find the relevant setting.
#### Step 3: Locate and Enable Service Principal Access
Scroll through the filtered results or navigate to the **"Developer settings"** section. Look for the setting named:
* **"Service principals can use Fabric APIs"** (in newer versions), or
* **"Service principals can use Power BI APIs"** (in older versions)
#### Step 4: Configure the Setting
1. Click on the setting to expand it
2. Toggle the switch to **Enabled**
3. Choose the scope:
* **The entire organization**: All service principals can access PowerBI APIs
* **Specific security groups**: Only service principals from designated Azure AD security groups can access (recommended for tighter control)
4. If you chose specific security groups, click **+ Add** and search for your security group
5. Click **Apply** at the bottom to save your changes
**Recommended**: For better security, create a dedicated Azure AD security group for PowerBI service principals and add only the specific applications that need access. This provides better audit trails and easier access management.
This setting may take a few minutes to propagate. If you're enabling this for the first time, wait 10-15 minutes before attempting to add the service principal to workspaces.
#### Step 5: Enable Export Reports as Image Files
While still in the PowerBI Admin Portal Tenant settings, you also need to enable the **"Export reports as image files"** setting:
1. In the same Tenant settings page, use the search box to search for **"export"**
2. Look for the setting named **"Export reports as image files"**
3. Toggle the switch to **Enabled**
4. Choose the appropriate scope (entire organization or specific security groups)
5. Click **Apply** to save your changes
This setting allows TextQL to generate visual previews and thumbnails of your PowerBI reports when needed.
## Step 2: PowerBI Workspace Configuration
After creating your Azure AD app registration and enabling service principal access, you need to add the service principal to your PowerBI workspace.
### 2.1 Navigate to Your PowerBI Workspace
Go to [https://app.powerbi.com](https://app.powerbi.com) and sign in with your PowerBI account.
Select the workspace you want to connect to TextQL.
### 2.2 Add Service Principal to Workspace
To grant your Azure AD application access to the workspace, you need to add it as a member.
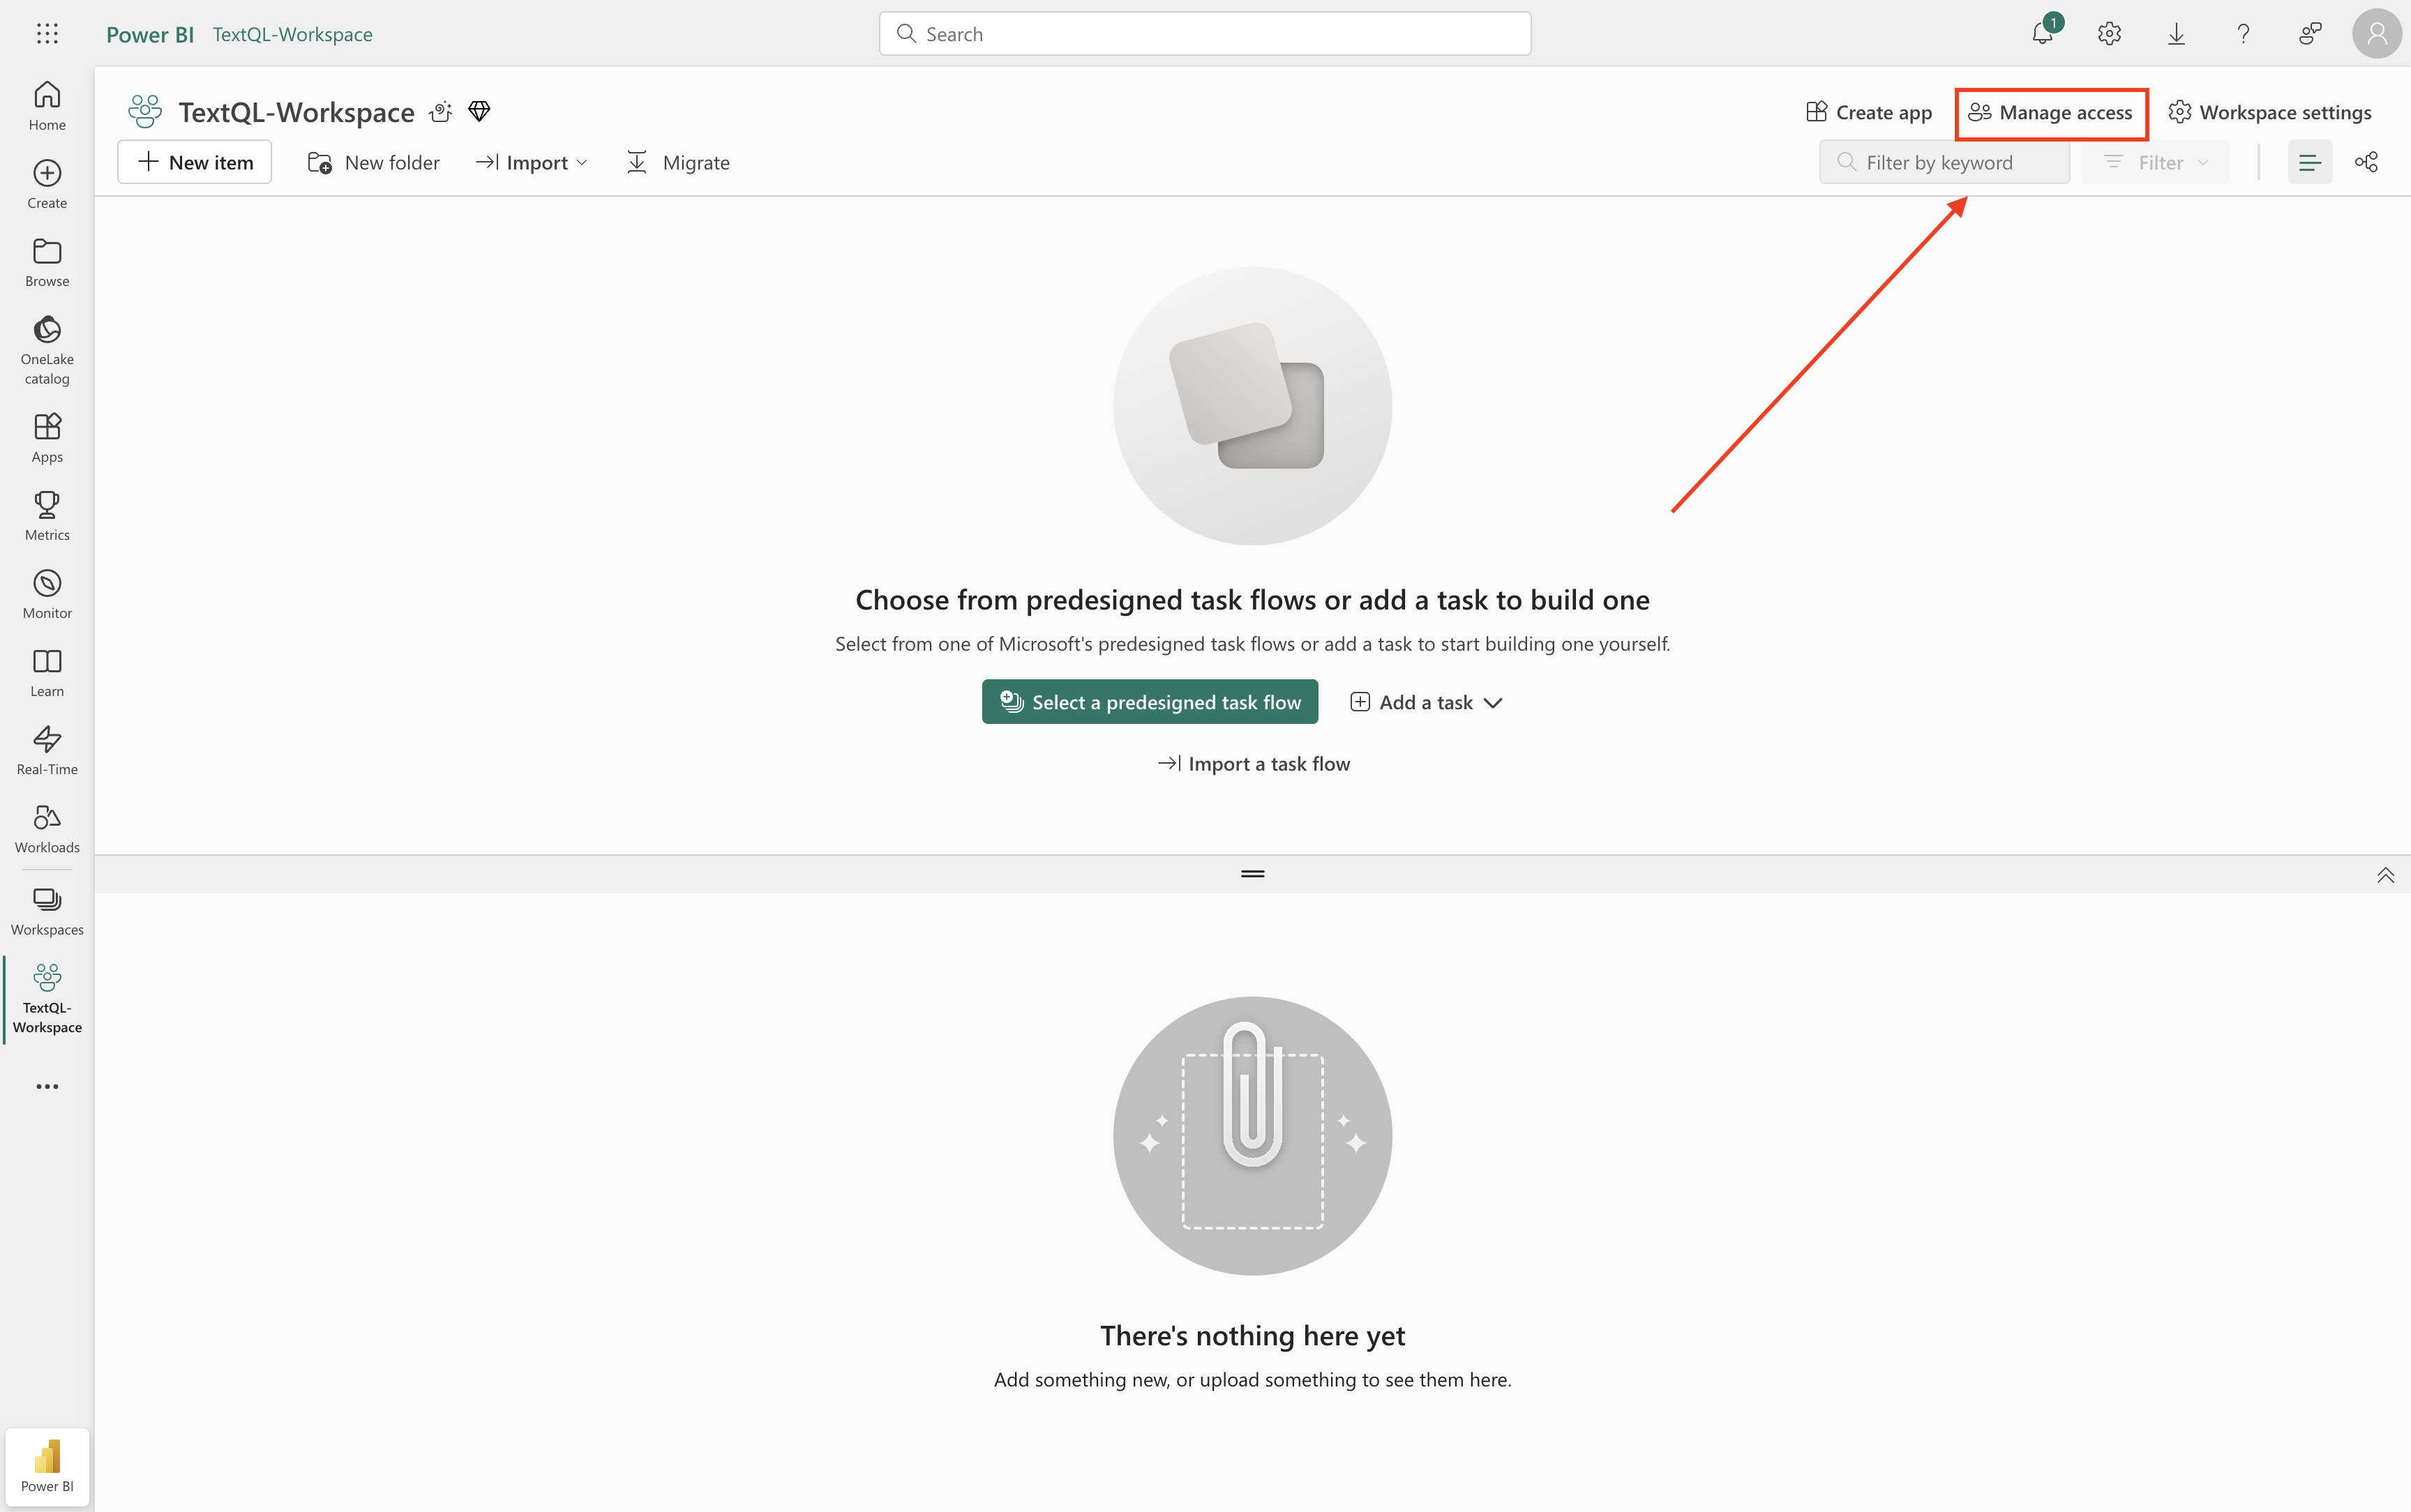
1. In your PowerBI workspace, click the **Manage access** button in the top toolbar
#### Step 2: Search for Developer Settings
In the upper-right corner, use the "Filter by keyword" search box to search for **"developer"** or **"service principal"** to quickly find the relevant setting.
#### Step 3: Locate and Enable Service Principal Access
Scroll through the filtered results or navigate to the **"Developer settings"** section. Look for the setting named:
* **"Service principals can use Fabric APIs"** (in newer versions), or
* **"Service principals can use Power BI APIs"** (in older versions)
#### Step 4: Configure the Setting
1. Click on the setting to expand it
2. Toggle the switch to **Enabled**
3. Choose the scope:
* **The entire organization**: All service principals can access PowerBI APIs
* **Specific security groups**: Only service principals from designated Azure AD security groups can access (recommended for tighter control)
4. If you chose specific security groups, click **+ Add** and search for your security group
5. Click **Apply** at the bottom to save your changes
**Recommended**: For better security, create a dedicated Azure AD security group for PowerBI service principals and add only the specific applications that need access. This provides better audit trails and easier access management.
This setting may take a few minutes to propagate. If you're enabling this for the first time, wait 10-15 minutes before attempting to add the service principal to workspaces.
#### Step 5: Enable Export Reports as Image Files
While still in the PowerBI Admin Portal Tenant settings, you also need to enable the **"Export reports as image files"** setting:
1. In the same Tenant settings page, use the search box to search for **"export"**
2. Look for the setting named **"Export reports as image files"**
3. Toggle the switch to **Enabled**
4. Choose the appropriate scope (entire organization or specific security groups)
5. Click **Apply** to save your changes
This setting allows TextQL to generate visual previews and thumbnails of your PowerBI reports when needed.
## Step 2: PowerBI Workspace Configuration
After creating your Azure AD app registration and enabling service principal access, you need to add the service principal to your PowerBI workspace.
### 2.1 Navigate to Your PowerBI Workspace
Go to [https://app.powerbi.com](https://app.powerbi.com) and sign in with your PowerBI account.
Select the workspace you want to connect to TextQL.
### 2.2 Add Service Principal to Workspace
To grant your Azure AD application access to the workspace, you need to add it as a member.
1. In your PowerBI workspace, click the **Manage access** button in the top toolbar
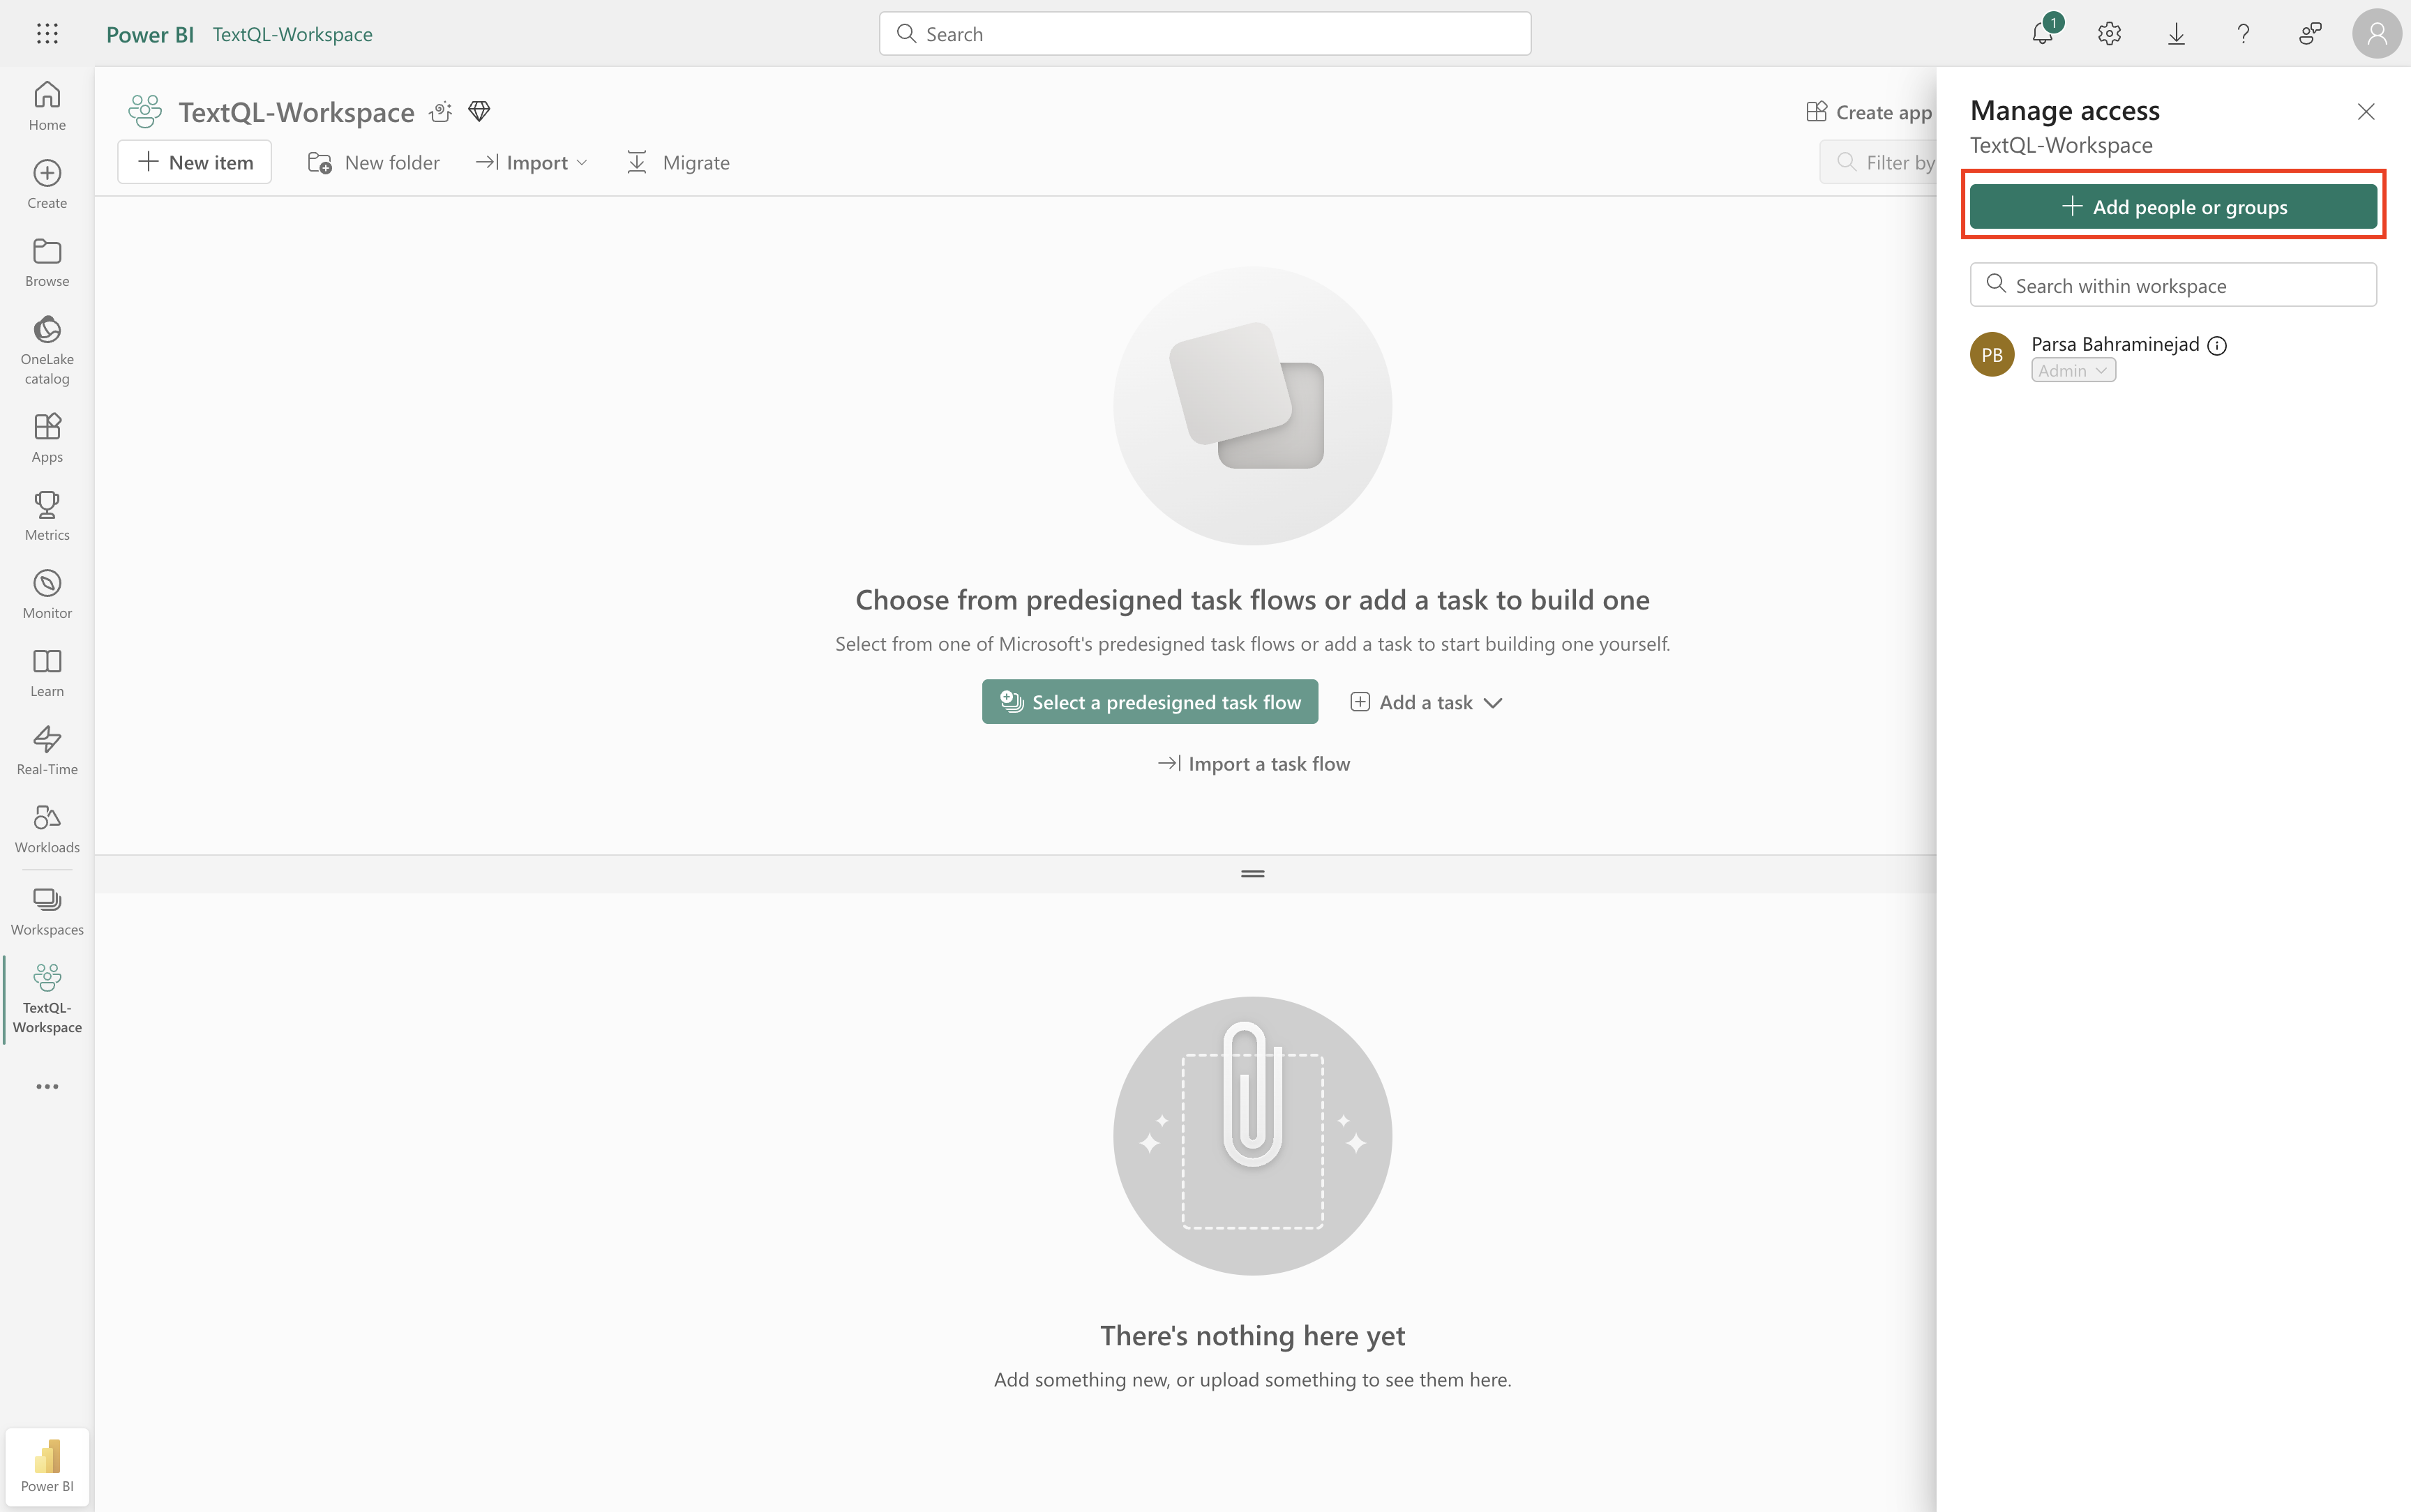
 2. In the "Manage access" dialog that appears, click **+ Add people or groups**
3. In the search box, type the name of your Azure AD application (e.g., "TextQL PowerBI Connector")
2. In the "Manage access" dialog that appears, click **+ Add people or groups**
3. In the search box, type the name of your Azure AD application (e.g., "TextQL PowerBI Connector")
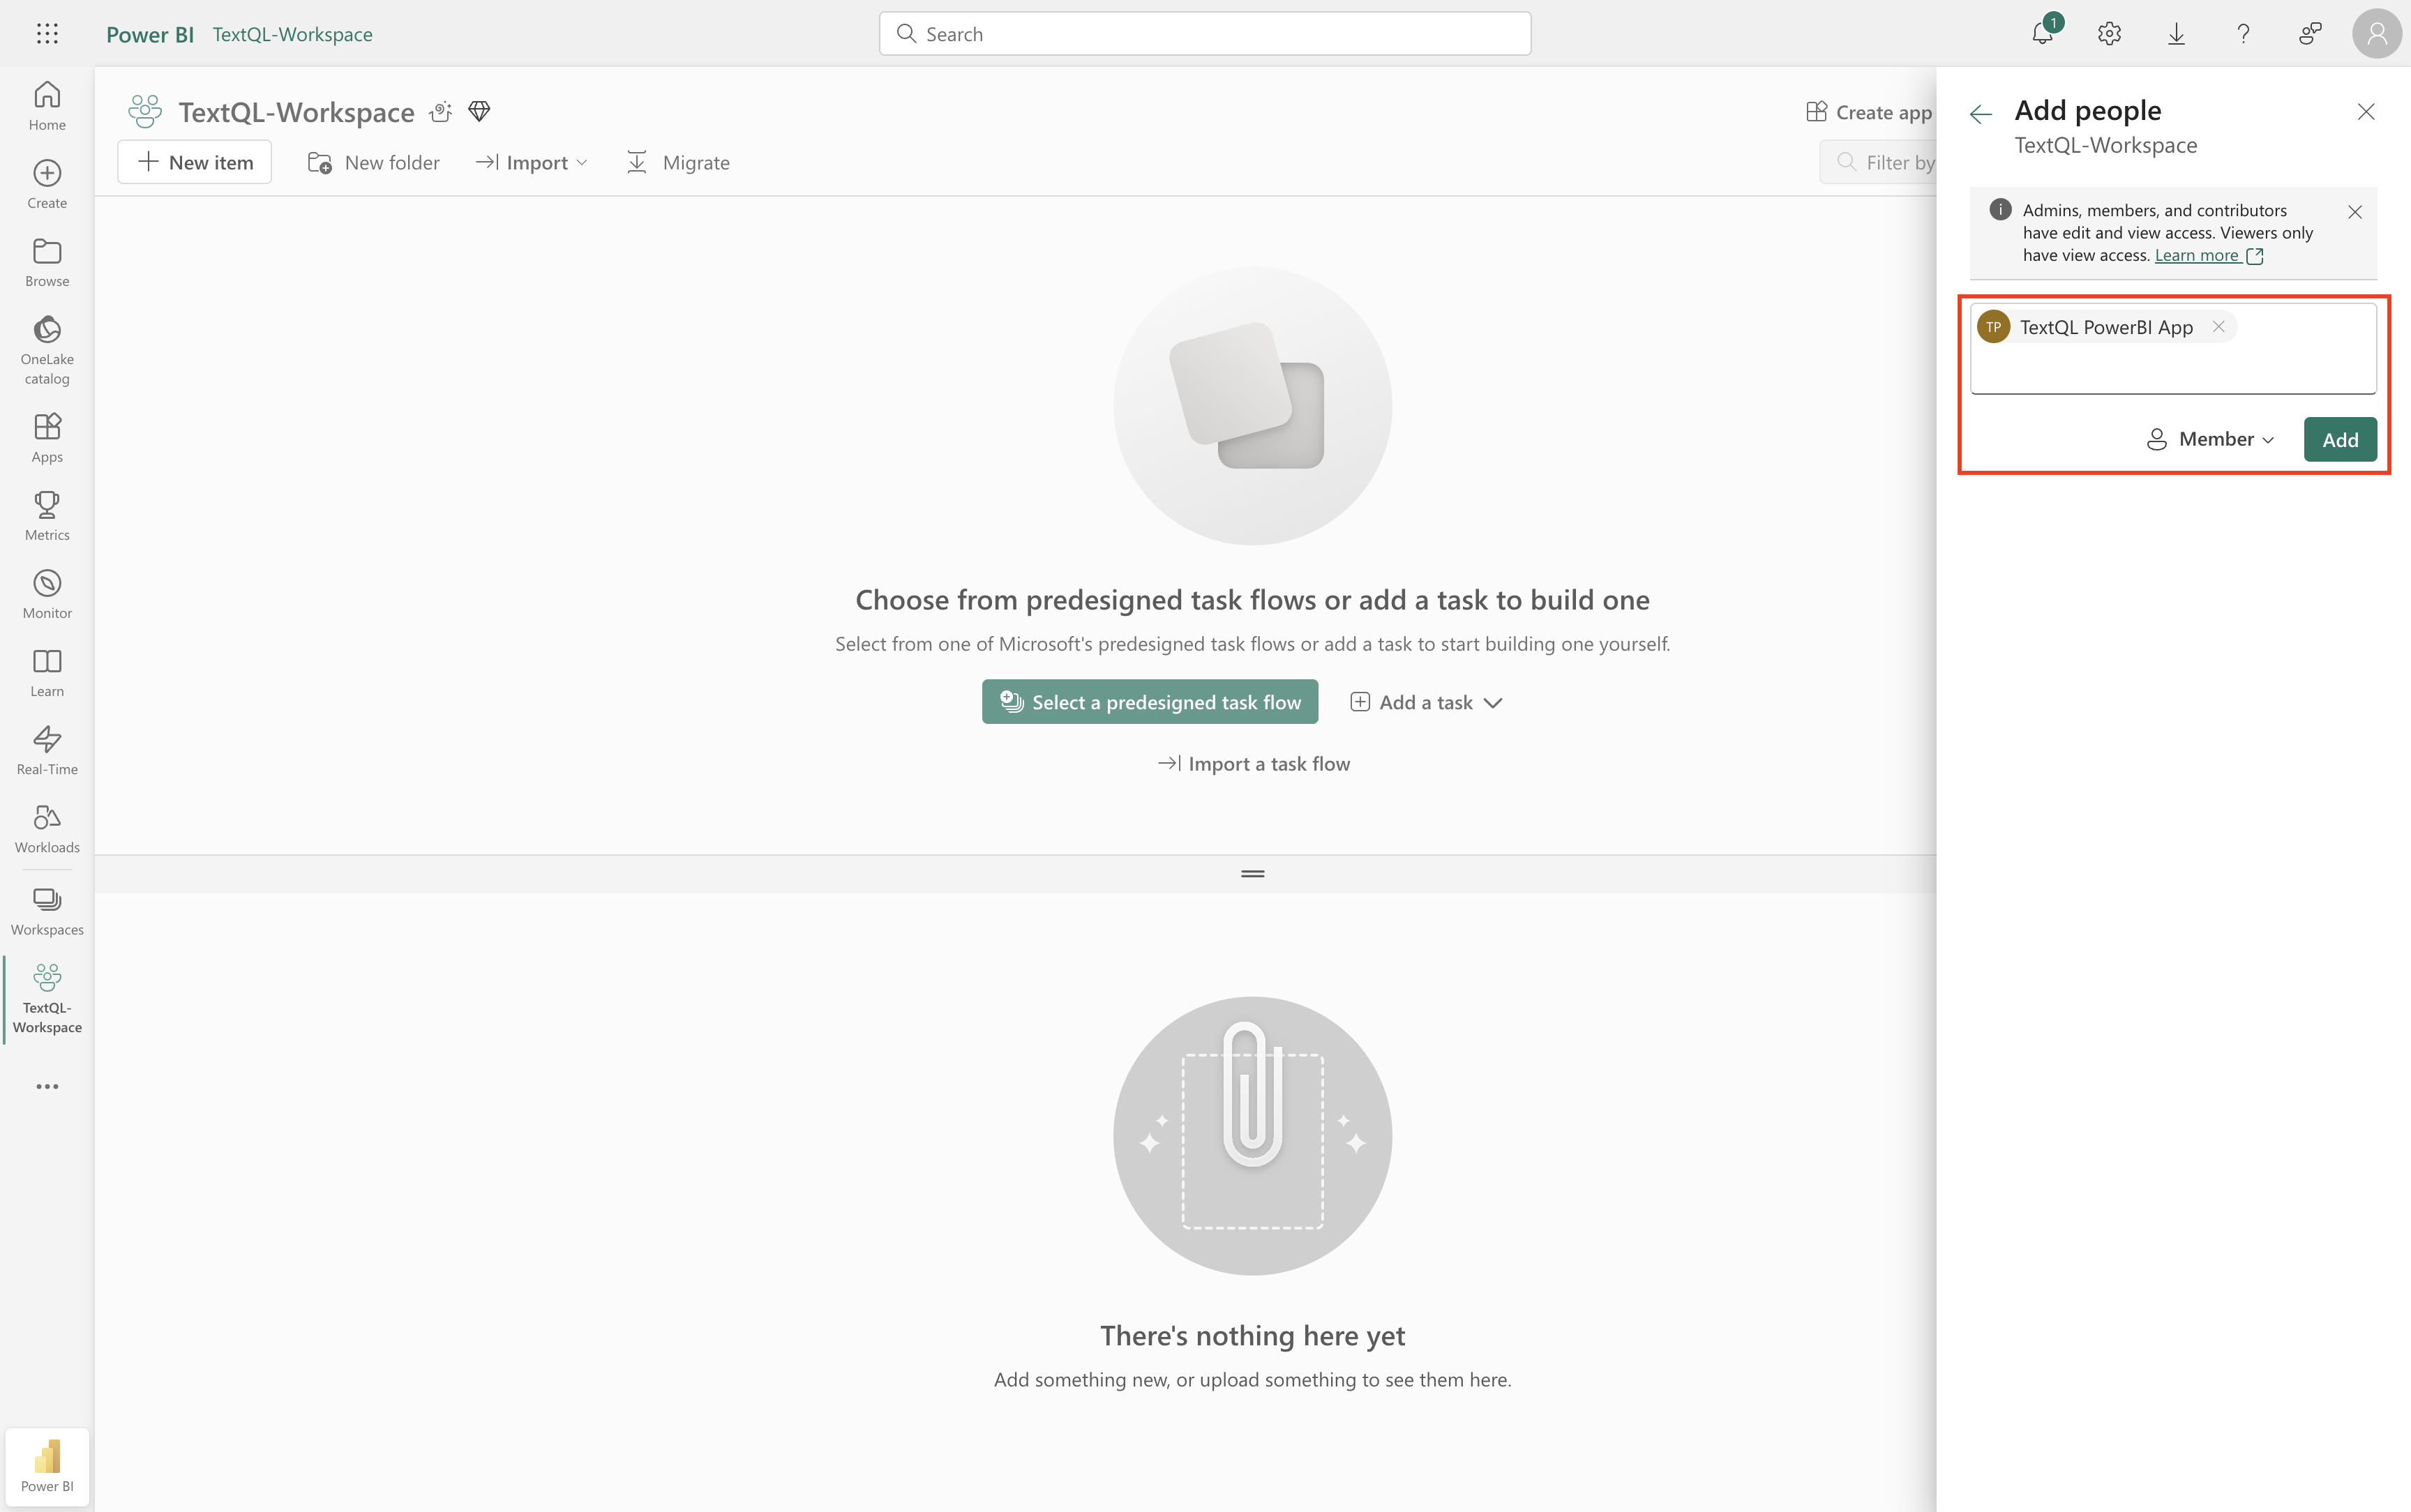
 If you can't find your application by name, you can also search by the **Application (Client) ID** from your Azure app registration.
4. Select your application from the search results. It will be labeled as **(Service Principal)**
5. Assign an appropriate role:
* **Viewer**: Read-only access to datasets and reports (minimum required for TextQL)
* **Contributor**: Can generate embed tokens for viewing reports in TextQL
* **Member**: Full access to APIs and content (recommended for full functionality)
* **Admin**: Full access including workspace management
6. Click **Add** to grant access
If you can't find your application by name, you can also search by the **Application (Client) ID** from your Azure app registration.
4. Select your application from the search results. It will be labeled as **(Service Principal)**
5. Assign an appropriate role:
* **Viewer**: Read-only access to datasets and reports (minimum required for TextQL)
* **Contributor**: Can generate embed tokens for viewing reports in TextQL
* **Member**: Full access to APIs and content (recommended for full functionality)
* **Admin**: Full access including workspace management
6. Click **Add** to grant access
 The service principal needs at least **Viewer** permissions to access workspace content for TextQL. If you need TextQL to create or modify content, assign **Contributor** or higher permissions.
## Step 3: Creating the Connector in TextQL
Now that you have your Azure credentials and workspace configured, you can create the PowerBI connector in TextQL.
### 3.1 Navigate to the Connectors Page
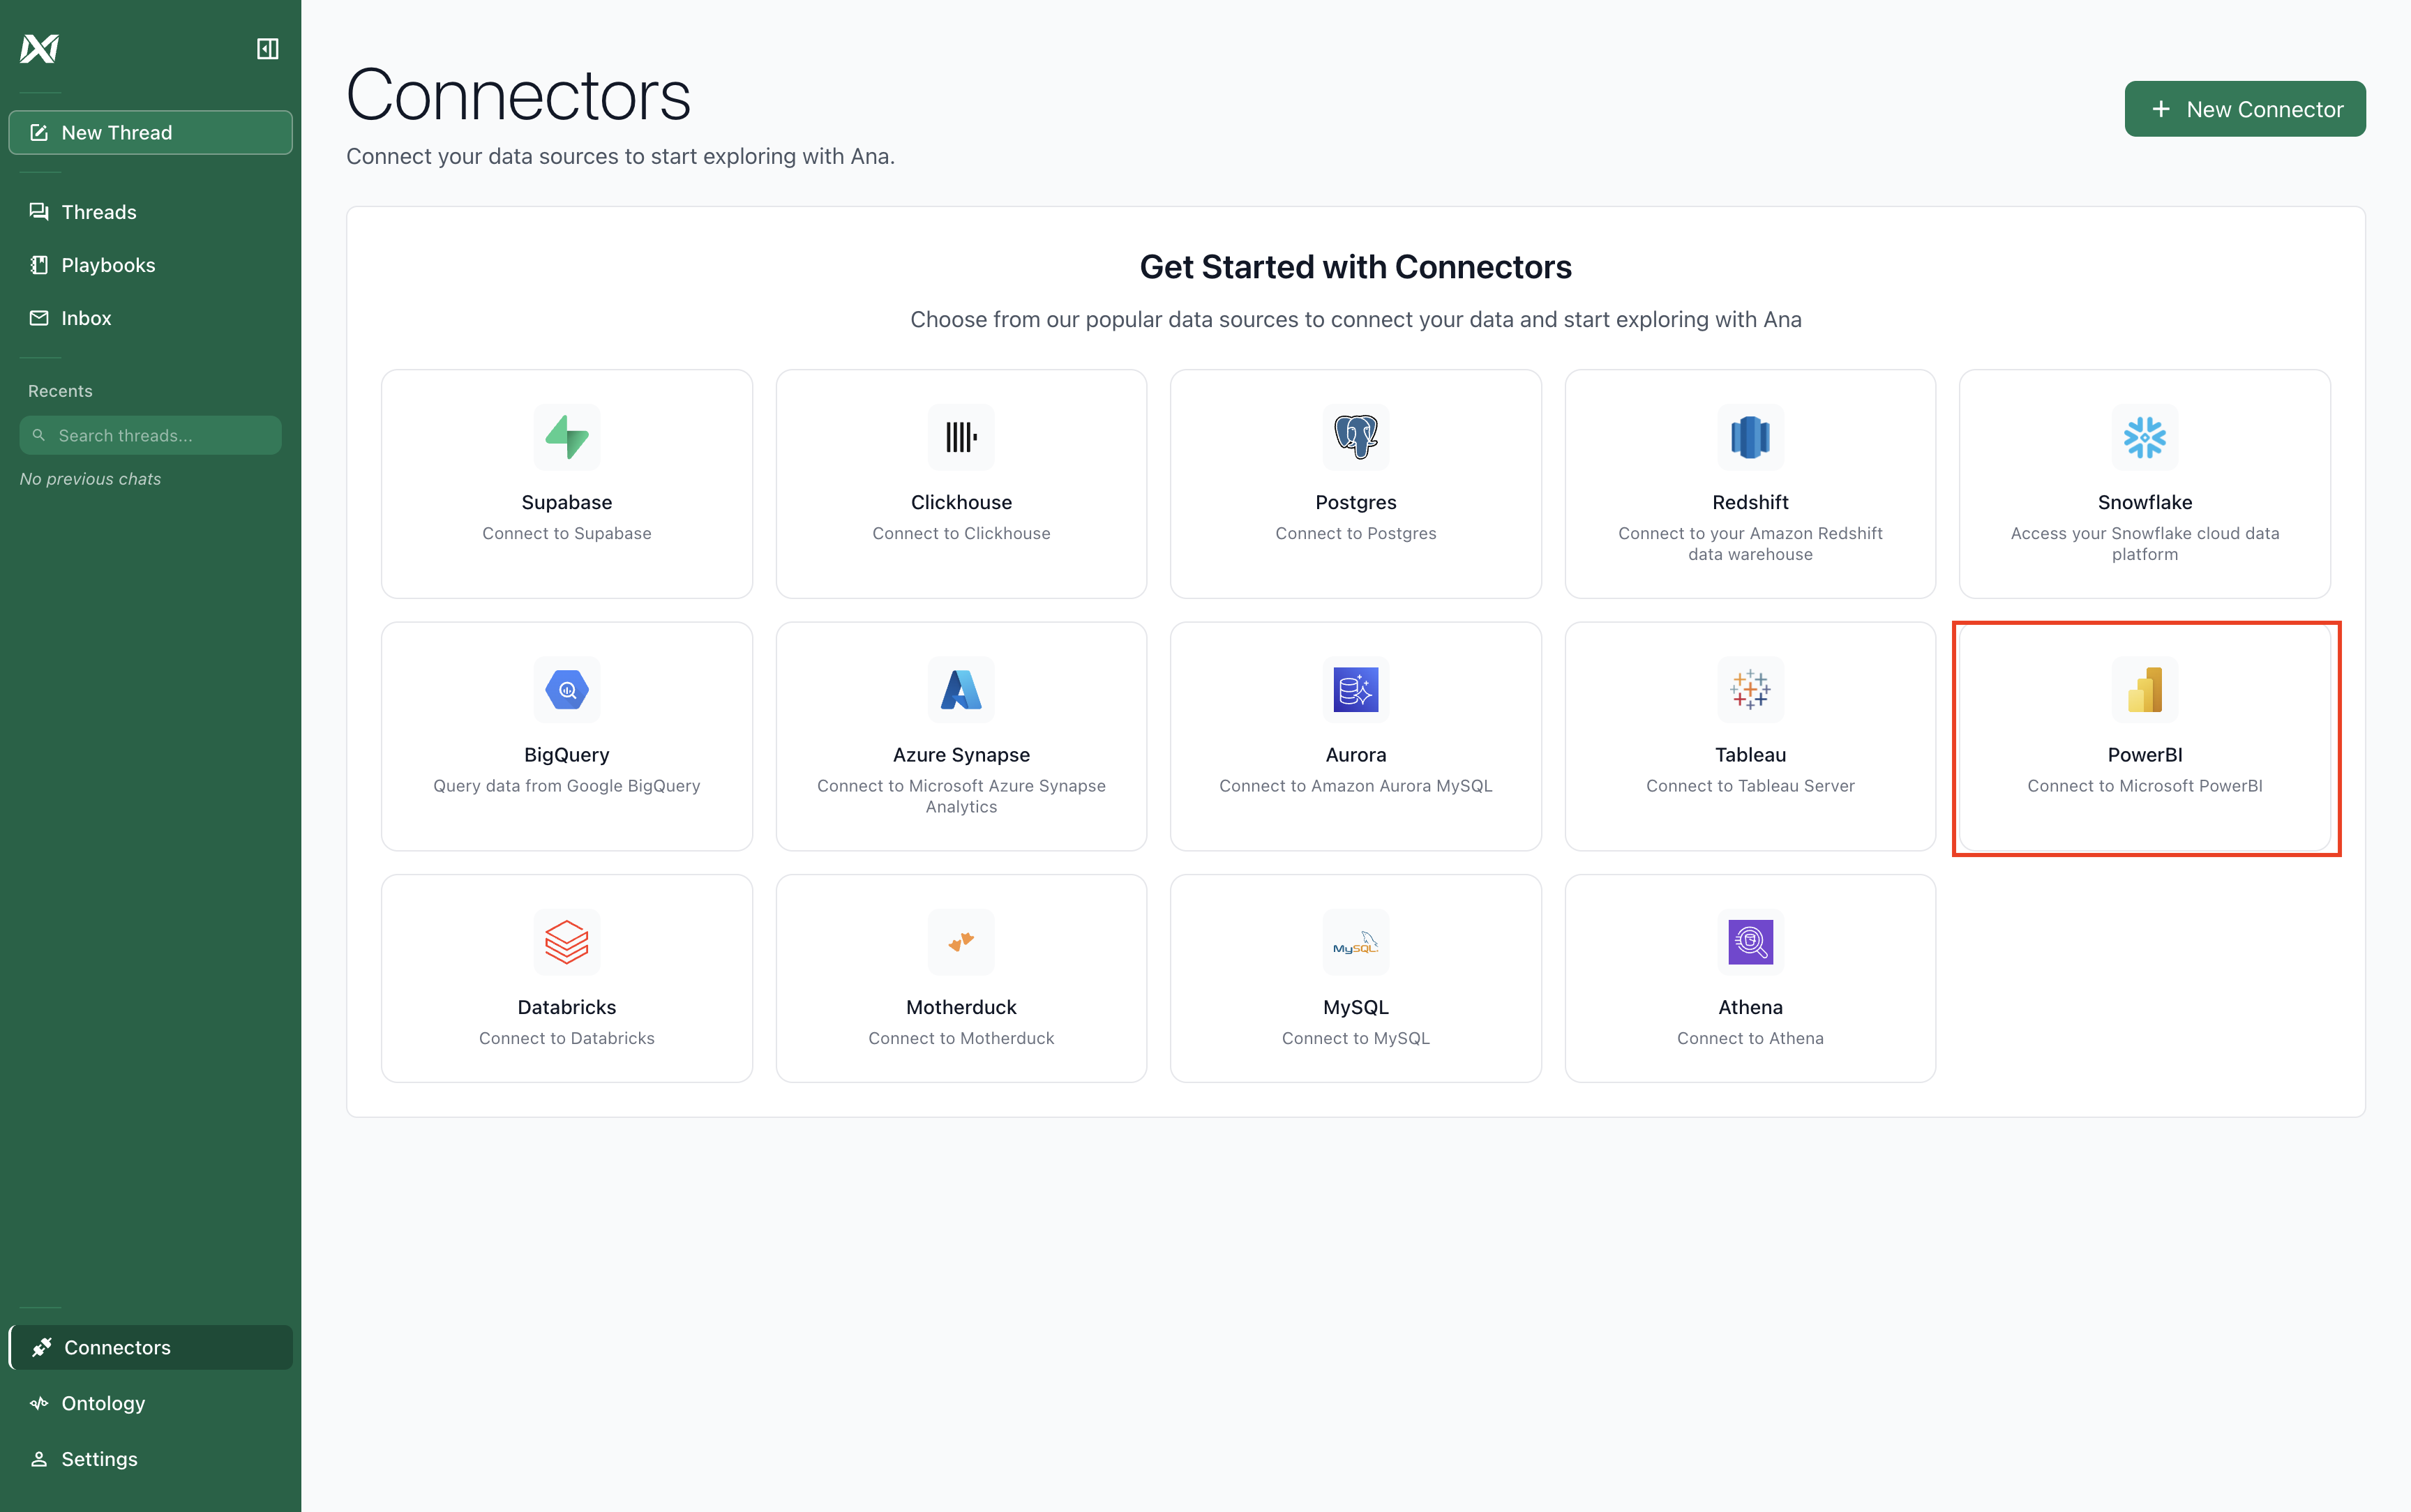
Go to the [TextQL Connectors Page](https://app.textql.com/connectors) and click the **PowerBI** card to add a new PowerBI connector.
The service principal needs at least **Viewer** permissions to access workspace content for TextQL. If you need TextQL to create or modify content, assign **Contributor** or higher permissions.
## Step 3: Creating the Connector in TextQL
Now that you have your Azure credentials and workspace configured, you can create the PowerBI connector in TextQL.
### 3.1 Navigate to the Connectors Page
Go to the [TextQL Connectors Page](https://app.textql.com/connectors) and click the **PowerBI** card to add a new PowerBI connector.
 ### 3.2 Fill in the Connector Form
A form will appear asking for your PowerBI connection details:
### 3.2 Fill in the Connector Form
A form will appear asking for your PowerBI connection details:
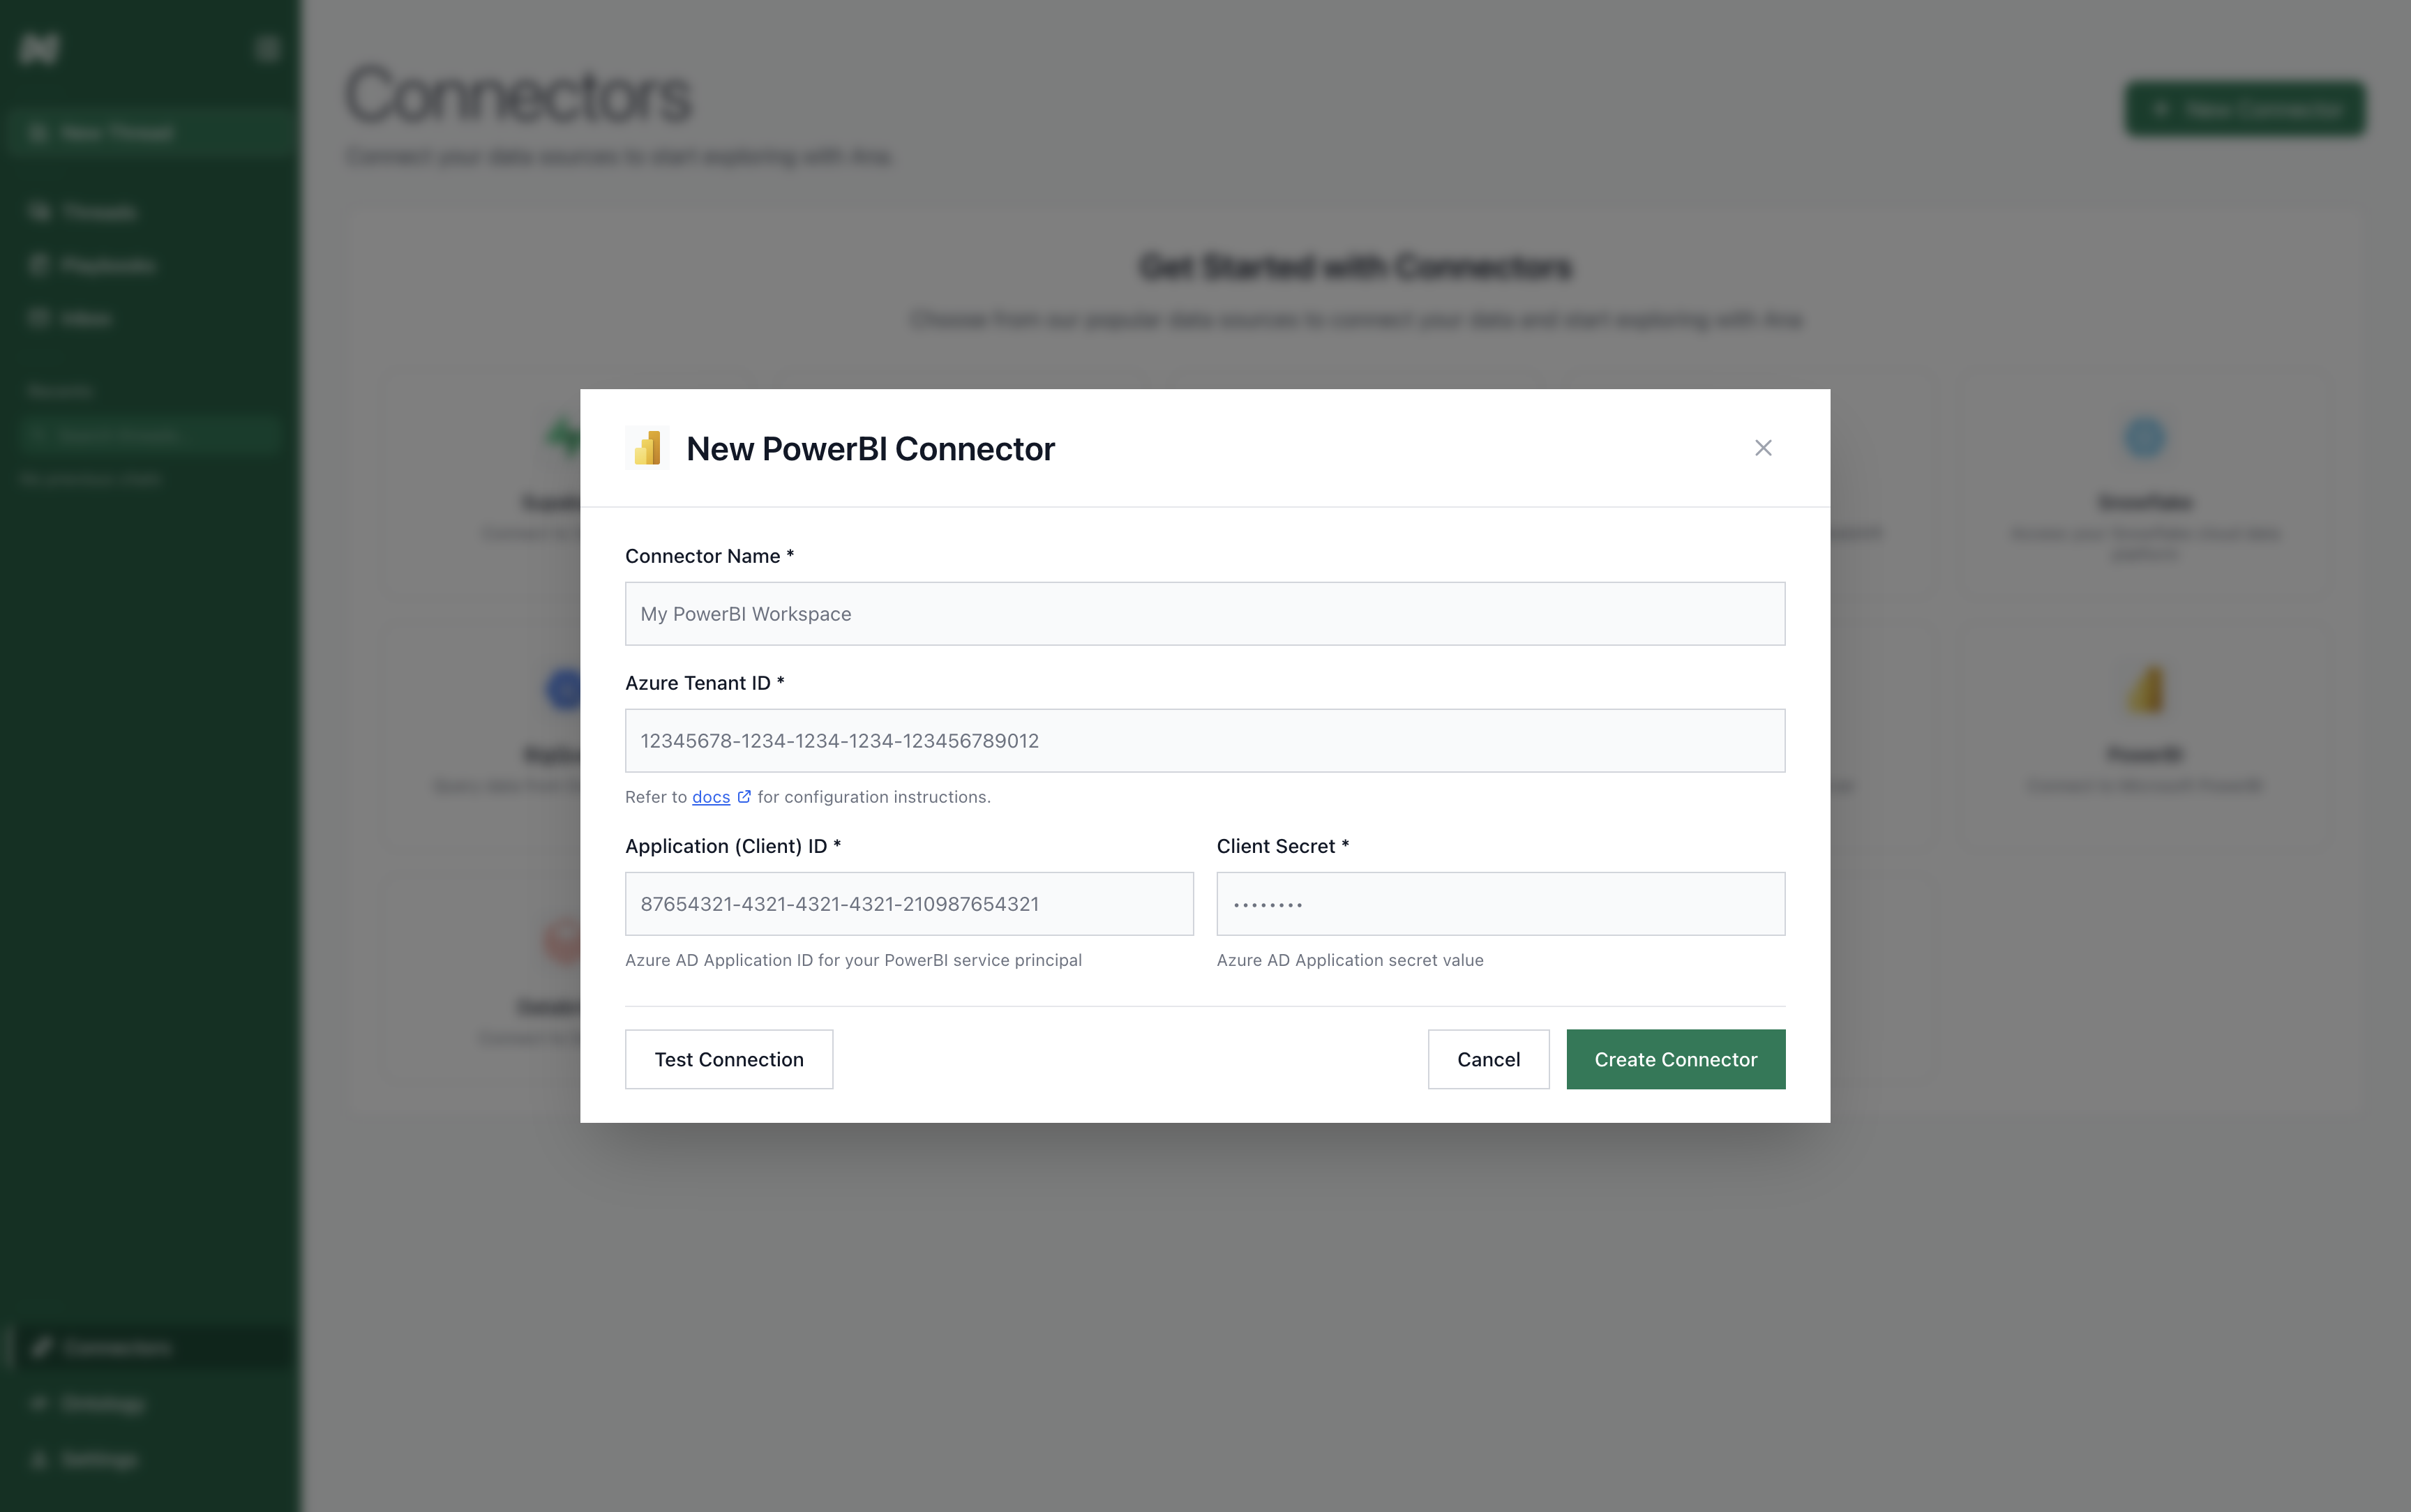 Enter the credentials you obtained from Azure:
* **Connector Name**: A descriptive name for this connector (e.g., "Marketing PowerBI Workspace")
* **Azure Tenant ID**: The Directory (tenant) ID from your Azure app registration
* **Application (Client) ID**: The Application (client) ID from your Azure app registration
* **Client Secret**: The client secret value you generated earlier
### 3.3 Test and Create the Connector
Click **Test Connection** to verify your credentials are correct.
Enter the credentials you obtained from Azure:
* **Connector Name**: A descriptive name for this connector (e.g., "Marketing PowerBI Workspace")
* **Azure Tenant ID**: The Directory (tenant) ID from your Azure app registration
* **Application (Client) ID**: The Application (client) ID from your Azure app registration
* **Client Secret**: The client secret value you generated earlier
### 3.3 Test and Create the Connector
Click **Test Connection** to verify your credentials are correct.
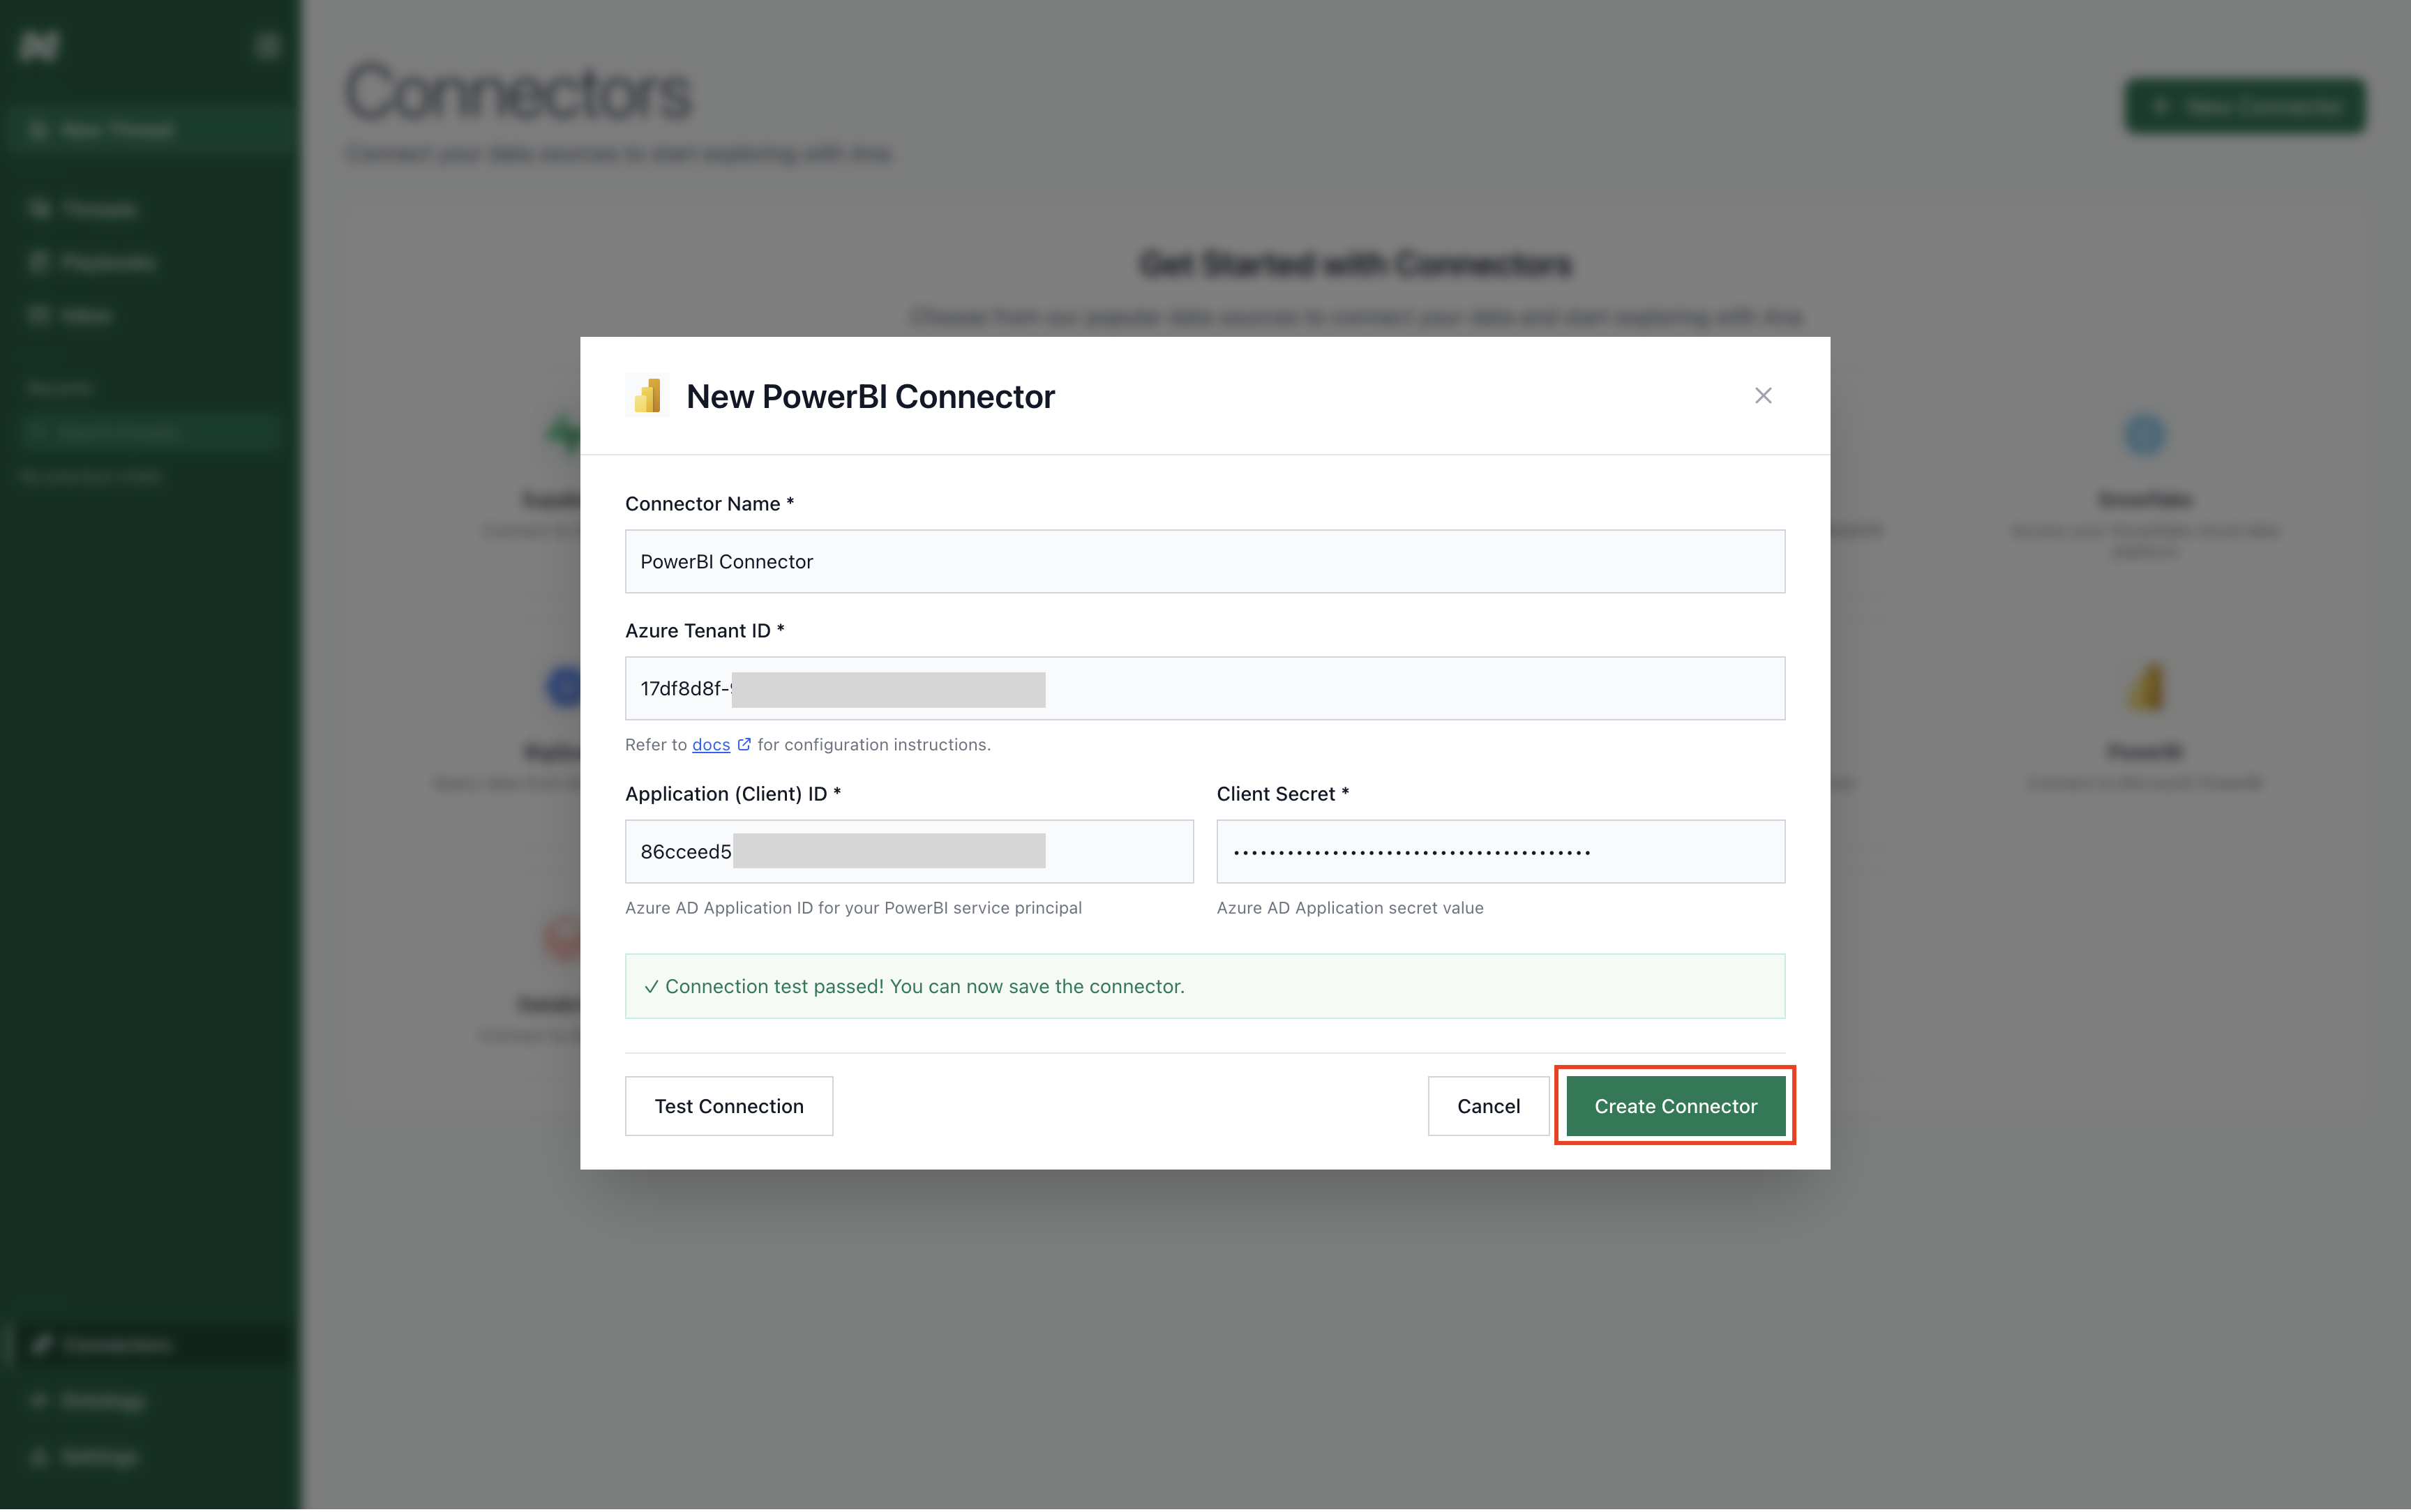 If the test succeeds, you'll see a green checkmark with the message "Connection test passed! You can now save the connector." Click **Create Connector** to save your PowerBI connector.
If the connection test fails, verify that:
1. All credentials are entered correctly
2. The Azure AD application has the required PowerBI API permissions
3. The service principal has been added to your PowerBI workspace with appropriate permissions
4. The client secret hasn't expired
## Step 4: Syncing Your PowerBI Data
After creating your connector, TextQL will automatically navigate to the PowerBI Explorer and begin discovering your PowerBI content.
### 4.1 Automatic Discovery
When you click **"Create Connector"**, TextQL will:
1. Automatically navigate to the PowerBI Explorer page
2. **Automatically start discovering** reports and datasets from your PowerBI workspace
If the test succeeds, you'll see a green checkmark with the message "Connection test passed! You can now save the connector." Click **Create Connector** to save your PowerBI connector.
If the connection test fails, verify that:
1. All credentials are entered correctly
2. The Azure AD application has the required PowerBI API permissions
3. The service principal has been added to your PowerBI workspace with appropriate permissions
4. The client secret hasn't expired
## Step 4: Syncing Your PowerBI Data
After creating your connector, TextQL will automatically navigate to the PowerBI Explorer and begin discovering your PowerBI content.
### 4.1 Automatic Discovery
When you click **"Create Connector"**, TextQL will:
1. Automatically navigate to the PowerBI Explorer page
2. **Automatically start discovering** reports and datasets from your PowerBI workspace
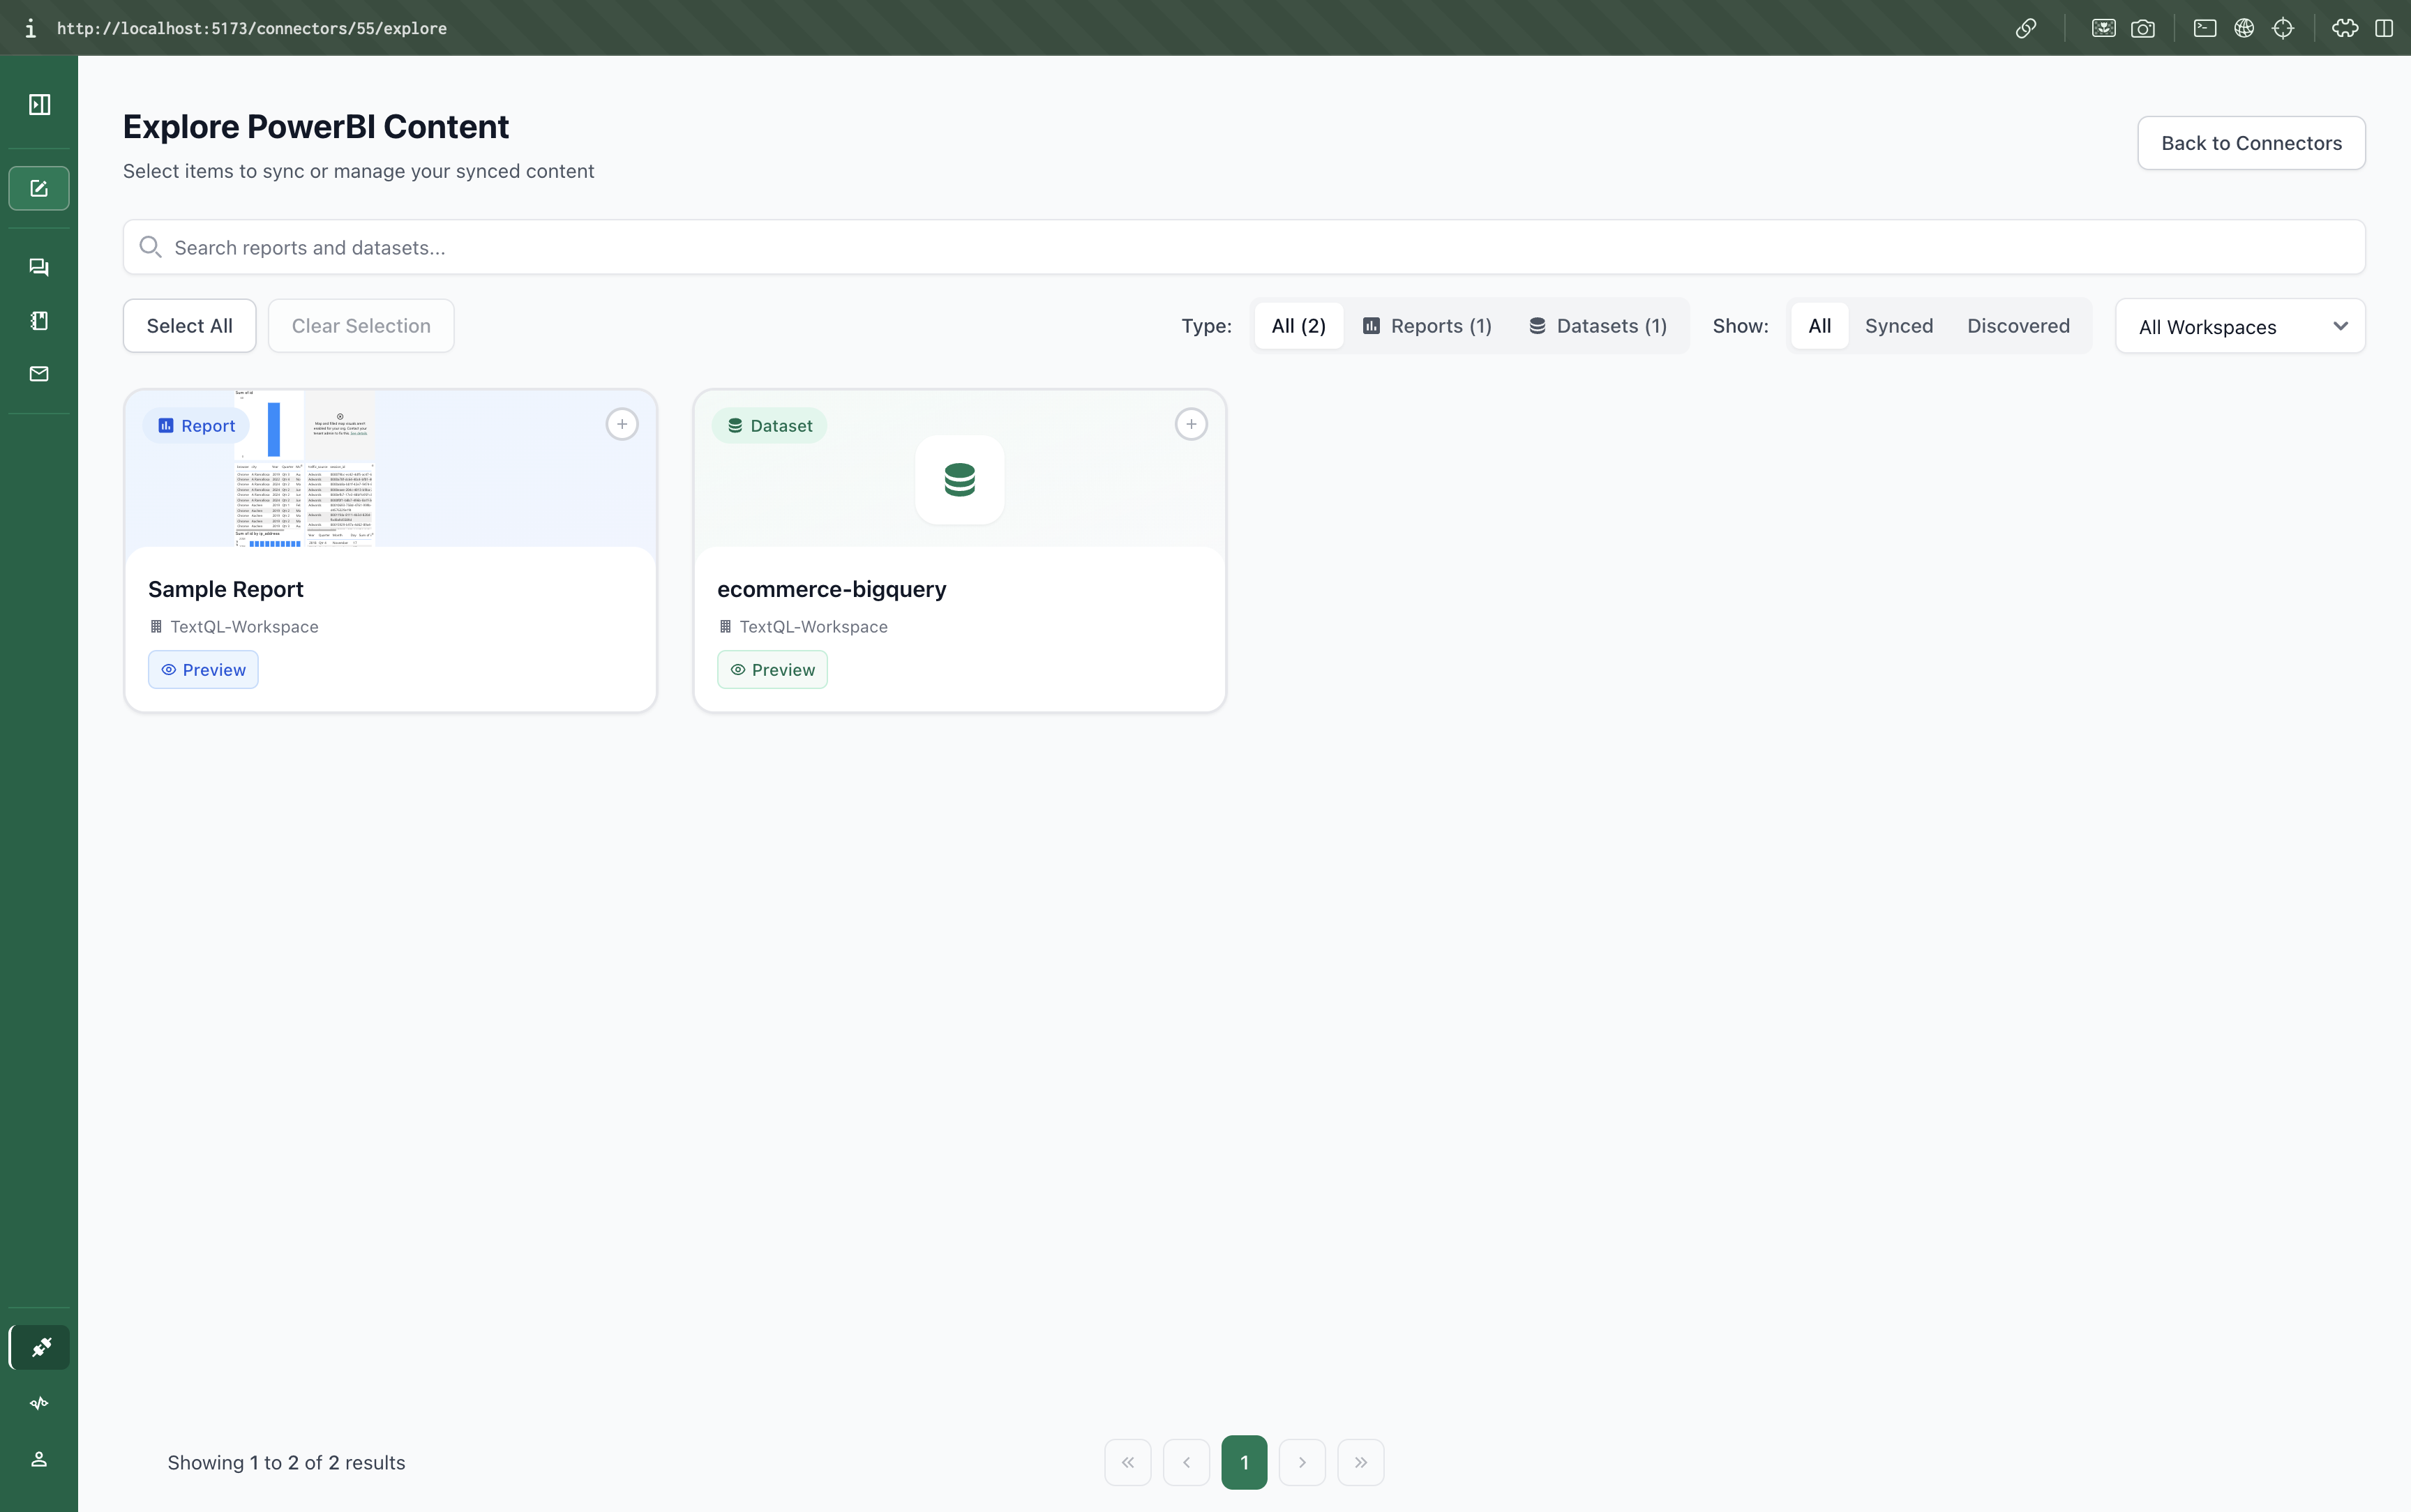 The discovery process will identify:
* **Reports**: All reports and dashboards in your PowerBI workspace
* **Datasets**: All datasets with their tables and relationships
* **Workspaces**: Multiple workspaces if your service principal has access to them
### 4.2 Select Content to Sync
After discovery completes, you can select which items to sync:
1. Use the **search box** to find specific reports or datasets
2. Switch between **Reports** and **Datasets** tabs
3. Filter by **All**, **Synced**, or **Discovered** items
4. Select specific **workspaces** from the dropdown
5. Click the **+** icon on individual items to select them
6. Or use **"Select All Reports"**/**"Select All Datasets"** to sync multiple items at once
7. Click **"Sync X Items"** to sync the selected content
### 4.3 Troubleshooting: Missing Data Previews
If you don't see data previews or table metadata in the sync interface, this is likely due to PowerBI API access restrictions.
This does not affect your ability to chat with Ana about your data.
## Chatting with your dashboards
Once your PowerBI connector is set up and synced, you can start chatting with your dashboards. Here's how to attach your PowerBI data to a chat:
### Step 1: Start a New Chat
Navigate to [TextQL Chat](https://app.textql.com/chat/new) to begin asking questions about your PowerBI data.
The discovery process will identify:
* **Reports**: All reports and dashboards in your PowerBI workspace
* **Datasets**: All datasets with their tables and relationships
* **Workspaces**: Multiple workspaces if your service principal has access to them
### 4.2 Select Content to Sync
After discovery completes, you can select which items to sync:
1. Use the **search box** to find specific reports or datasets
2. Switch between **Reports** and **Datasets** tabs
3. Filter by **All**, **Synced**, or **Discovered** items
4. Select specific **workspaces** from the dropdown
5. Click the **+** icon on individual items to select them
6. Or use **"Select All Reports"**/**"Select All Datasets"** to sync multiple items at once
7. Click **"Sync X Items"** to sync the selected content
### 4.3 Troubleshooting: Missing Data Previews
If you don't see data previews or table metadata in the sync interface, this is likely due to PowerBI API access restrictions.
This does not affect your ability to chat with Ana about your data.
## Chatting with your dashboards
Once your PowerBI connector is set up and synced, you can start chatting with your dashboards. Here's how to attach your PowerBI data to a chat:
### Step 1: Start a New Chat
Navigate to [TextQL Chat](https://app.textql.com/chat/new) to begin asking questions about your PowerBI data.
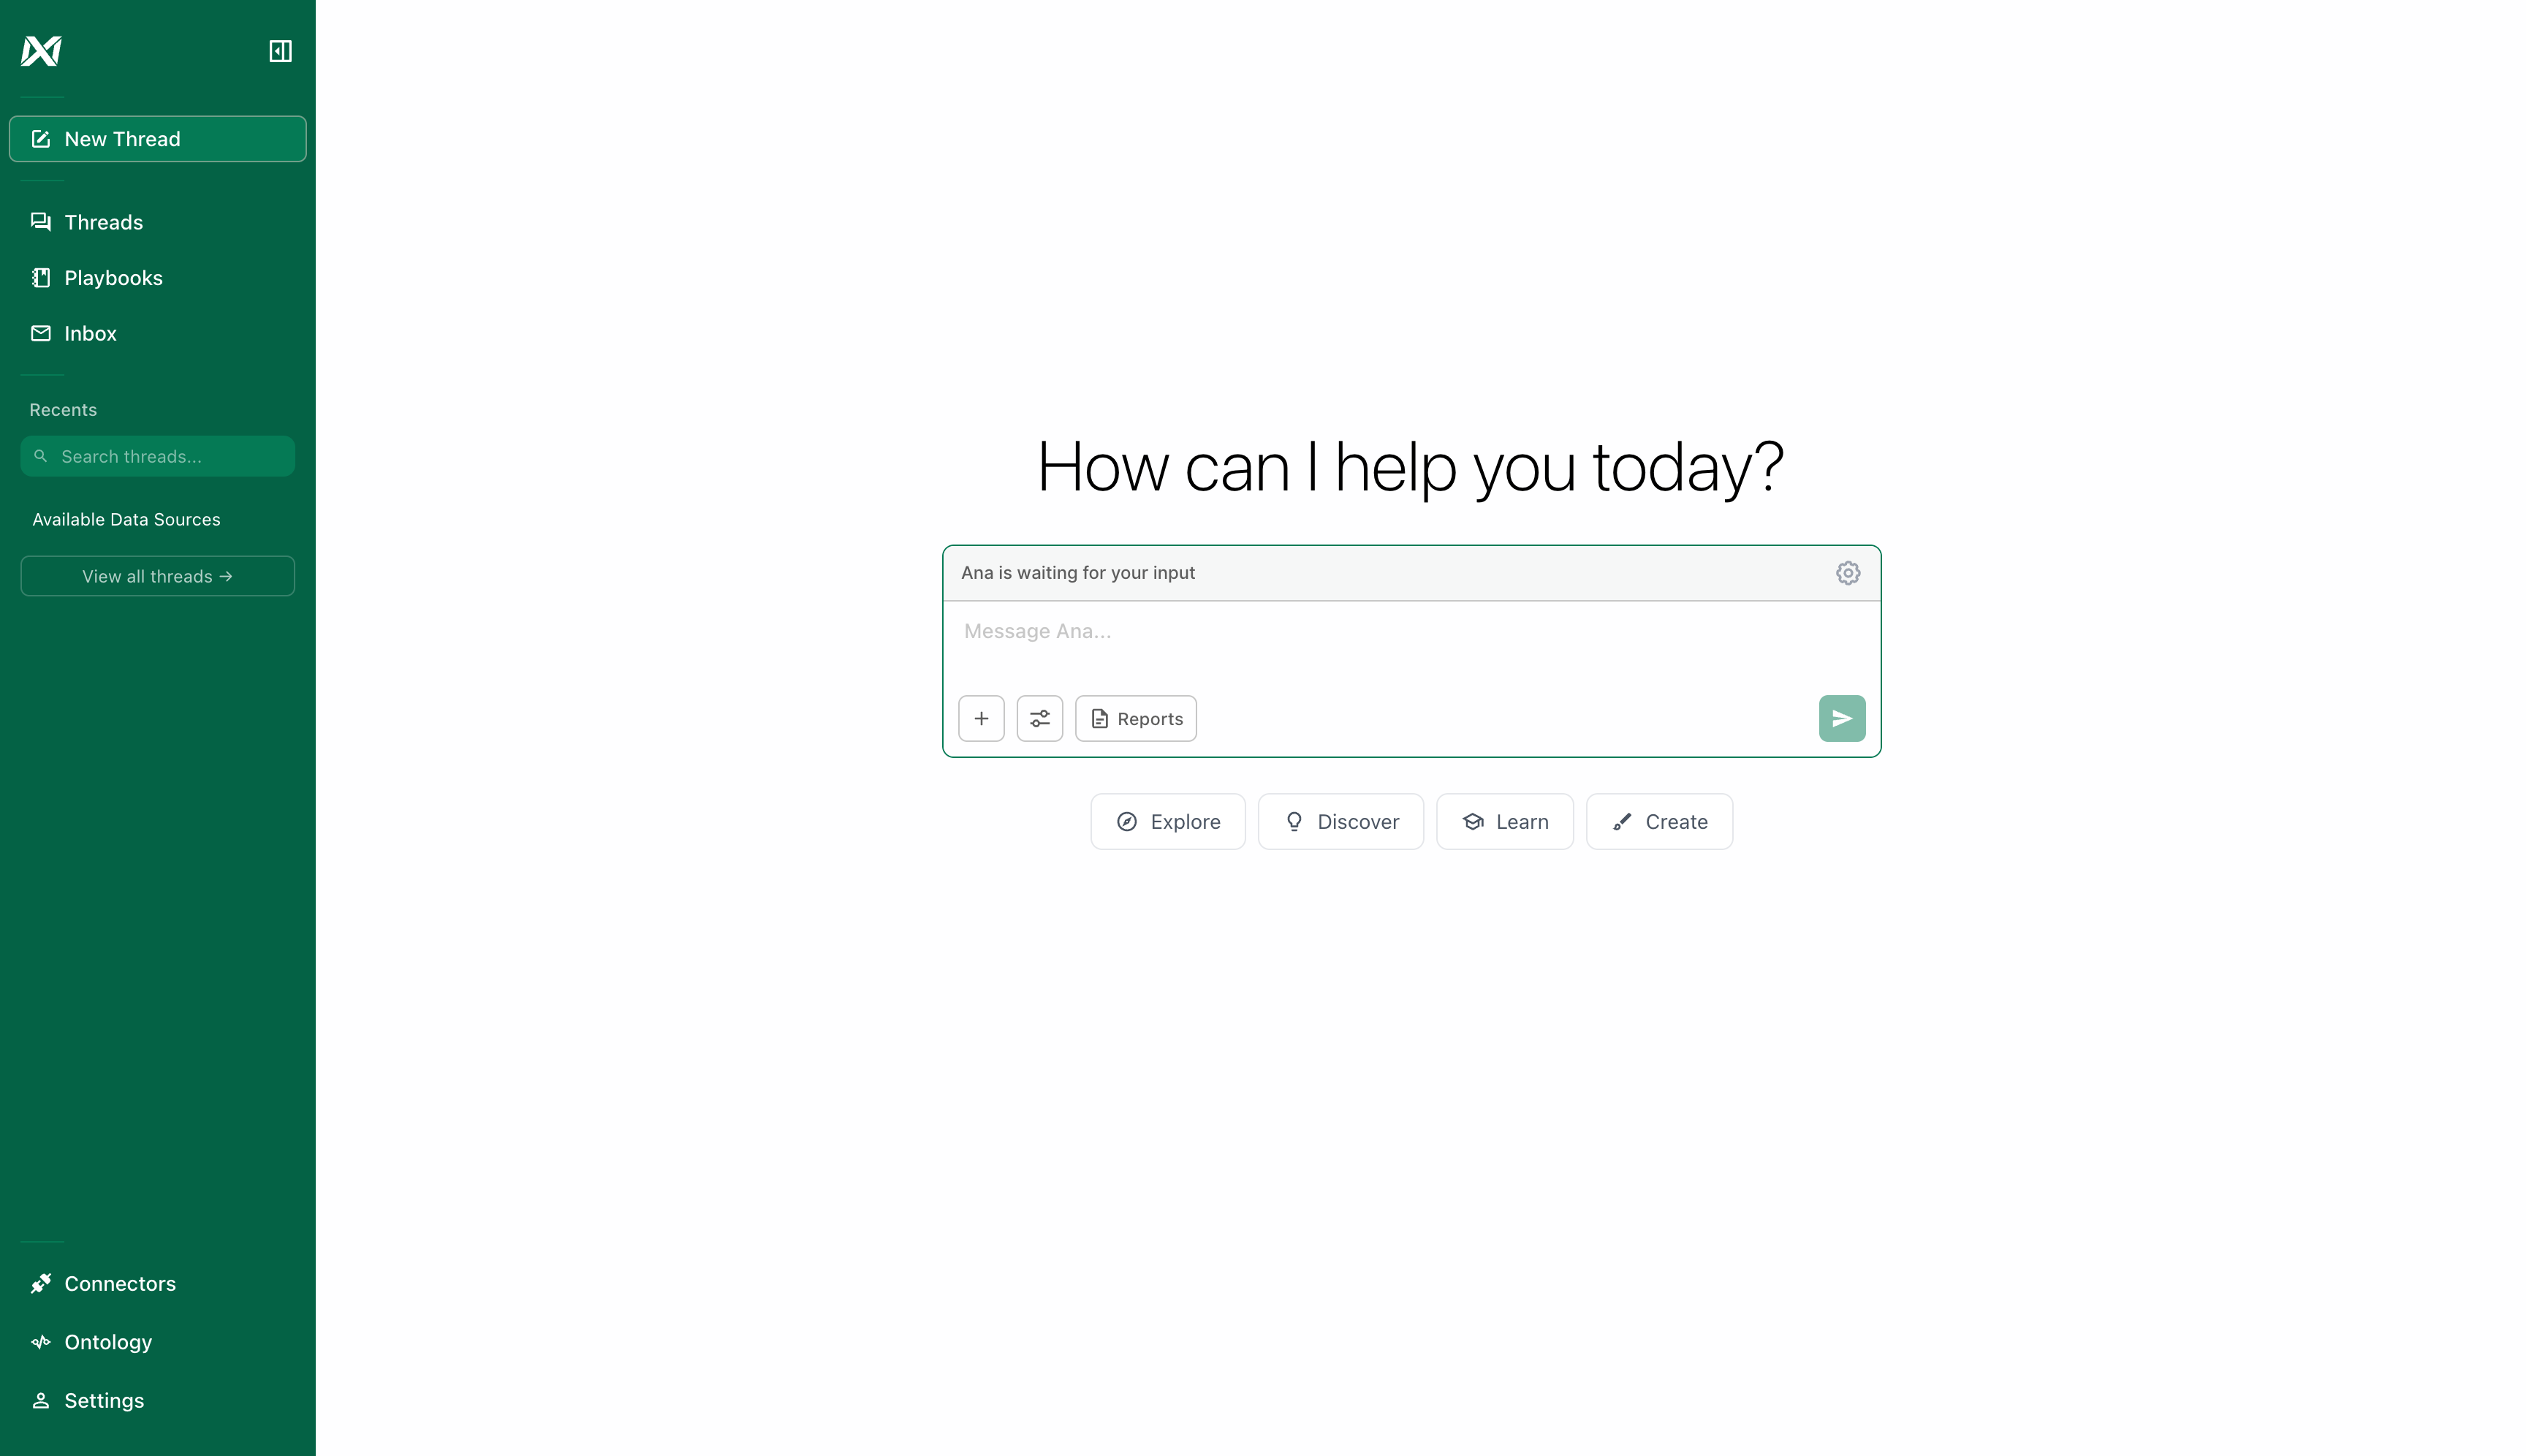 ### Step 2: Open Attachment Options
Click the **+** icon next to the message input to open the attachment dropdown.
### Step 2: Open Attachment Options
Click the **+** icon next to the message input to open the attachment dropdown.
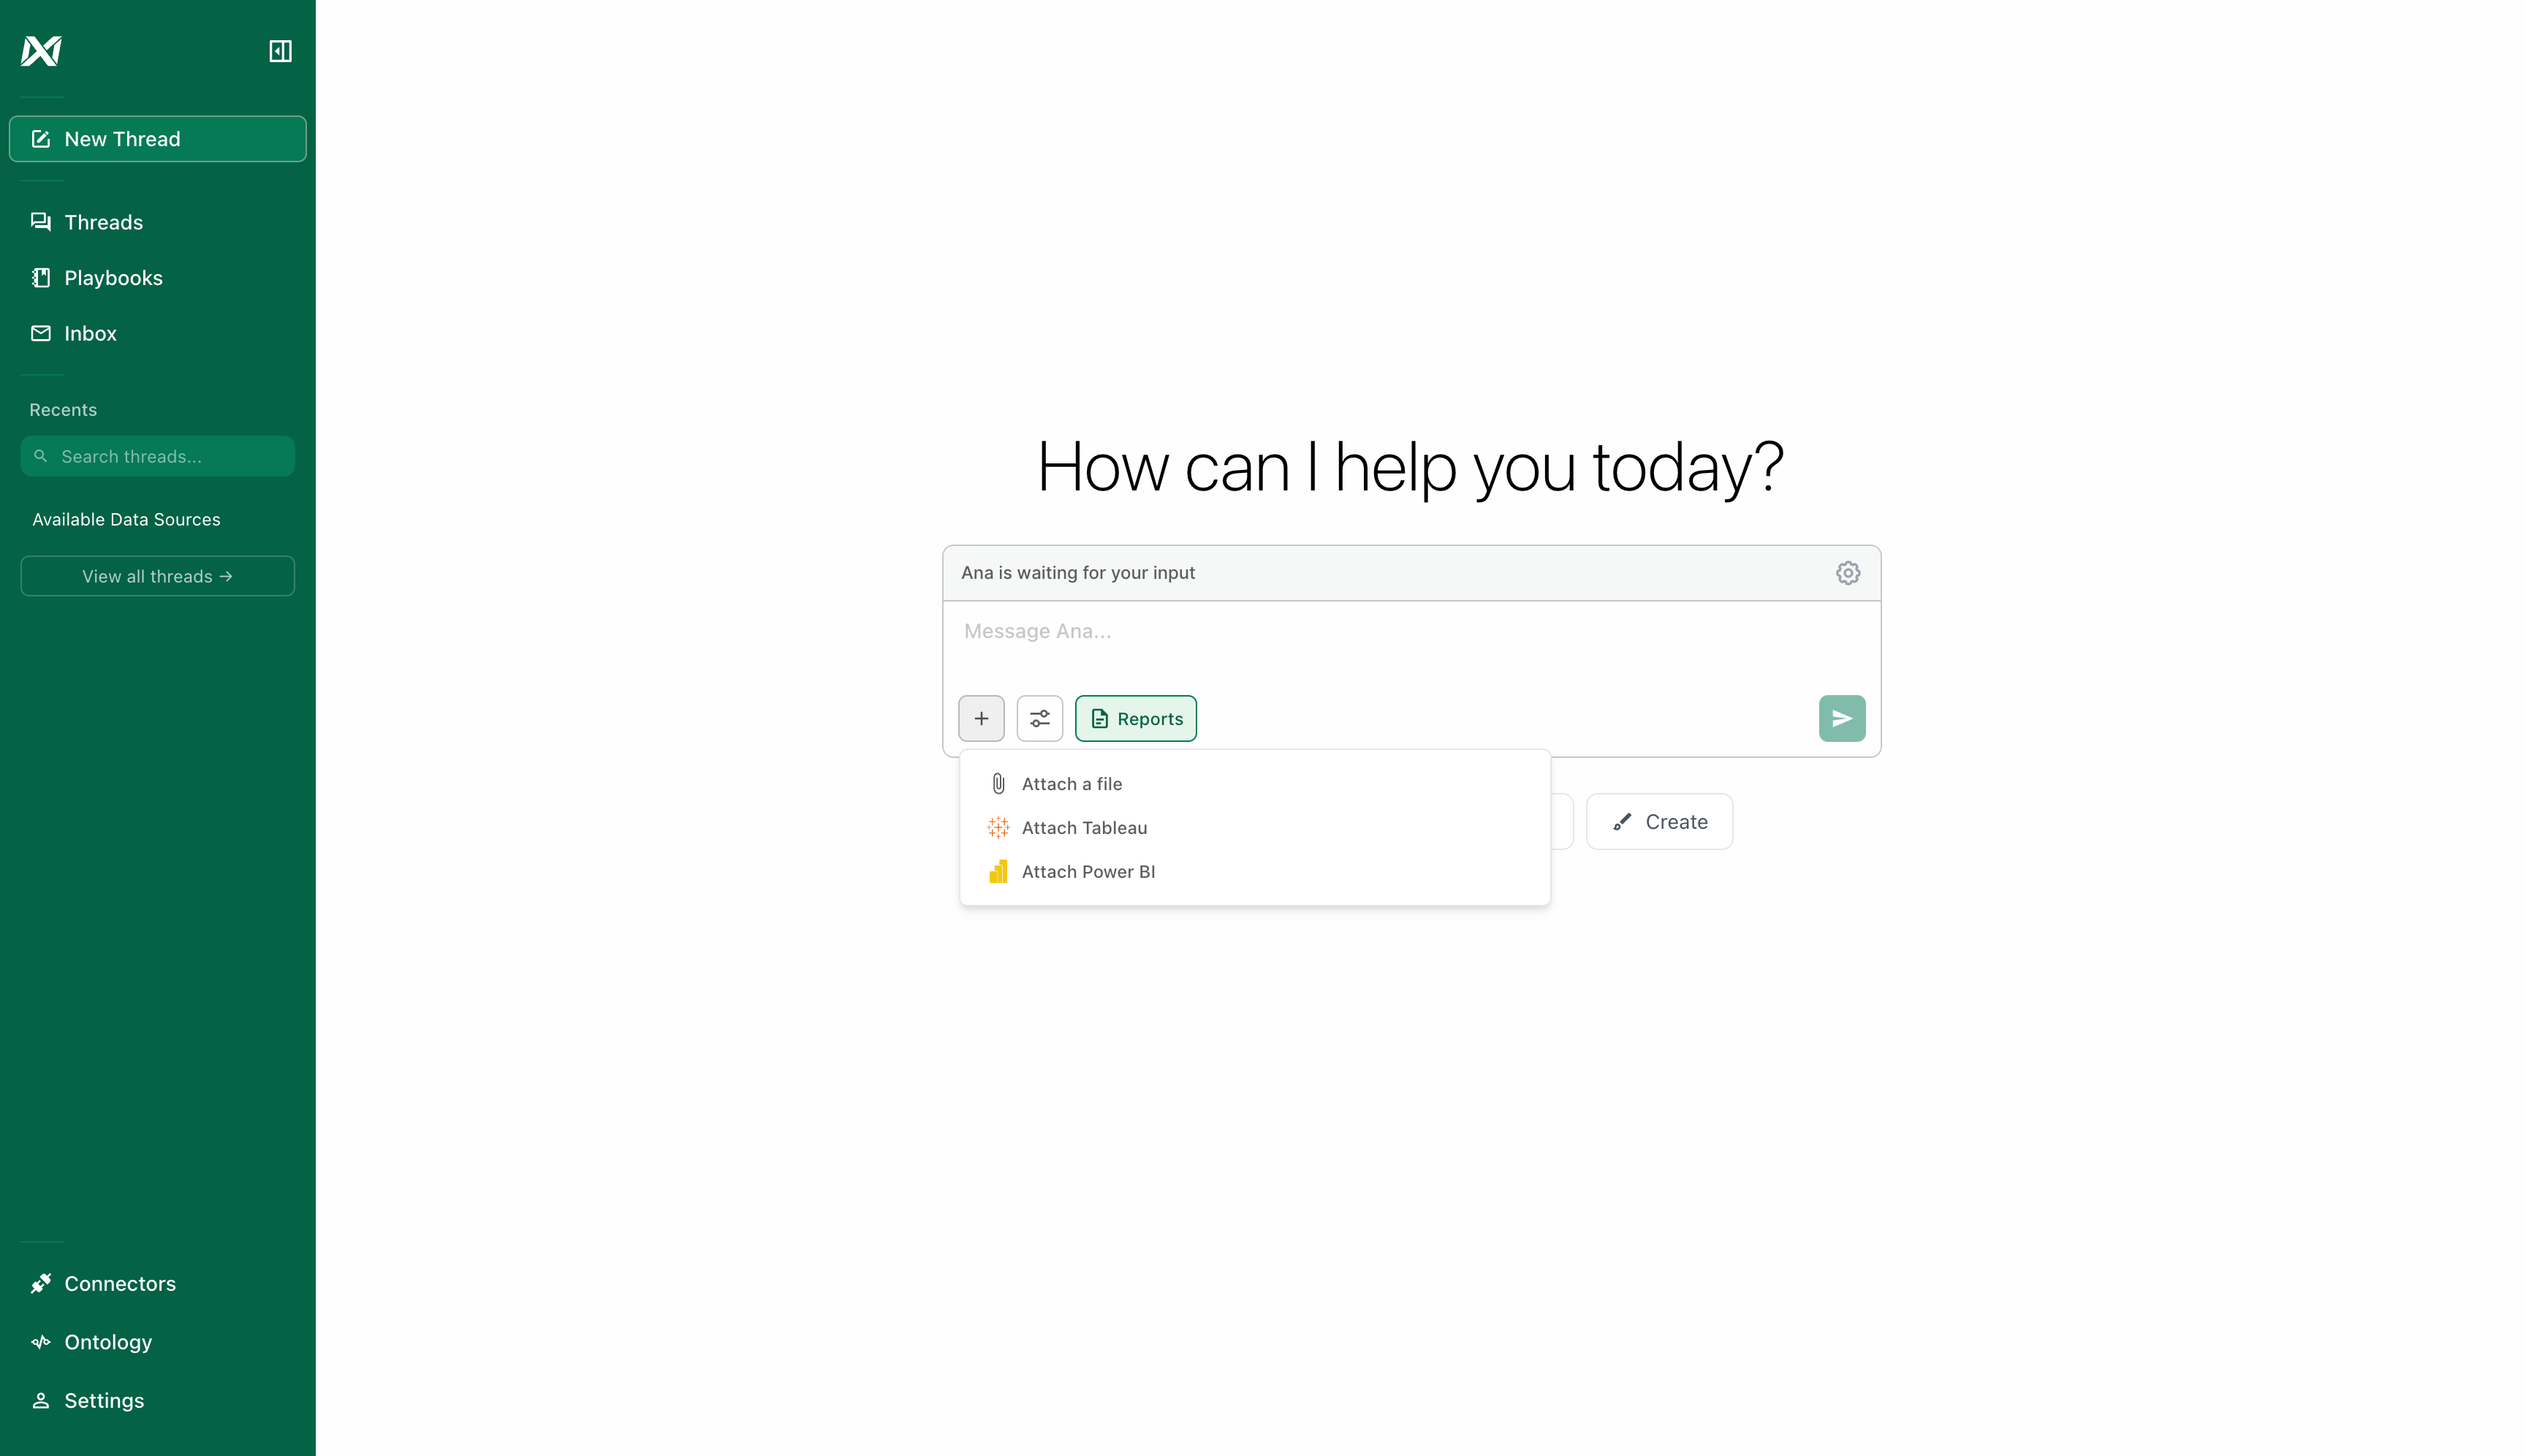 ### Step 3: Select PowerBI
Click **"Attach PowerBI"** from the dropdown menu.
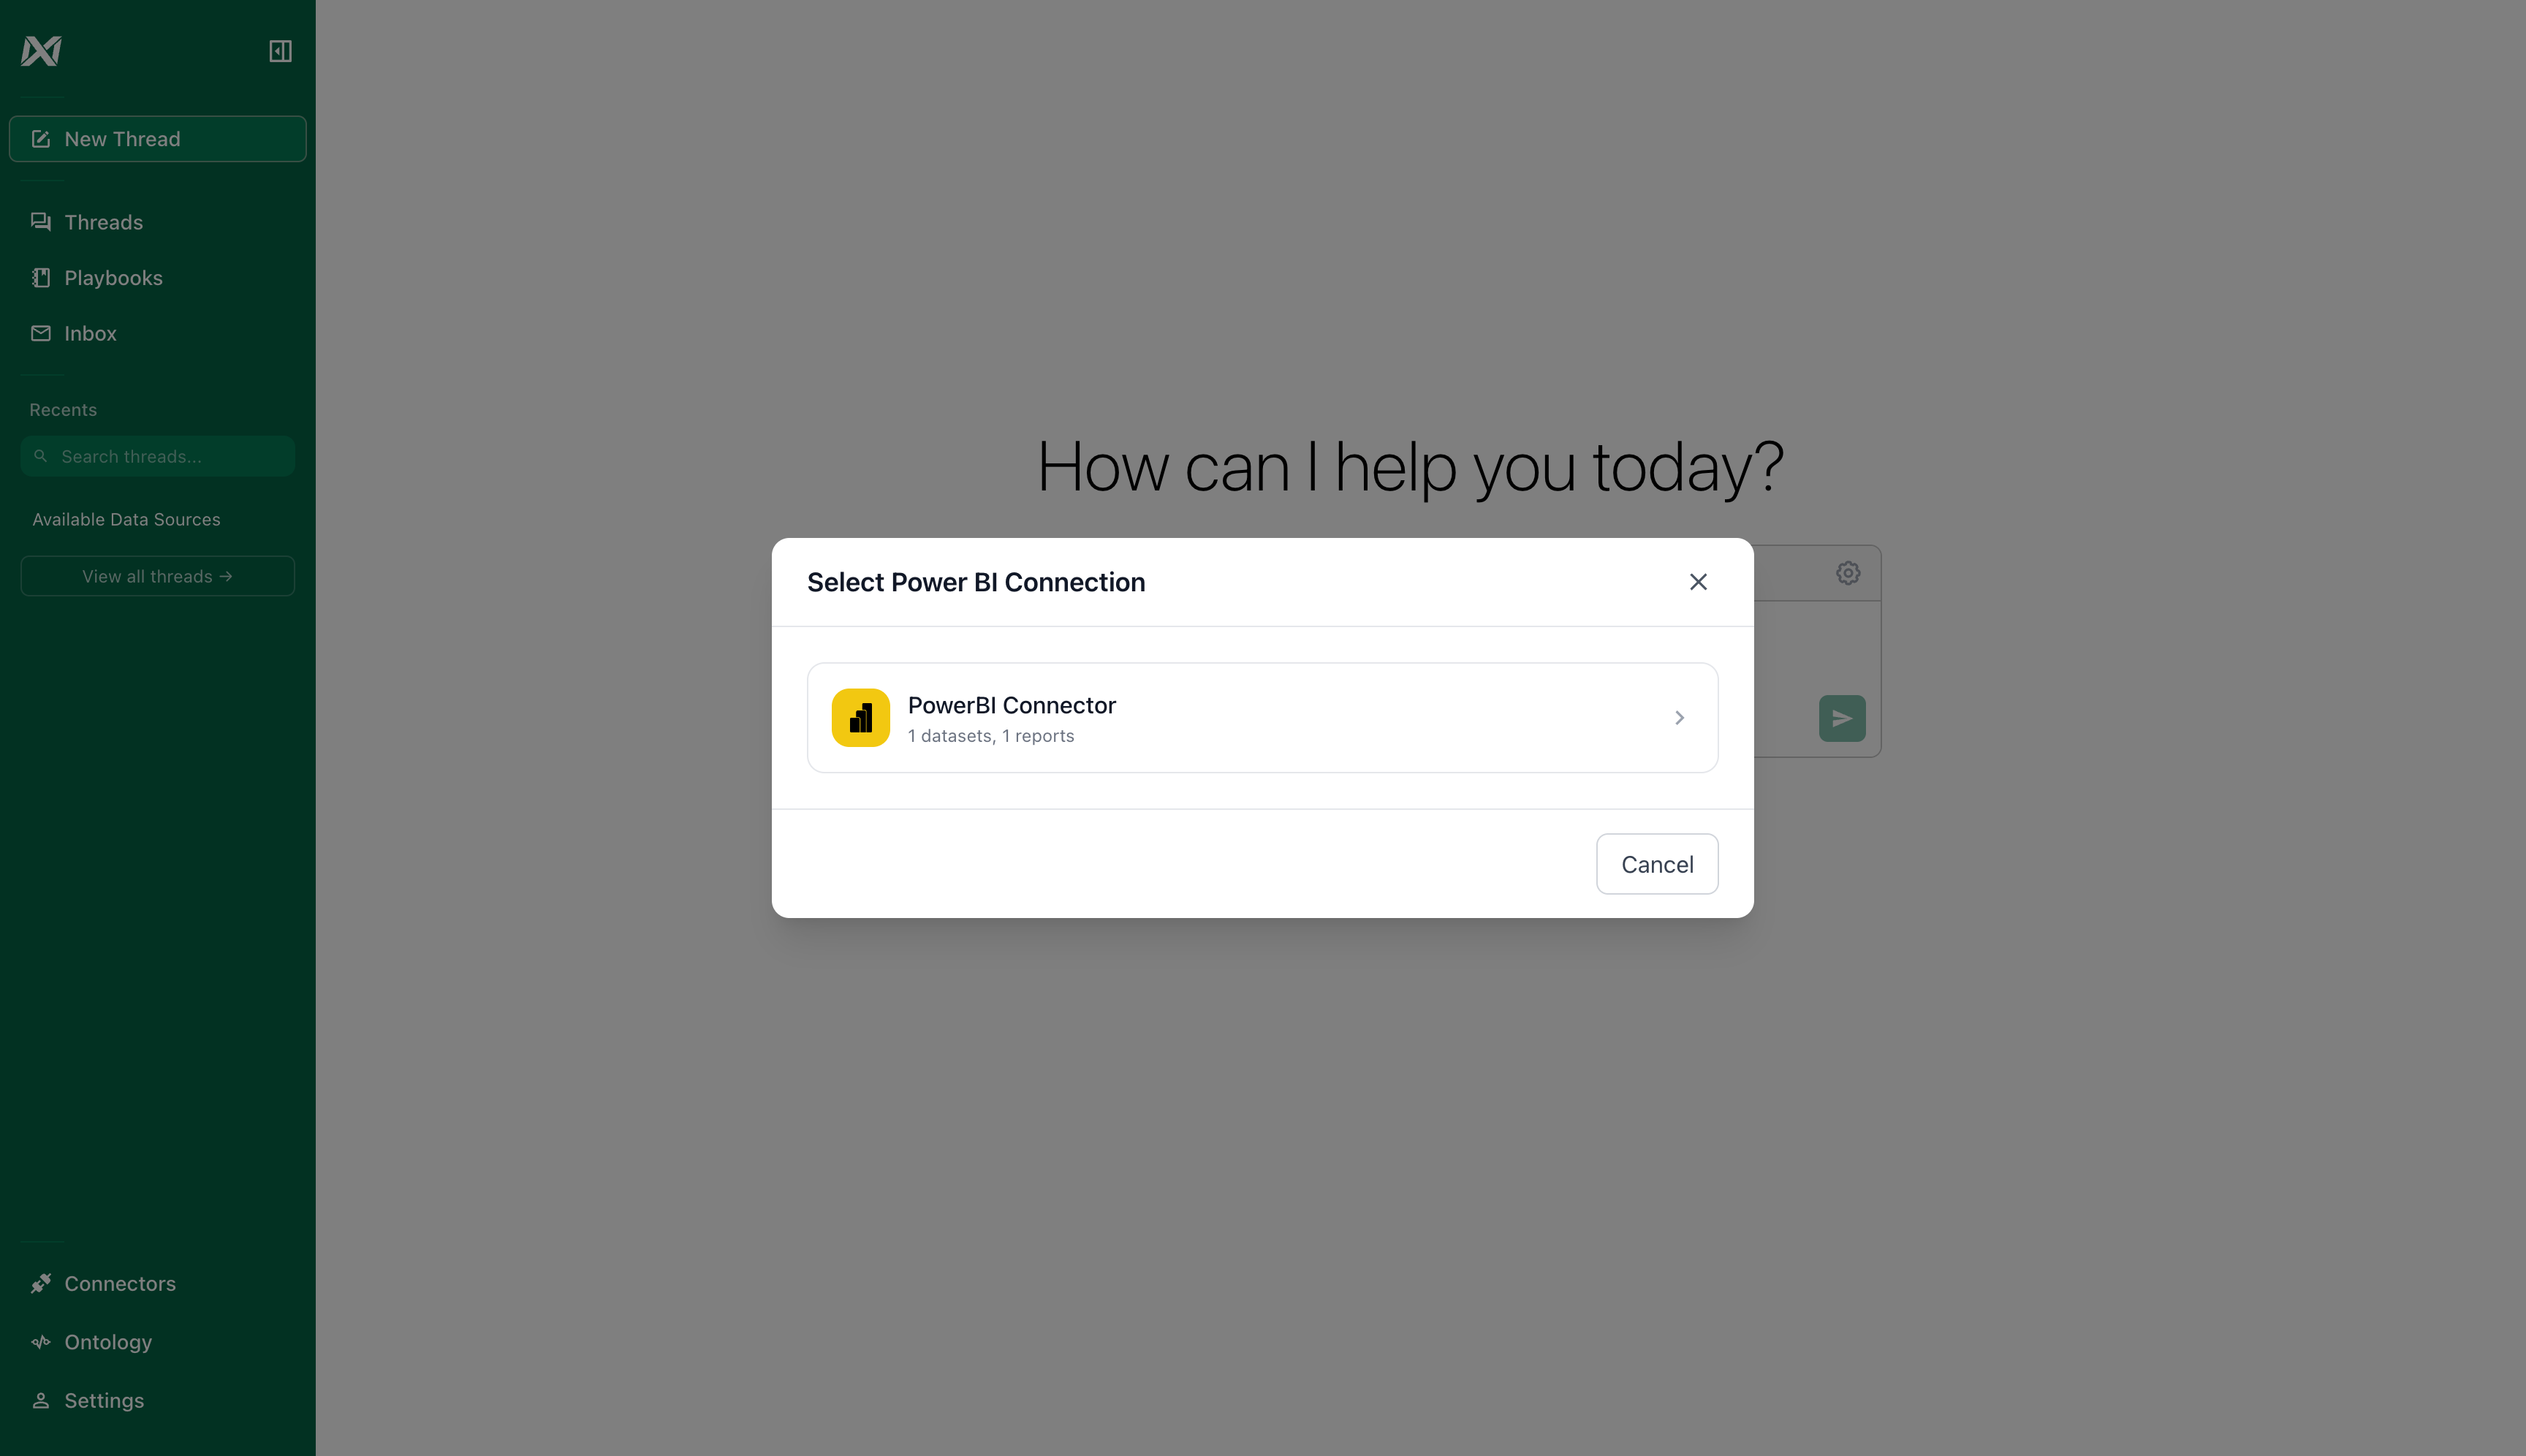
### Step 4: Choose Your Connector
Select the PowerBI connector you want to use. You'll see the number of datasets and reports available.
### Step 3: Select PowerBI
Click **"Attach PowerBI"** from the dropdown menu.
### Step 4: Choose Your Connector
Select the PowerBI connector you want to use. You'll see the number of datasets and reports available.
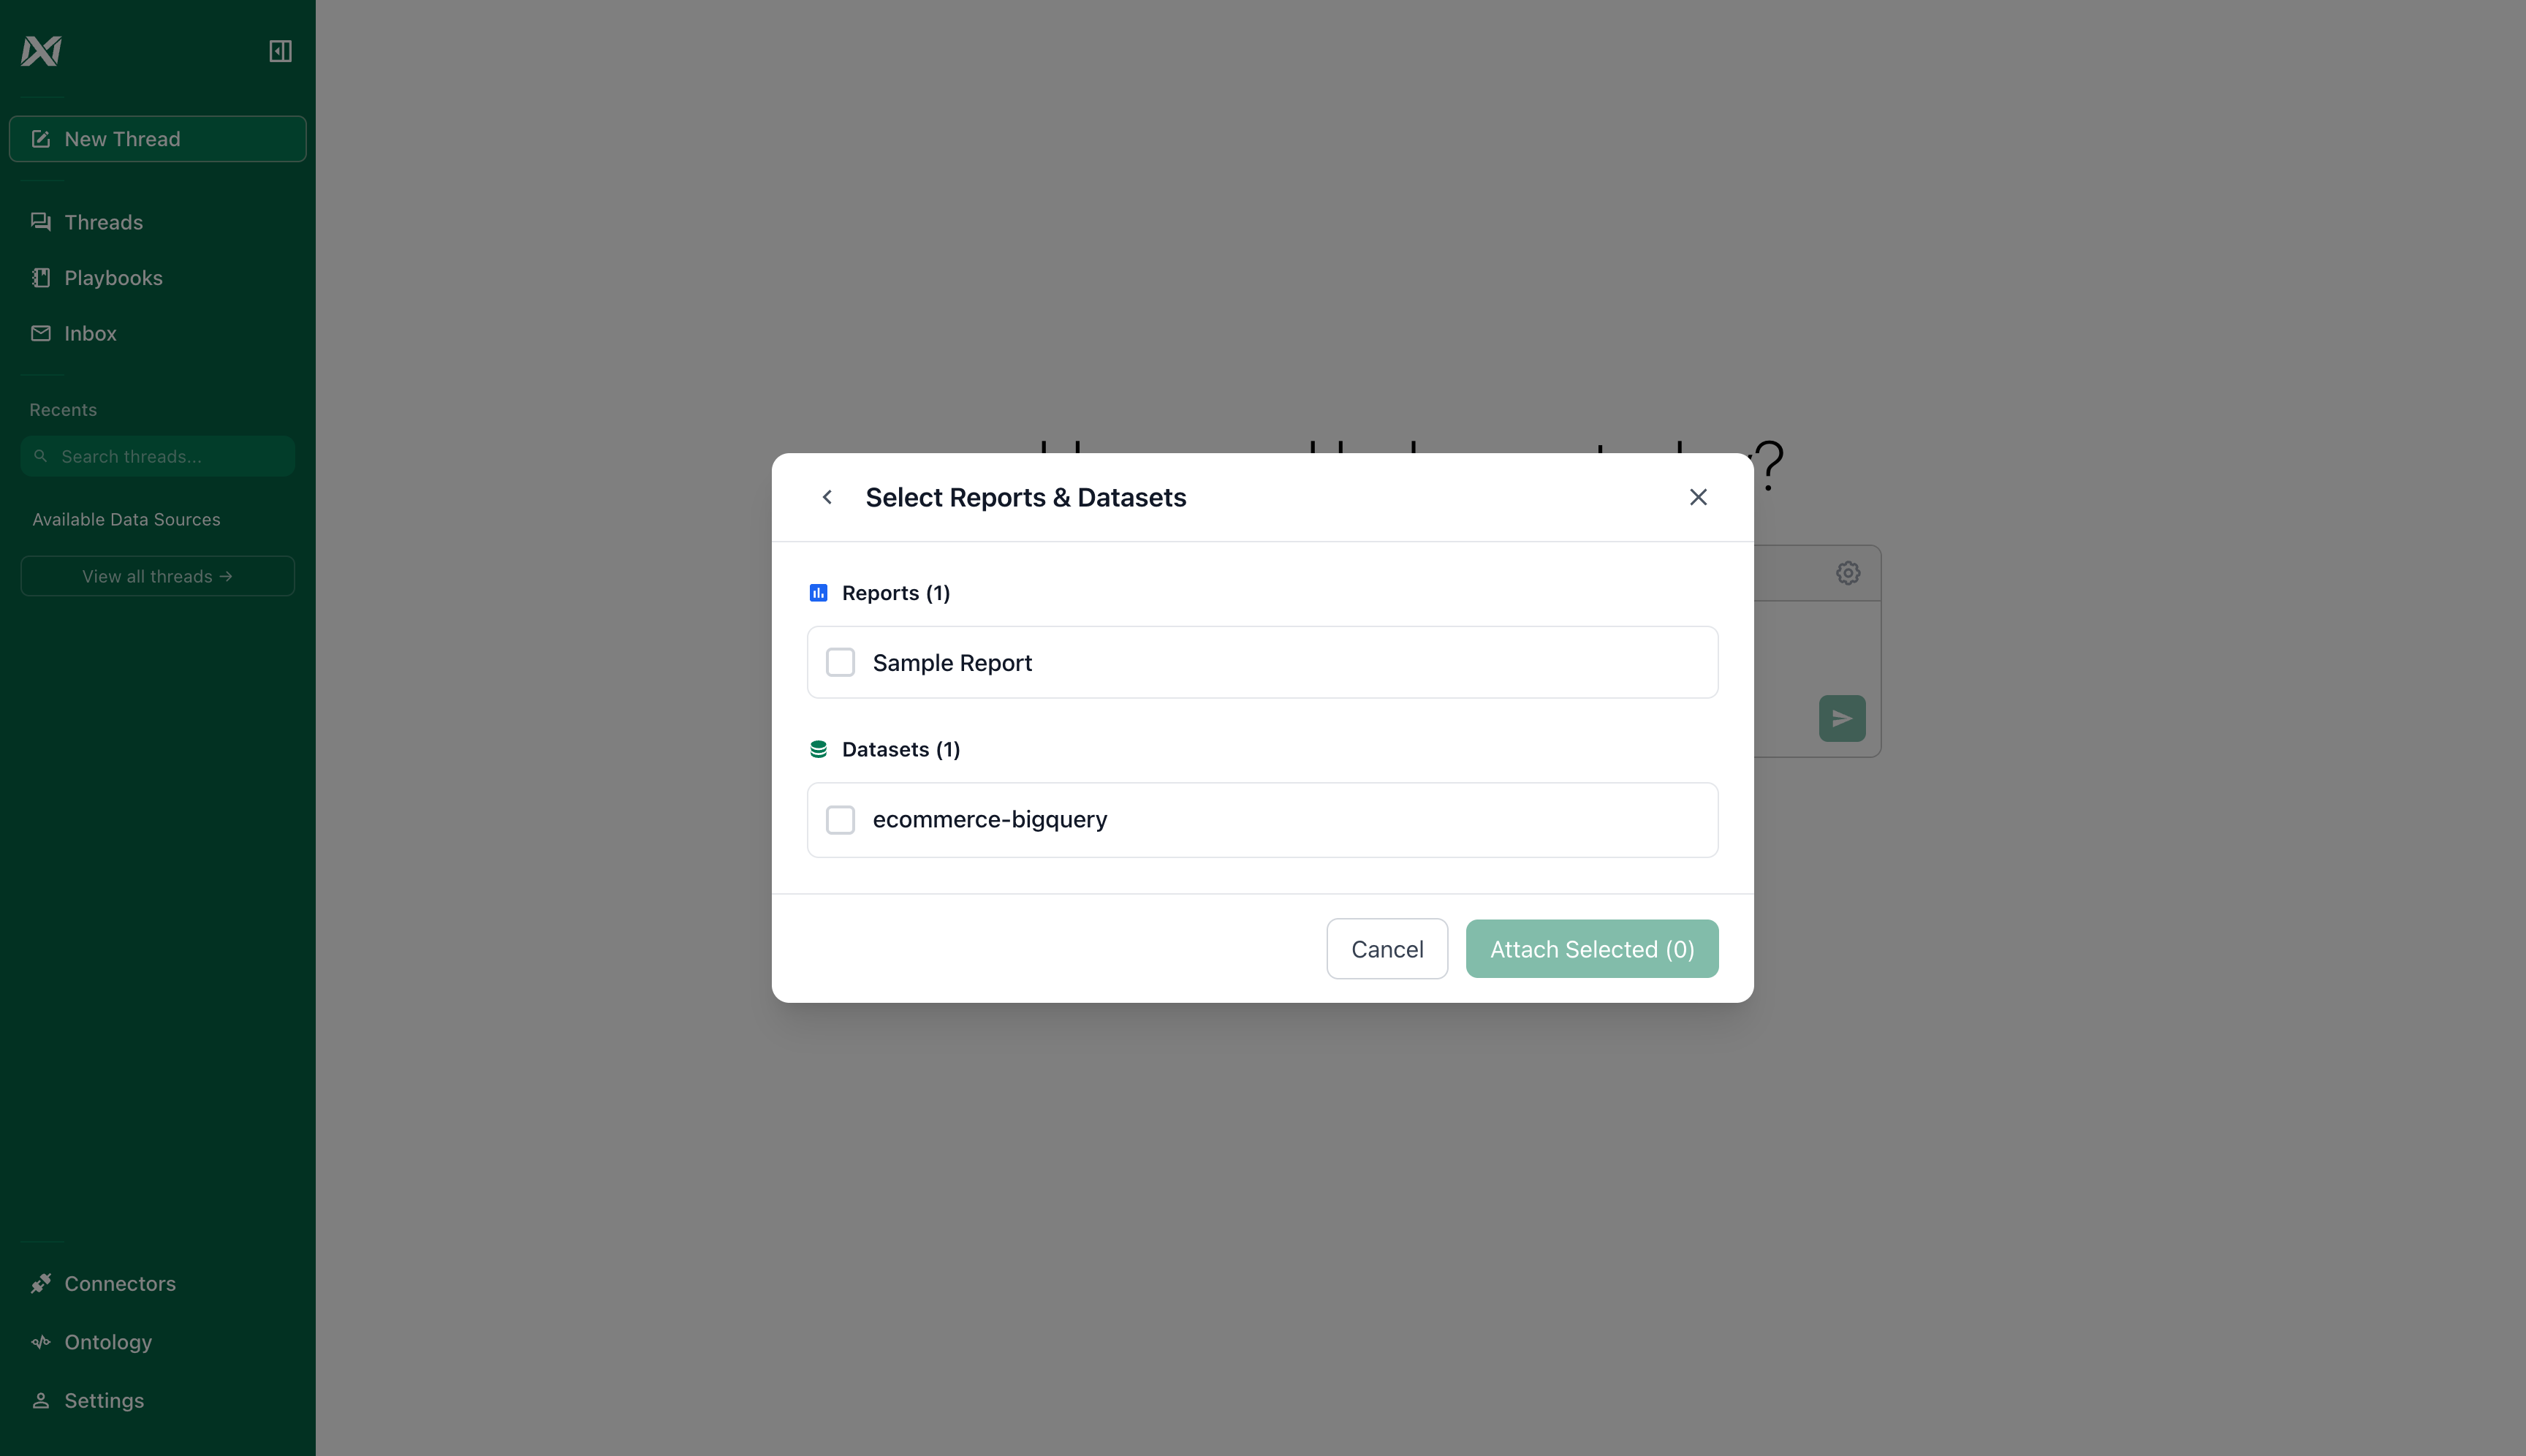
 ### Step 5: Select Datasets and Reports
Choose which datasets and reports you want to attach to this chat. You can select multiple items.
### Step 5: Select Datasets and Reports
Choose which datasets and reports you want to attach to this chat. You can select multiple items.
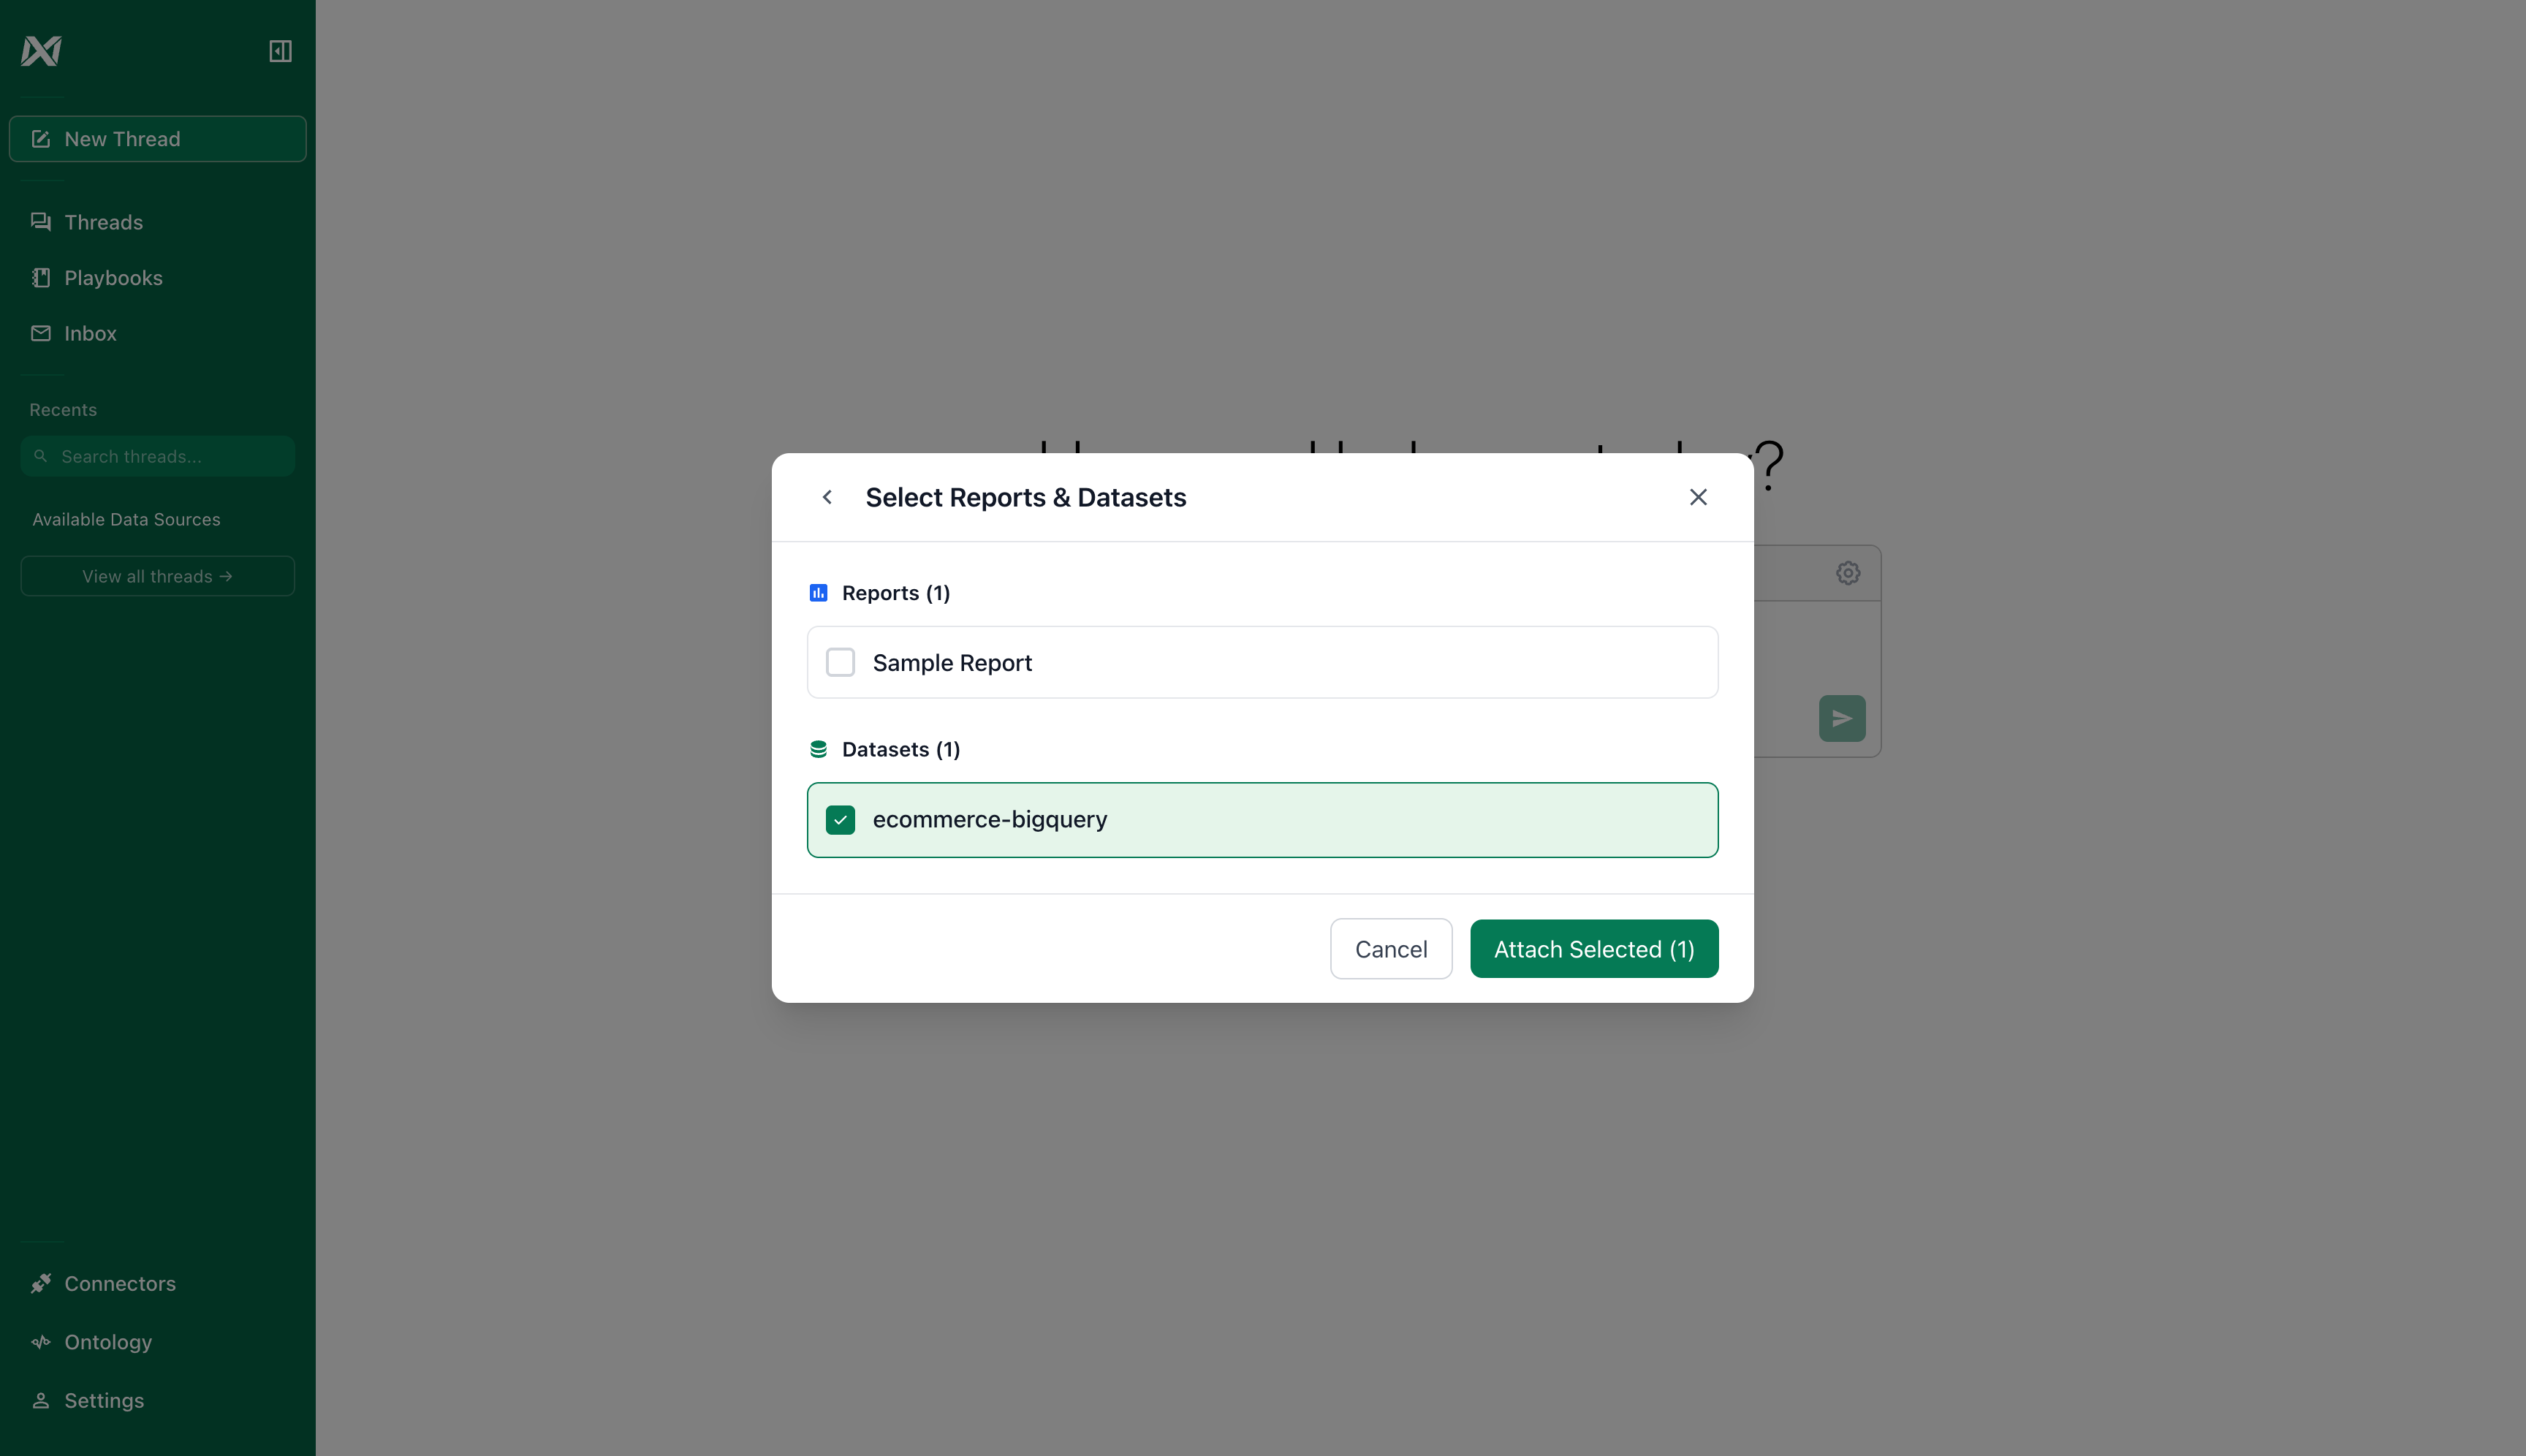
 ### Step 6: Confirm Selection
Once you've selected your items, the "Attach Selected" button will show the count of selected items.
### Step 6: Confirm Selection
Once you've selected your items, the "Attach Selected" button will show the count of selected items.
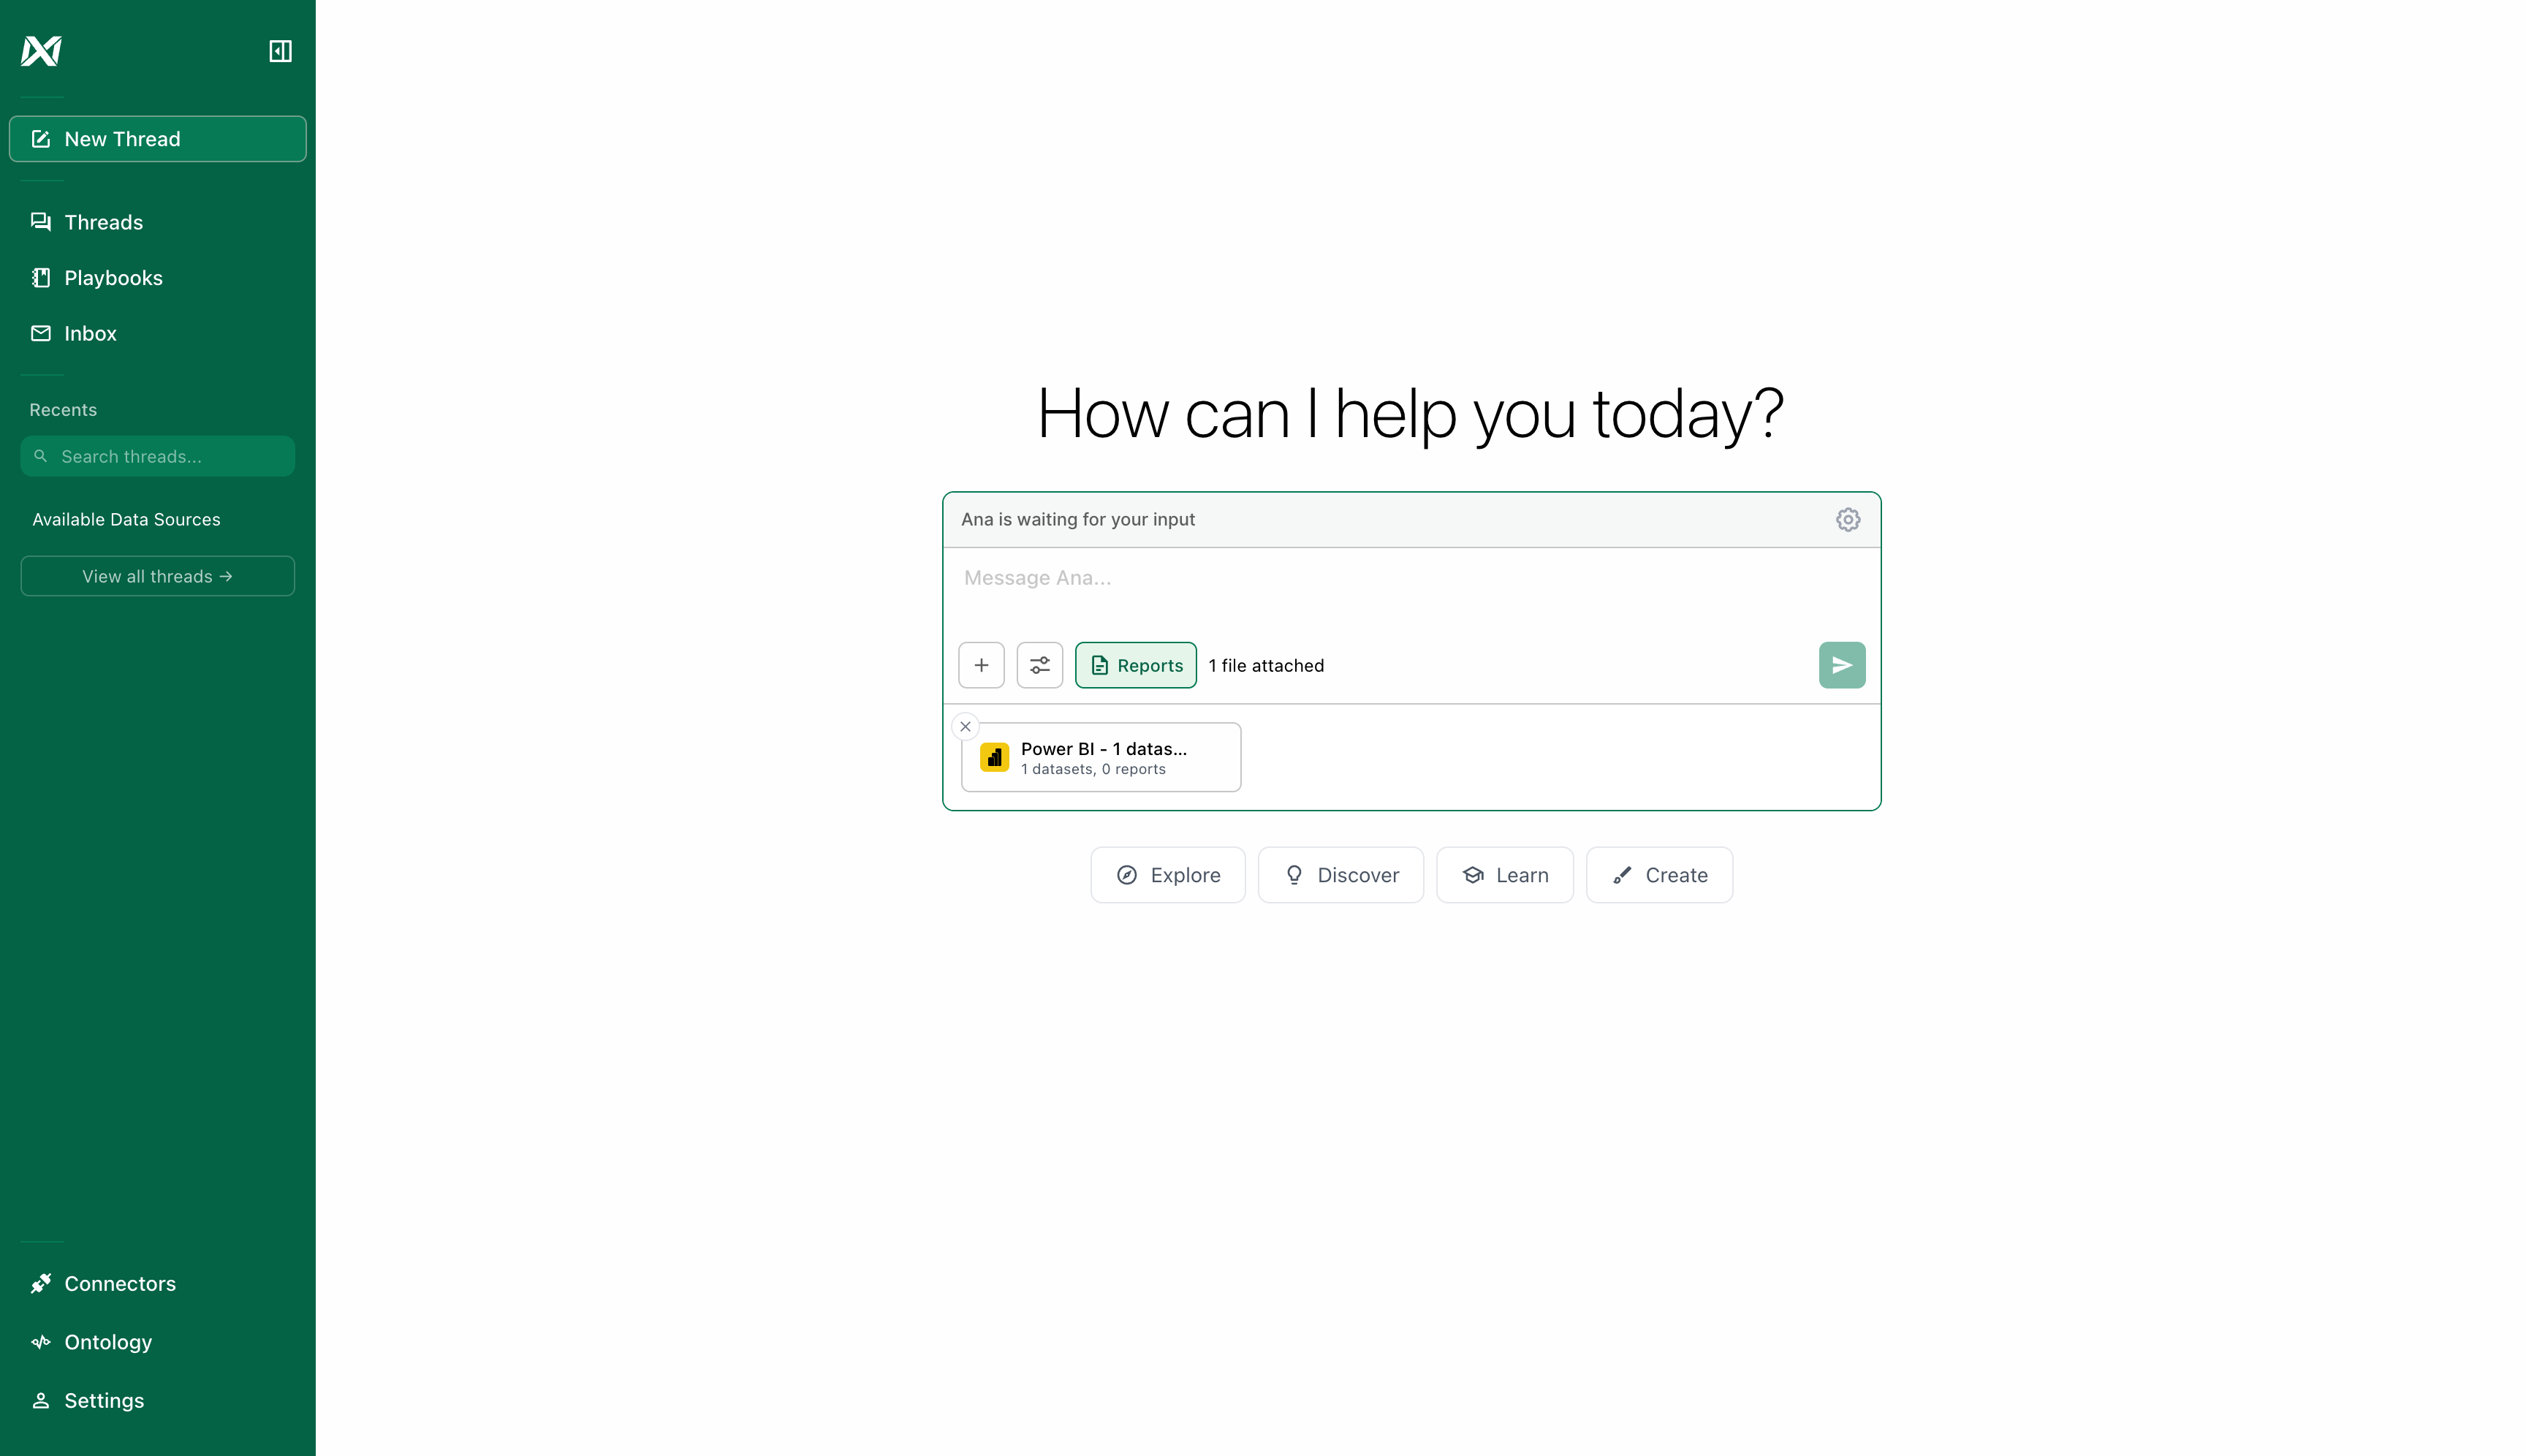
 ### Step 7: Data Attached
After clicking "Attach Selected", your PowerBI data will be attached to the chat and you can start asking Ana questions.
### Step 7: Data Attached
After clicking "Attach Selected", your PowerBI data will be attached to the chat and you can start asking Ana questions.
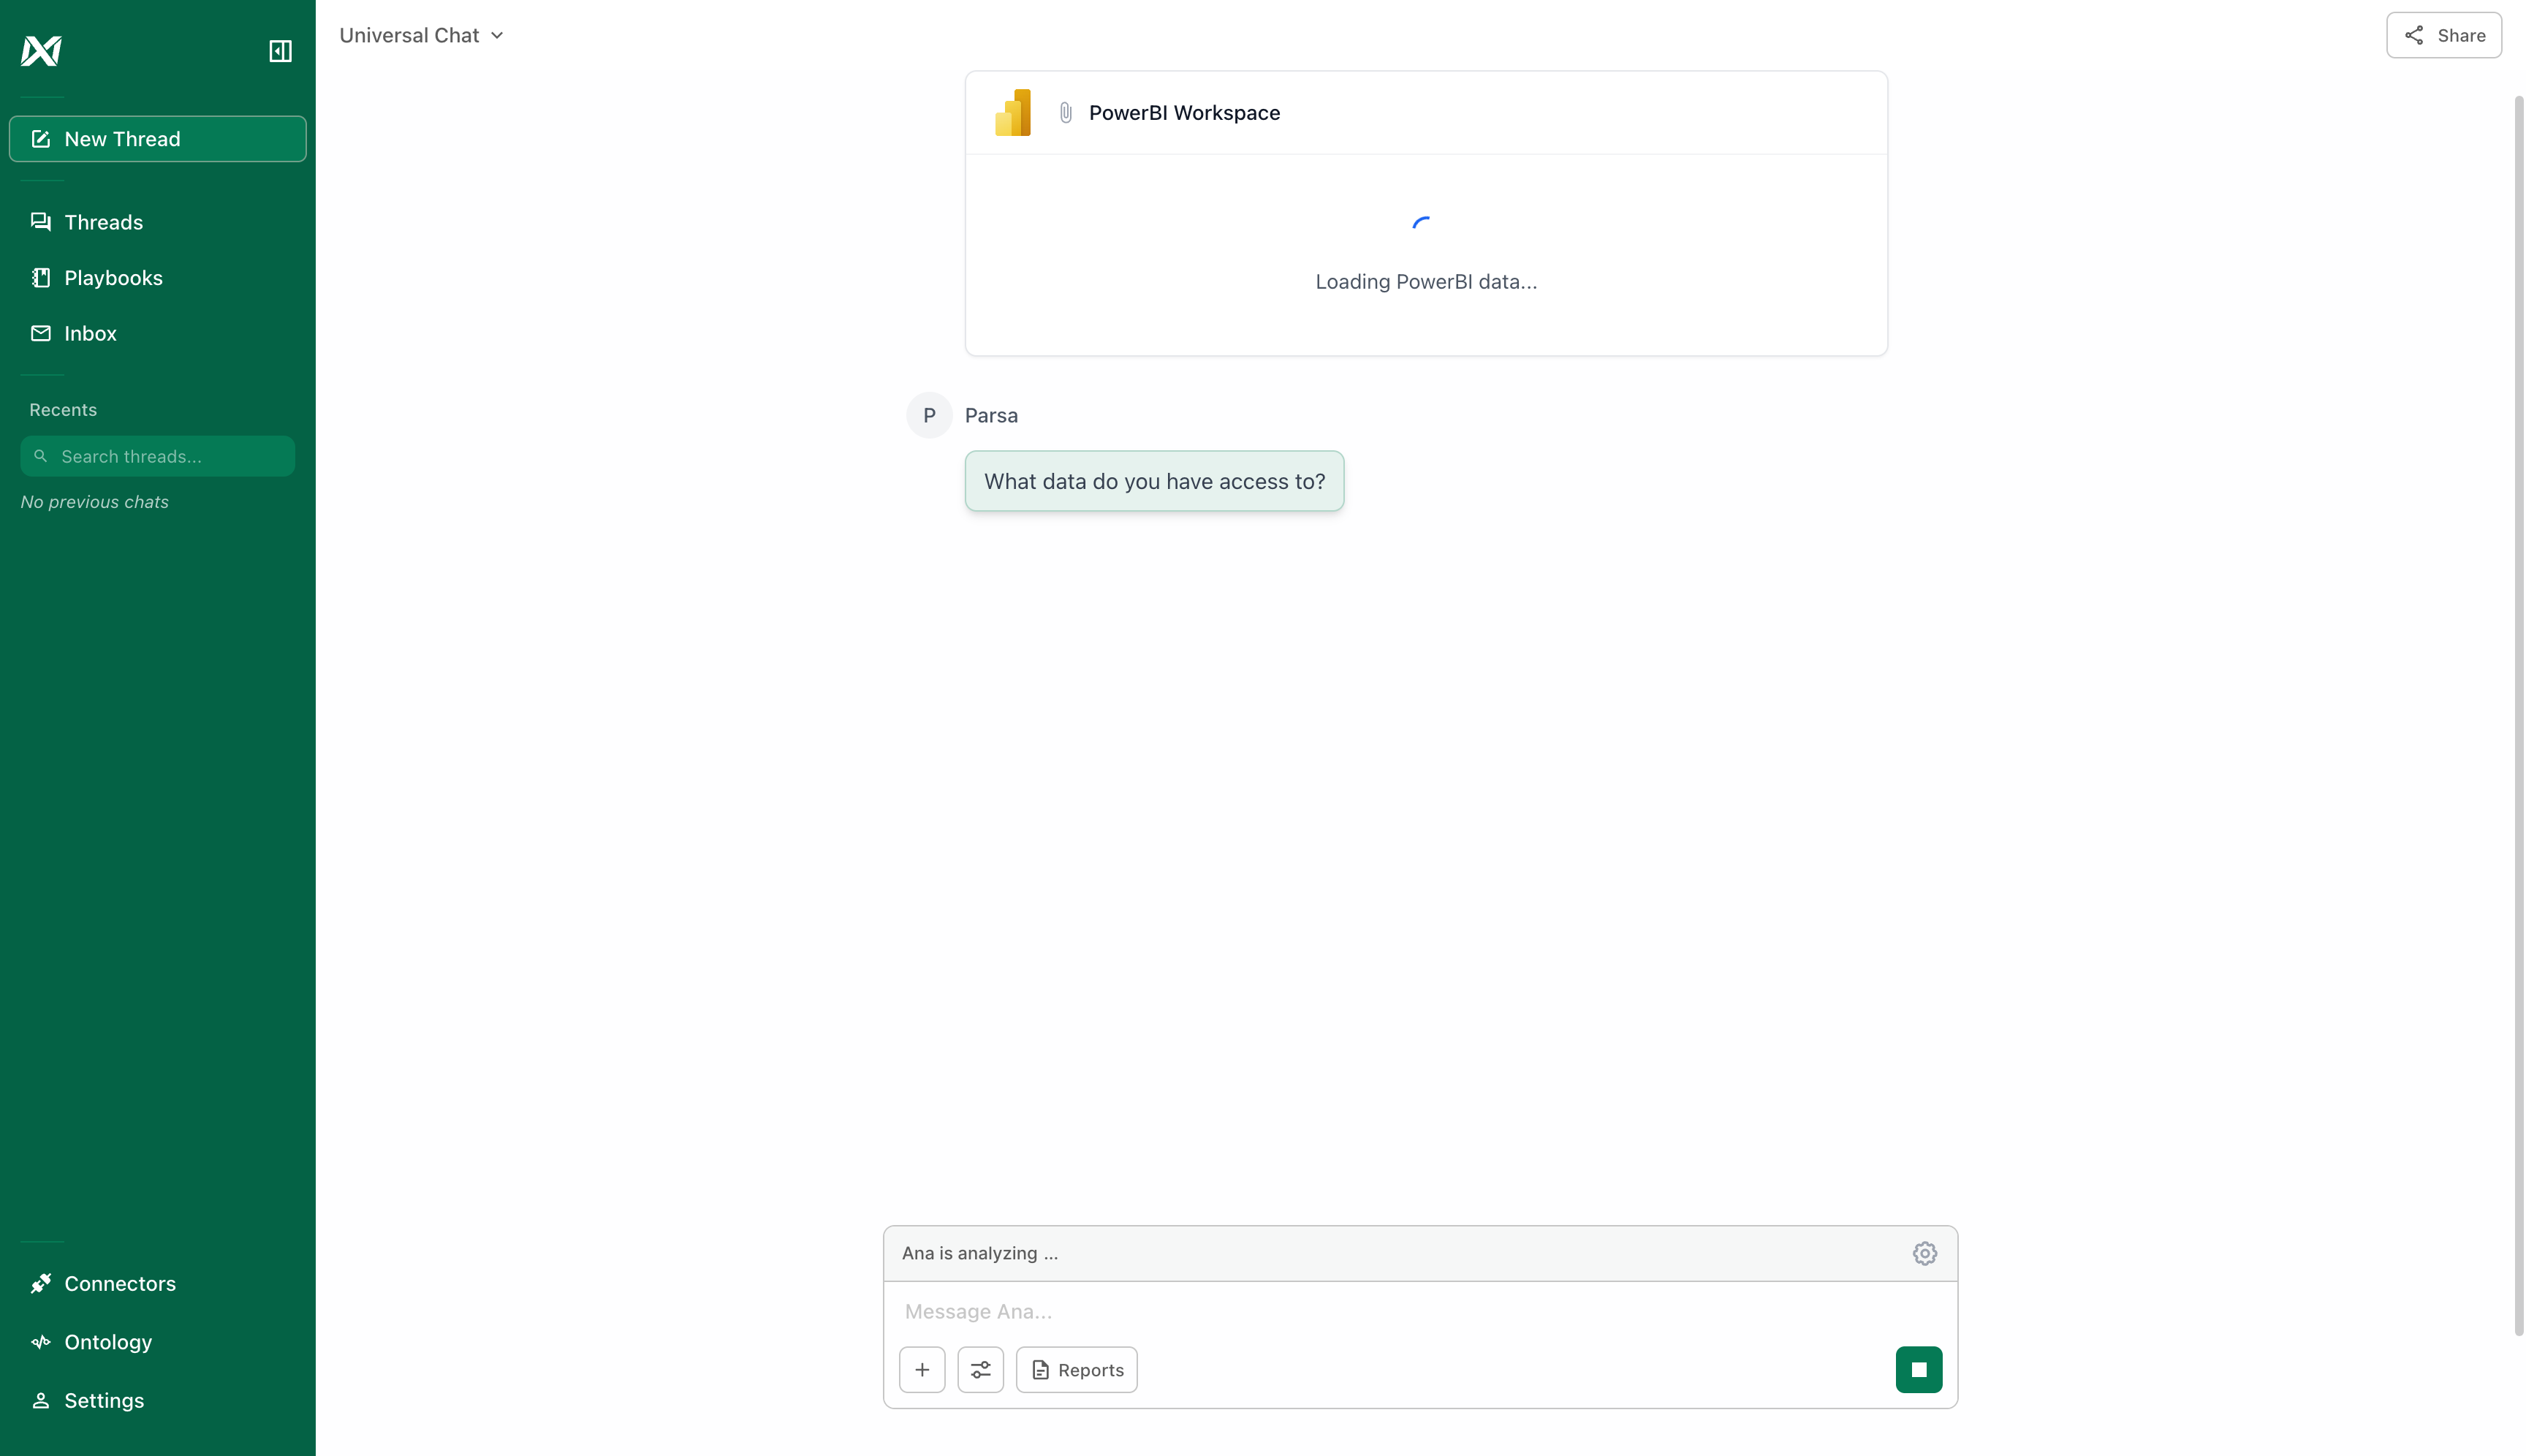
 Ask Ana anything you want. She can see / filter your datasets and reports, and run DAX queries over your underlying data.
 ## Troubleshooting
### Connection Test Fails
If your connection test fails, check the following:
1. **Verify Azure credentials**: Ensure Tenant ID, Client ID, and Client Secret are correct
2. **Check API permissions**: Confirm your Azure AD app has the required PowerBI permissions
3. **Verify workspace access**: Ensure the service principal has been added to the PowerBI workspace
4. **Check secret expiration**: Client secrets expire - you may need to generate a new one
5. **Review Azure AD policies**: Some organizations have conditional access policies that may block service principal access
### Cannot See Expected Datasets
If you're connected but don't see expected datasets:
1. **Verify workspace permissions**: The service principal needs at least Viewer access to the workspace
2. **Check dataset permissions**: Some datasets may have row-level security (RLS) that restricts access
### Authentication Errors
If you encounter authentication errors while using the connector:
1. **Client secret expiration**: Generate a new client secret in Azure and update your connector
2. **Token issues**: Try disconnecting and reconnecting the connector
3. **Permission changes**: Verify that workspace permissions haven't been modified
## Next Steps
* Explore other [connector types](/core/datasources/the-connectors-page)
* Learn about [the Ontology](/core/ontology/overview) to organize your PowerBI data
* Set up [scheduled reports](/core/how-it-works/playbooks) based on your PowerBI data
## Troubleshooting
### Connection Test Fails
If your connection test fails, check the following:
1. **Verify Azure credentials**: Ensure Tenant ID, Client ID, and Client Secret are correct
2. **Check API permissions**: Confirm your Azure AD app has the required PowerBI permissions
3. **Verify workspace access**: Ensure the service principal has been added to the PowerBI workspace
4. **Check secret expiration**: Client secrets expire - you may need to generate a new one
5. **Review Azure AD policies**: Some organizations have conditional access policies that may block service principal access
### Cannot See Expected Datasets
If you're connected but don't see expected datasets:
1. **Verify workspace permissions**: The service principal needs at least Viewer access to the workspace
2. **Check dataset permissions**: Some datasets may have row-level security (RLS) that restricts access
### Authentication Errors
If you encounter authentication errors while using the connector:
1. **Client secret expiration**: Generate a new client secret in Azure and update your connector
2. **Token issues**: Try disconnecting and reconnecting the connector
3. **Permission changes**: Verify that workspace permissions haven't been modified
## Next Steps
* Explore other [connector types](/core/datasources/the-connectors-page)
* Learn about [the Ontology](/core/ontology/overview) to organize your PowerBI data
* Set up [scheduled reports](/core/how-it-works/playbooks) based on your PowerBI data